Showing posts with label blogger posts. Show all posts

Tuesday, 27 September 2016

Share Blogger Post Automatically to Facebook using IFTTT

Automatically posting a blog post to Facebook used to be a challenge. The idea was simple, which is to notify Facebook that you have a blog you want posted on your wall, and the social media will do as you command. The implementation, however, was more complicated than that.

Even with Facebook's post-by-email feature, only the blog name and title will appear on the wall, leaving behind the content or link. There are other plugins available, but they don't work as straightforward as they're supposed to be. There is always something missing.
How to Share Blogger post automatically to Facebook using IFTTT

Here is an online utility IFTTT (If This, Then That), which is capable of moving social postings between sites. Setting it up is fairly easy, and just as easy to use. So, let's see how we can share Blogger posts automatically to Facebook using IFTTT.

Step 1. Sign up for a free IFTTT account

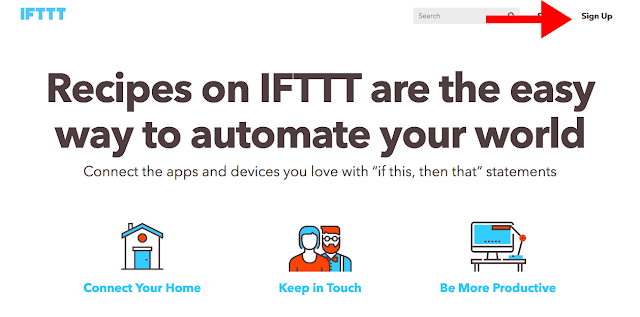
Visit IFTTT.com and set up an account by creating a username and password.

sign up IFTTT to connect Blogger with Facebook

Now, IFTTT will take you through a mini-tutorial - click on the word 'this', 'that' and 'Continue' button several times. Finally, select 3 channels that interest you and click 'Continue' to finish with the registration.

Step 2. Create a new recipe

Once registered, we need to 'Create a Recipe'. A recipe is basically the process of combining two platforms together - in our case, we will combine Blogger with Facebook. This shouldn't take more than five minutes.

To get started, click the 'My Recipes' link and then click the 'Create a Recipe' button, as shown below:
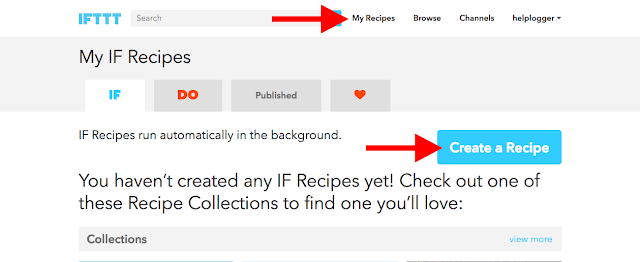
create IFTTT Blooger to Facebook recipe

Start creating the recipe by clicking the blue 'this' word and select a "trigger channel". The trigger you need to choose is Blogger - search for it in the box, as illustrated below:
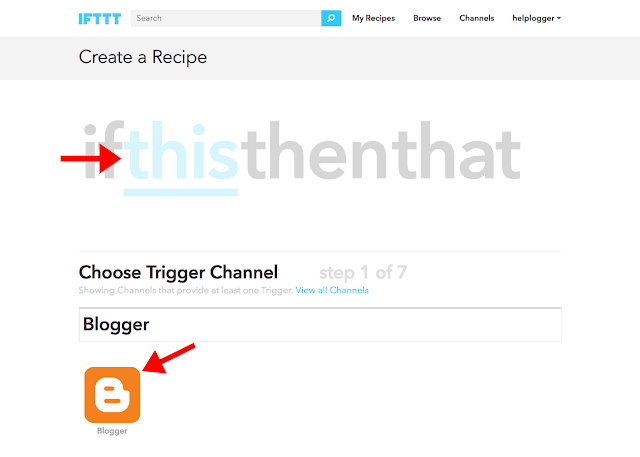
create Blogger recipe using IFTTT


Step 3. Connect Blogger blog with IFTTT

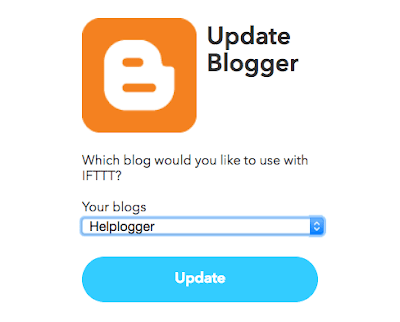
Connect your Blogger account in order to tie it with your IFTTT account. A 'Request for Permission' pop-up will appear > click the 'Allow' button and choose which blog you want to use with IFTTT from the drop-down menu, then click the 'Update' button.

add Blogger blog to IFTTT for automatic posting

After our Blogger blog has been connected, 'Choose a Trigger' that allows you to specify what kind of posts will be published to Facebook. You can choose 'Any new post' or 'New posts labeled'.
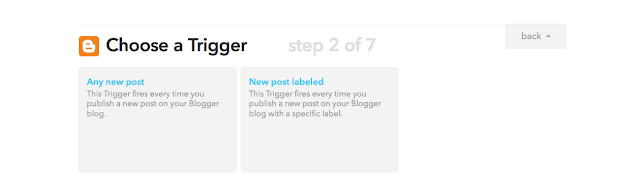
automatically publish new Blogger post using IFTTT

Finally, press the blue 'Create Trigger' button to proceed to the next step.
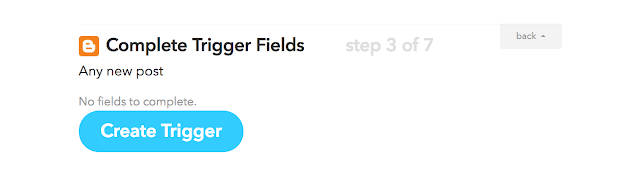
connect Facebook to Blogger to post automatically

Step 4. Creating the 'That' trigger

After registration, Create a Recipe that will specify the direction with which your blog posting will take. Since you want to link Blogger to Facebook, then the Recipe will be - if Blogger, then Facebook. What you're doing is replacing 'this' to Blogger, which is the source, and 'that' to Facebook, which is the target destination.

if Blogger then Facebook IFTTT

To set up 'that', click on the blue-colored 'that'. This will bring up a window that contains a list of social media sites. Search for 'Facebook' in the box and select the 'Facebook Pages' option (select the plain 'Facebook' option if you want to post to your personal profile).
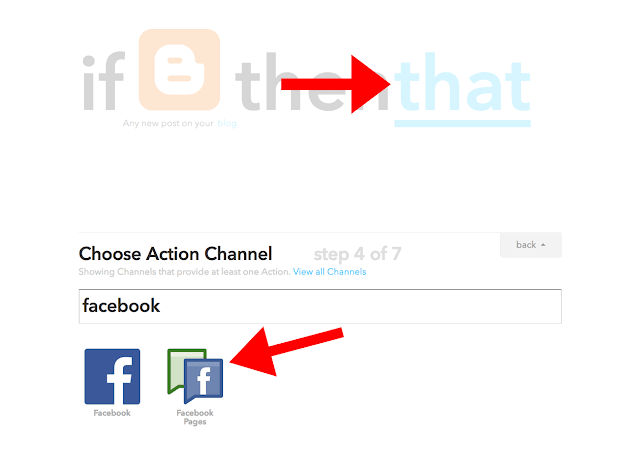
choose action channel IFTTT facebook

Step 5. Connect Facebook page with IFTTT

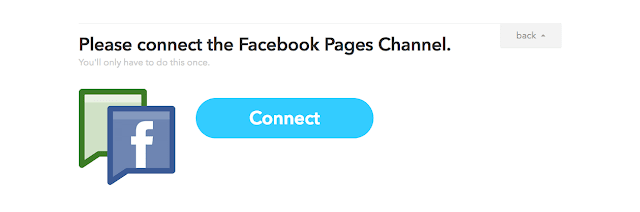
Connect your Facebook account. Make sure you are logged into your Facebook account, before you connect. Pressing the 'Connect' button will open a pop-up window to allow IFTTT post on your Facebook page, then select your Facebook page.

connect facebook pages channel on IFTTT

Hit the 'Done' and 'Continue to the next step' buttons and we're almost done...

You will be prompted to 'Choose an Action', where you get to specify if you only want to 'Create a status message', 'Create a link post', or 'Update a photo from URL'. Choose 'Create a link post' as shown below:
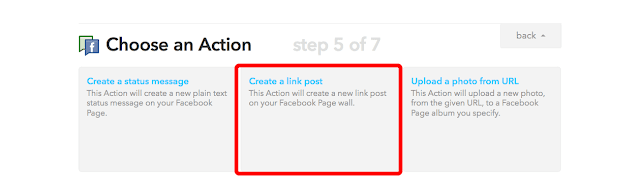
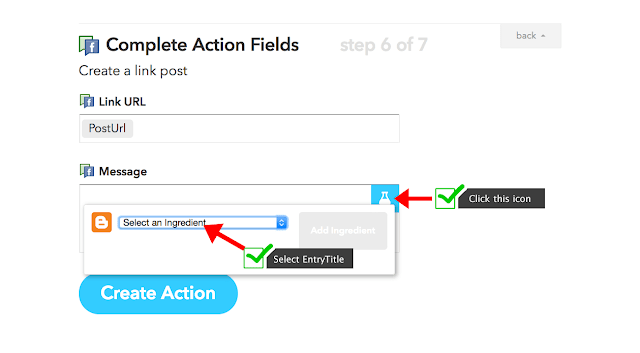
post Blogger automatically to facebook

Step 6. Choosing the ingredients

Once you choose an action, a 'Complete Action Fields' window will appear with 'Link URL' and 'Message' box. To add an ingredient, click on the 'Message' field and you'll see a test tube icon on the right hand side. If you click it, a drop-down menu will appear which will let you choose a field to include - select 'PostTitle' and click 'Add Ingredient' blue button on the right side.

IFTTT Blogger recipe ingredients for Facebook

If you are unsure of what each ingredient does, please visit this page.
Step 7. Finish creating the recipe

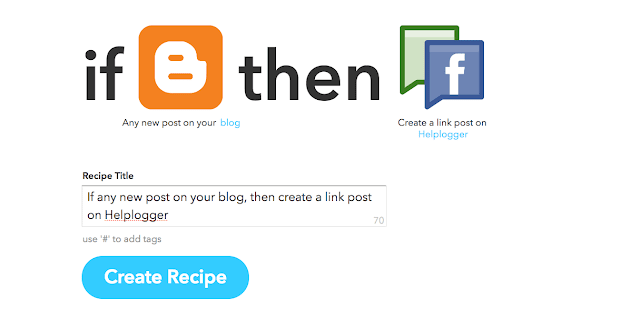
Finally, click the blue 'Create Action' button and your recipe should look something like this:

share blogger post automatically to facebook

To complete your recipe, hit the 'Create Recipe' button.

And that's it! This is how IFTTT recipes are created. Next time you publish a Blogger post, it will be automatically shared to Facebook.

Tuesday, 13 September 2016

Customizable Related Posts Widget for Blogger

We already posted a few tutorials on how to add related posts widget with thumbnails in Blogger with summaries or only titles, which can be compiled into a single All-In-One Widget with powerful options. This new customizable related posts widget for Blogger integrates all the features we've seen before and more, such as thumbnails (square or round), post dates, excerpts, display only titles / thumbnails.

Now let's see what this related posts blogger widget has to offer.

related posts widget, blogger widget

Related Posts Widget Features:

  • 9 attractive styles to match your needs
  • Show Title, excerpt & thumbnails
  • Display simple related posts with titles / summaries / post date
  • Choose whether to display the post thumbnails or not
  • Ability to control the thumbnail image size
  • Option to choose square or round thumbnails
  • Show post text excerpts
  • Control the length of the post excerpt / title
  • Determine the number of related posts to display

Requirements:

  1. The related posts widget recognizes post thumbnails uploaded through Blogger itself (or Picasa Web Albums), other images from Photobucket, Flickr, or other non-Blogger hosts will not be supported.
  2. This widget is compatible with the standard desktop Blogger templates except Dynamic Views, which does not accept customization.
  3. The script does not work on private blogs, so your blog / site must be open to the public in order to show.

Adding Customizable Related Posts Widget in Blogger

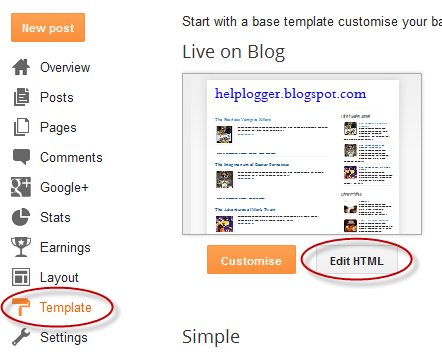
Log into your Blogger dashboard, go to 'Template' and open template editor by clicking the 'Edit HTML' button below 'Live On Blog' preview.

Next, we're going to use the template search feature, be sure to follow these directions exactly:

1. Place your cursor on the template code.
2. Click once.
3. Press CTRL and F at the same time (PC) or Command and F (Mac).

The search box will open in the upper right corner of the template editor.


Type </head> in the search box, then press ENTER. This will take you to the </head> tag in your template and highlight it in yellow.

Select and copy the entire CSS style below and paste it directly ABOVE the </head> tag:
<style type='text/css'>
.related-posts-container{margin:55px 0px;}.related-posts-container h4{font:20px &#39;Open Sans&#39;, sans-serif;margin-bottom:20px;}.related-posts-container ul,.related-posts-container ul li{list-style: none;margin: 0;padding: 0;}.related-posts-container ul li a{text-transform:capitalize !important;font:bold 13px &#39;Open Sans&#39;, sans-serif;outline: 0;}.related-snippets{margin-top:5px;font:italic 12px &#39;Open Sans&#39;, sans-serif;}.related-posts-1 li{list-style:inside none disc !important;}.related-posts-1 li,.related-posts-2 li{border-top:1px solid rgba(0,0,0,0.04);padding:0.8em 0 !important;}.related-posts-1 li:first-child,.related-posts-2 li:first-child{border-top:medium none;}li.related-post-item{margin:0 3% 3% 0 !important;width:22.7%;float:left;list-style:none;position:relative;}li.related-post-item:last-child{margin:0 0 2% !important;}.related-thumb-large{width:100%;height:auto;border:none;margin:0px auto 10px;padding:0 !important;}.related-posts-8 li .related-title,.related-posts-9 li .related-title,.related-posts-9 li .related-snippets{padding-left:74px;}.related-posts-8 li:nth-child(even),.related-posts-9 li:nth-child(even){margin:0 0 4% !important;}.related-posts-8 li,.related-posts-9 li{background-color:#ffffff;box-shadow:0 0 4px rgba(180, 180, 180, 0.55);width:42% !important;float:left;margin:0 4% 4% 0 !important;padding:3% !important;}.related-thumb{float:left;height:64px;margin-right:10px;object-fit:cover;width:64px;}.related-posts-6 li,.related-posts-6 a{line-height:0 !important;}.related-posts-6 .related-thumb-large{margin-bottom:0;}.related-posts-7 li.related-post-item{margin:0 !important;width:25% !important;}.related-wrapper{position:absolute;left:0px;right:0;top:0px;bottom:0;margin:0 auto;z-index:4;background:rgba(77,77,77,0.2);}.related-wrapper-inner{position:relative;height:100%;z-index:99;width:100%;display:table;vertical-align:middle;text-align:center;-moz-box-sizing:border-box;-webkit-box-sizing:border-box;box-sizing:border-box;}.related-wrapper .related-title{vertical-align:middle;display:table-cell;color:#ffffff;font:bold 16px &#39;Open Sans&#39;, sans-serif;padding:0 20px;}.related-date{margin-top:5px;font:italic 11px &#39;Open Sans&#39;, sans-serif;color:#999999;}
</style>

Next, we need to add the script  - search for the following line:
<b:includable id='postQuickEdit' var='post'>

Once you found it, click the small arrow not beside it but with one level above to expand code and scroll down until you see </b:includable> - right below this tag, you should see the line including the "postQuickEdit" id.

See the screenshot for more help:


Just ABOVE the </b:includable> tag, add the following script:
<b:if cond='data:blog.pageType == &quot;item&quot;'>
<div class='related-posts-container' id='related-posts-widget'/>
<div style='clear: both;'/>
<script type='text/javascript'>
var labelArray = [<b:if cond='data:post.labels'><b:loop values='data:post.labels' var='label'>&quot;<data:label.name/>&quot;<b:if cond='data:label.isLast != &quot;true&quot;'>,</b:if></b:loop></b:if>];
var relatedSettings = {
blogURL:&quot;<data:blog.homepageUrl/>&quot;,
relatedHeading:&quot;&lt;h4&gt;&lt;span&gt;Related Posts&lt;/span&gt;&lt;/h4&gt;&quot;,
relatedPosts:4,
relatedStyle:4,
thumbnailSize:&quot;w300-h200-p-nu&quot;,
defaultThumb:&quot;https://blogger.googleusercontent.com/img/b/R29vZ2xl/AVvXsEiyCD8ctBK_QgHoEWR7Ph_przbYdFK2dJx8ObGaAP56qcQnRdzkg6kSfrgpOp19dh33wMFX1kdpdV6LeRivfhNFYhlV4XKSFU9POi8vz_H-FUEzmMkzo5oUPPOW7akB8mbfYdMnWm8LLeHp/300-h200-c/no-thumb.png&quot;,
roundThumbs:false,
titleLength:&quot;auto&quot;,
snippetLength:45,
centerText:false,
openNewTab:false
};</script>
<script type='text/javascript'>
//<![CDATA[
var randomRelatedIndex,startRelated;!function(a,b,c){var d={callBack:function(){}};for(var e in relatedSettings)d[e]="undefined"==relatedSettings[e]?d[e]:relatedSettings[e];var f=function(a){var d=b.createElement("script");d.type="text/javascript",d.src=a,c.appendChild(d)},g=function(a,b){return Math.floor(Math.random()*(b-a+1))+a},h=function(a){var c,d,b=a.length;if(0===b)return!1;for(;--b;)c=Math.floor(Math.random()*(b+1)),d=a[b],a[b]=a[c],a[c]=d;return a},i="object"==typeof labelArray&&labelArray.length>0?"/-/"+h(labelArray)[0]:"",j=function(a){var b=a.feed.openSearch$totalResults.$t-d.relatedPosts,c=g(1,b>0?b:1);f(d.blogURL.replace(/\/$/,"")+"/feeds/posts/summary"+i+"?alt=json-in-script&orderby=updated&start-index="+c+"&max-results="+d.relatedPosts+"&callback=startRelated")},k=function(a){var l,m,n,o,p,q,b=document.getElementById("related-posts-widget"),c=h(a.feed.entry),e=d.relatedStyle,f=d.relatedHeading+'<ul class="related-posts-'+e+'">',g=d.openNewTab?' target="_blank"':"",i=d.centerText?"text-align:center;":"",j=d.roundThumbs?"-webkit-border-radius:50%;-moz-border-radius:50%;border-radius:50%;":"",k='<span style="display:block;clear:both;"></span>';if(b){for(var r=0;r<d.relatedPosts&&r!=c.length;r++){n=c[r].title.$t,o="auto"!==d.titleLength&&d.titleLength<n.length?n.substring(0,d.titleLength)+"&hellip;":n,p="media$thumbnail"in c[r]&&d.thumbnailSize!==!1?c[r].media$thumbnail.url.replace(/\/s[0-9]+(\-c)?/,"/"+d.thumbnailSize):d.defaultThumb,l=h(c[r].published.$t);for(var s=[1,2,3,4,5,6,7,8,9,10,11,12],t=["January","February","March","April","May","June","July","August","September","October","November","December"],u=l.split("-")[2].substring(0,2),v=l.split("-")[1],w=l.split("-")[0],x=0;x<s.length;x++)if(parseInt(v)==s[x]){v=t[x];break}postdate=v+" "+u+" "+w,q="summary"in c[r]&&d.snippetLength>0?c[r].summary.$t.replace(/<br ?\/?>/g," ").replace(/<.*?>/g,"").replace(/[<>]/g,"").substring(0,d.snippetLength)+"&hellip;":"";for(var y=0,z=c[r].link.length;y<z;y++)m="alternate"==c[r].link[y].rel?c[r].link[y].href:"#";1==e?f+='<li><a href="'+m+'" '+g+">"+o+"</a></li>":2==e?f+='<li><a href="'+m+'" '+g+'><div class="related-title">'+o+'</div></a><div class="related-snippets">'+q+"</div></li>":3==e?f+='<li class="related-post-item" style="'+i+'"><a href="'+m+'" '+g+'><img alt="" class="related-thumb-large" src="'+p+'" style="'+j+'"><div class="related-title">'+o+'</div></a><div class="related-snippets">'+q+"</div></li>":4==e?f+='<li class="related-post-item" style="'+i+'"><a href="'+m+'" '+g+'><img alt="" class="related-thumb-large" src="'+p+'" style="'+j+'"><div class="related-title">'+o+'</div></a><div class="related-date">'+postdate+"</div></li>":5==e?f+='<li class="related-post-item" style="'+i+'"><a href="'+m+'" '+g+'><img alt="" class="related-thumb-large" src="'+p+'" style="'+j+'"><div class="related-title">'+o+"</div></a></li>":6==e?f+='<li class="related-post-item"><a href="'+m+'" '+g+'><img alt="" class="related-thumb-large" src="'+p+'" style="'+j+'"><div class="related-wrapper" style="'+j+'"><div class="related-wrapper-inner"><div class="related-title">'+o+"</div></div></div></a></li>":7==e?f+='<li class="related-post-item"><a href="'+m+'" '+g+'><img alt="" class="related-thumb-large" src="'+p+'" style="'+j+'"></a></li>':8==e?f+='<li class="related-post-item"><a class="related-post-item-wrapper" href="'+m+'" '+g+'><img alt="" class="related-thumb" src="'+p+'" style="'+j+'"><div class="related-title">'+o+'</div></a><div class="related-date">'+postdate+"</div></li>":9==e&&(f+='<li><a href="'+m+'" '+g+'><img alt="" class="related-thumb" src="'+p+'" style="'+j+'"><div class="related-title">'+o+'</div></a><div class="related-snippets">'+q+"</div></li>")}b.innerHTML=f+="</ul>"+k,d.callBack()}};randomRelatedIndex=j,startRelated=k,f(d.blogURL.replace(/\/$/,"")+"/feeds/posts/summary"+i+"?alt=json-in-script&orderby=updated&max-results=0&callback=randomRelatedIndex")}(window,document,document.getElementsByTagName("head")[0]);
//]]>
</script>
</b:if>

How to Customize the Related Posts Widget for Blogger?

To change the 'Related Posts' text that appears above the widget, modify the text in red:
relatedHeading: &quot;&lt;h4&gt;&lt;span&gt;Related Posts&lt;/span&gt;&lt;/h4&gt;&quot;,

To change the number of posts to display, change the '4' value from this line:
relatedPosts: 4,

Note: you may need to change the percentages in the CSS styles above in order to make posts fit the related container. Just follow the values in red and play with them until you get the best results.

To change the style of the related posts widget, modify the '4' value from:
relatedStyle: 4,

Available Related Posts Styles

  1. simple related posts widget that will show post titles only
  2. display post titles and snippets
  3. display post thumbnails, titles and snippets
  4. display related posts thumbnails, titles and post date (shows by default)
  5. display related posts thumbnails and titles
  6. post titles in front of thumbnails, instead of having them below the thumbnail
  7. display thumbnails only
  8. small thumbnail with titles on the right and date below
  9. small thumbnails with post titles and excerpts on the right

Customizing the Related Post Thumbnail Size & Style

By default, thumbnails are resized and cropped automatically to be 300px wide by 200px tall. If you want to change the width and height of the thumbnails, modify the '300' and '200' values from:
thumbnailSize: &quot;w300-h200-p-nu&quot;,
defaultThumb: &quot;https://blogger.googleusercontent.com/img/b/R29vZ2xl/AVvXsEiyCD8ctBK_QgHoEWR7Ph_przbYdFK2dJx8ObGaAP56qcQnRdzkg6kSfrgpOp19dh33wMFX1kdpdV6LeRivfhNFYhlV4XKSFU9POi8vz_H-FUEzmMkzo5oUPPOW7akB8mbfYdMnWm8LLeHp/300-h200-c/no-thumb.png&quot;,
Note: 'w' comes from width, 'h' comes from height. To make the thumbnails square, change the 'h' (height) value and make it equal with 'w' (width) value. A higher value will result in more high-res images.

If you want thumbnails have rounded corners, change 'false' with 'true':
roundThumbs:false,

Customizing Related Titles & Excerpts

To shorten the post title, change auto with the number of characters to show:
titleLength: &quot;auto&quot;,

To reduce or add more characters to the snippets, change the "45" value:
snippetLength: 45,

If you want to center text (title and summary), change 'false' to 'true':
centerText:false,

To open links in a new tab when visitors click on a related post, change "false" to "true":
openNewTab: false

Once you're done with the settings, click the 'Save Template' button and now you can see the related posts widget live on your Blogger blog.

Final words

That's it! With the new customizable Related Posts widget for Blogger you will be able to add unique features to the related content section of your blog. However, all of these styles look and work slightly different, so take your time, and pick your favorite.

Friday, 9 September 2016

Add Load More Posts or Infinite Scrolling to Blogger

You might have seen the implementation of infinite scrolling at Facebook, Twitter or Google+. Instead of showing Older / Newer posts links, we can load posts dynamically whenever a "Load more posts" button is clicked, or by scrolling down the page. This tutorial will show you how to implement Ajax based loading script that will add Load More Posts or Infinite Scrolling to Blogger, so that visitors can easily navigate without reloading the page.

How it works?

- You have the option to add a 'Load More Posts' button or load automatically the older posts as visitors scroll down the page.
- Once implemented, Load More Posts / Infinite Scrolling applies to all Blogger posts on index pages (homepage, archive, label pages). It can't be added on individual posts.

Demo

To see it live, check out the demo below. When you scroll down to the bottom of the page, you will see the "Load More Posts" button. Once you click it, the next 3 posts set to display will load below.


Adding Load More Posts or Infinite Scrolling to Blogger

1. Log into your Blogger account and click on your blog where you want to add it.
2. Go to 'Template' and click the 'Edit HTML' button to open the Template editor > click anywhere in the code area and press CTRL + F keys (or Command + F) to open the search box.


3. Type the tag below in the search box and press ENTER to find it:
</head>
4. Just above the </head> tag, add the following scripts/css styles:

a. If you want to load posts with 'Load More Posts' button like in the demo blog:
<script src='https://ajax.googleapis.com/ajax/libs/jquery/2.2.0/jquery.min.js'/>
<b:if cond='data:blog.pageType != &quot;static_page&quot;'>
<b:if cond='data:blog.pageType != &quot;item&quot;'>
<script type='text/javascript'>
//<![CDATA[
!function(a){function b(){h||(h=!0,d?(f.find("a").hide(),f.find("img").show(),a.ajax(d,{dataType:"html"}).done(function(b){var b=a("<div></div>").append(b.replace(k,"")),c=b.find("a.blog-pager-older-link");c?d=c.attr("href"):(d="",f.hide());b=b.find(g).children();a(g).append(b),window._gaq&&window._gaq.push(["_trackPageview",d]);window.gapi&&window.gapi.plusone&&window.gapi.plusone.go&&window.gapi.plusone.go();window.disqus_shortname&&a.getScript("http://"+window.disqus_shortname+".disqus.com/blogger_index.js");window.FB&&window.FB.XFBML&&window.FB.XFBML.parse&&window.FB.XFBML.parse();f.find("img").hide();f.find("a").show();h=!1})):f.hide())}function c(){var a=Math.max(i.height(),j.height(),document.documentElement.clientHeight),c=i.scrollTop()+i.height();0>a-c&&b()}var d="",f=null,g="div.blog-posts",h=!1,i=a(window),j=a(document),k=/<script\b[^<]*(?:(?!<\/script>)<[^<]*)*<\/script>/gi;a(document).ready(function(){if("item"!=_WidgetManager._GetAllData().blog.pageType&&(d=a("a.blog-pager-older-link").attr("href"))){var g=a('<a href="javascript:;" >LOAD MORE POSTS</a>');g.click(b);i.scroll(c);f=a('<div class="load-more"></div>');f.append(g);f.append(e);f.insertBefore(a("#blog-pager"));a("#blog-pager").hide()}})}(jQuery);//]]>
</script>
<style type="text/css">
.load-more{display:block;text-align:center;margin:20px auto;}.load-more a,.load-more a:hover{text-decoration:none;font:bold 11px Open Sans, sans-serif;letter-spacing:1px;padding:10px 20px;background:#000000;color:#ffffff;}
</style>
</b:if>
</b:if>

b. If you want to add the infinite scrolling without button, paste this instead:
<script src='https://ajax.googleapis.com/ajax/libs/jquery/2.2.0/jquery.min.js'/>
<b:if cond='data:blog.pageType != &quot;static_page&quot;'>
<b:if cond='data:blog.pageType != &quot;item&quot;'>
<script type='text/javascript'>
//<![CDATA[
!function(a){function b(){h||(h=!0,d?(f.find("a").hide(),f.find("img").show(),a.ajax(d,{dataType:"html"}).done(function(b){var b=a("<div></div>").append(b.replace(k,"")),c=b.find("a.blog-pager-older-link");c?d=c.attr("href"):(d="",f.hide());b=b.find(g).children();a(g).append(b),window._gaq&&window._gaq.push(["_trackPageview",d]);window.gapi&&window.gapi.plusone&&window.gapi.plusone.go&&window.gapi.plusone.go();window.disqus_shortname&&a.getScript("http://"+window.disqus_shortname+".disqus.com/blogger_index.js");window.FB&&window.FB.XFBML&&window.FB.XFBML.parse&&window.FB.XFBML.parse();window.twttr&&window.twttr.widgets&&window.twttr.widgets.load&&window.twttr.widgets.load();f.find("img").hide();f.find("a").show();h=!1})):f.hide())}function c(){var a=Math.max(i.height(),j.height(),document.documentElement.clientHeight),c=i.scrollTop()+i.height();150>a-c&&b()}var d="",f=null,g="div.blog-posts",h=!1,i=a(window),j=a(document),k=/<script\b[^<]*(?:(?!<\/script>)<[^<]*)*<\/script>/gi;a(document).ready(function(){if("item"!=_WidgetManager._GetAllData().blog.pageType&&(d=a("a.blog-pager-older-link").attr("href"))){var g=a('<a href="javascript:;" >LOAD MORE POSTS</a>');g.click(b);i.scroll(c);f=a('<div class="load-more"></div>');f.append(g);f.append(e);f.insertBefore(a("#blog-pager"));a("#blog-pager").hide()}})}(jQuery);
//]]>
</script>
</b:if></b:if>

Note: This code uses jQuery library, so if you already have jQuery on your page, please remove the line in red highlighted above.

5. Click 'Save template' button and check the 'Load More Posts' button / Infinite Scrolling in your Blogger blog.

Conclusion

That's it! So this is how we can easily add Load More Posts / Infinite Scrolling to Blogger. From now on, our visitors can stay in same page and navigate through infinite number of posts on the fly!

Wednesday, 11 March 2015

Building a List/Grid View Switcher in Blogger with Auto Read More

A list of posts in grid or list view provides a more defined canvas with which a blogger or website owner can use as a guide in creating content. This concept has extended to visitors, where they can have control on whether or not they wish to display posts in list or grid view. While custom modification codes are shared by some blogging sites, others are not. Some that are shared, however, can be complex even to bloggers themselves, such as JQuery.

The good news is there are lightweight codes available, including the Auto Read More in Blogger. Through it, a blogger can add two buttons that will enable visitors to switch between grid view and list view, depending on what they prefer. These buttons, however, are only visible on limited pages - homepage, label page and archive page. Nonetheless, it is better than not having this particular feature at all.

Unlike JQuery, the Auto Read More uses HTML, CSS and JavaScript. To view posts in a list view, two sets of CSS codes are added as one. Another set is added to view posts in grid view. Other combination of codes is used to enable easy switch between views, particularly at a click of a button.


How to Add a List/Grid View Switcher in Blogger

Step 1. Log into your Blogger dashboard and select your blog, then go to "Template" > press the "Edit HTML" button.

Step 2. Click anywhere inside the code area and press the CTRL + F keys to open the search box. Type this tag below inside the box and hit Enter to find it:
</head>
Step 3. Just above the </head> tag, copy and paste the following CSS style and scripts:
<script type='text/javascript'>
function list_view(){
if(document.getElementsByClassName(&quot;post&quot;)) {elementArray = document.getElementsByClassName(&quot;post&quot;); while (elementArray.length) {elementArray[0].className = &quot;post-grid-view&quot;;}}
if(document.getElementsByClassName(&quot;post-title&quot;)) {elementArray = document.getElementsByClassName(&quot;post-title&quot;); while (elementArray.length) {elementArray[0].className = &quot;post-title-grid&quot;;}}
}
function grid_view(){
if(document.getElementsByClassName(&quot;post-grid-view&quot;)) {elementArray = document.getElementsByClassName(&quot;post-grid-view&quot;); while (elementArray.length) {elementArray[0].className = &quot;post&quot;;}}
if(document.getElementsByClassName(&quot;post-title-grid&quot;)) {elementArray = document.getElementsByClassName(&quot;post-title-grid&quot;); while (elementArray.length) {elementArray[0].className = &quot;post-title&quot;;}}
}
</script>
 <script type='text/javascript'>
posts_no_thumb_sum = 100;
posts_thumb_sum = 350;
</script>

<script type='text/javascript'>
//<![CDATA[
function removeHtmlTag(strx,chop){
if(strx.indexOf("<")!=-1)
{
var s = strx.split("<");
for(var i=0;i<s.length;i++){
if(s[i].indexOf(">")!=-1){
s[i] = s[i].substring(s[i].indexOf(">")+1,s[i].length);
}
}
strx = s.join("");
}
chop = (chop < strx.length-1) ? chop : strx.length-2;
while(strx.charAt(chop-1)!=' ' && strx.indexOf(' ',chop)!=-1) chop++;
strx = strx.substring(0,chop-1);
return strx+'...';
}
function createSummaryAndThumb(pID, pURL, pTITLE){
var div = document.getElementById(pID);
var imgtag = "";
var img = div.getElementsByTagName("img");
var summ = posts_no_thumb_sum;
if(img.length>=1) {
imgtag = '<span class="posts-thumb" style="float:left; margin-right: 10px;"><a href="'+ pURL +'"><img src="'+img[0].src+'" /></a></span>';
summ = posts_thumb_sum;
}

else {
imgtag = '<span class="posts-thumb" style="float:left; margin-right: 10px;"><a href="'+ pURL +'" title="'+ pTITLE+'"><img src="https://blogger.googleusercontent.com/img/b/R29vZ2xl/AVvXsEjRxTAHky18TDXgB3eKtk8UKzZowN5bi2EU0VDHrJu1daSBRQUcetycKqSIAtRjyAhlDsMQjVJ3MQx-xrLokYO1HIP1DcCl-l62wAXLuVk9WQKl9pjzvHPDyUkbwlFH8AbDsfkq8Cu-czzk/s1600/sorry-image-not-available.png" style="margin-top: -30px;" /></a></span>';
summ = posts_thumb_sum;
}

var summary = imgtag + '<a href="'+ pURL +'"><div class="post-summary-text">' + removeHtmlTag(div.innerHTML,summ) + '</div></a>';
div.innerHTML = summary;
}
//]]>
</script>

<b:if cond='data:blog.pageType != &quot;static_page&quot;'>
<b:if cond='data:blog.pageType!= &quot;item&quot;'>
<style>
#list-view-button {font-family: Verdana; text-align:left;cursor:pointer;font-size: 14px;border-bottom: 5px solid #eaeaea;text-decoration: none;}
#list-view-button a{text-decoration: none; color: #666;}
.grid-view-button {background-color:#efefef;color:#666;padding:5px 10px;border-radius: 5px;font-size: 12px;}
.list-view-button {background-color:#efefef;color:#000;padding:5px 10px;border-radius: 5px;font-size: 12px;}
.post-grid-view {width:100%;height:250px;overflow: hidden;float:left;margin:0px 0px 20px !important;position:relative;display: block; -webkit-transition:all 0.5s ease 0s; -moz-transition:all 0.5s ease 0s; -o-transition:all 0.5s ease 0s; transition:all 0.5s ease 0s; }
.post-grid-view .posts-thumb {width:40% !important;height:250px !important;float:left;margin:0px;position:relative;border-top: 0px solid transparent !important;overflow: hidden;}
.post-grid-view .post-header {display: none;}
.post-grid-view .post-body img {min-width: 300px !important; min-height: 250px !important;display:block;width:100%!important;height:auto!important;max-width:800px!important;max-height:400px!important;border:none;outline:none;position:relative;margin: 0px;padding:0;}
.post-grid-view .post-summary-text {opacity: 1; background: none; width: 58%;font-size: 120% !important;clear: none !important; display: inline-block !important; padding: 80px 0px !important; color: #666 !important; text-shadow: none !important; float: right !important; text-align: left; position: relative !important; font-family: &#39;Open Sans Condensed&#39;, sans-serif;}
.post-grid-view .post-body {height: 250px;background:#f5f5f5; box-shadow: none !important;}
.post-title-grid a { font-size:170%;color: #777;font-family: &#39;Open Sans Condensed&#39;, sans-serif;}
.post-title-grid { position: absolute; left: 42%; top: 5%; z-index: 1;}
.post-grid-view .post-footer {left: 41%; display:block;position: absolute; bottom: 2%;font-size: 120%; background: transparent !important; border: 0px solid transparent !important;font-family: &#39;Open Sans Condensed&#39;, sans-serif;}
.post-grid-view .post-footer a{color: #128EC9;}
.post-grid-view a.comment-bubble {display: none;}
.main-inner .column-center-inner .section {margin: 0px !important;}
.post { -webkit-transition:all 0.5s ease 0s; -moz-transition:all 0.5s ease 0s; -o-transition:all 0.5s ease 0s; transition:all 0.5s ease 0s;}

#blog-pager {clear:both;}
.post {height:auto;width:32.2%;display:inline-block;text-decoration:none;float:left;margin:0 1% 1% 0%;overflow: hidden;padding:0!important;}
.date-header {display: none;}
h3.post-title a {font-size:90%;font-family: &#39;Open Sans Condensed&#39;, sans-serif;text-transform:uppercase;color:#fff;text-shadow: 1px 1px 0 rgba(0, 0, 0, 0.1);font-weight: bold;}
h3.post-title {text-align: center; position:absolute;top:0;width:100%;overflow:hidden;margin:0px !important;padding-top: 30%; background-color: rgba(50, 126, 213, 0.8);transform: scale(1);opacity: 0;z-index: 10;height: 100%;transition: all 300ms ease-out 0s;}
h3.post-title:hover {opacity: 1;}
.posts-thumb {width:100%!important;height:200px!important;overflow:hidden;clear:both;}
.post-body {border-radius:2px;box-shadow:0 5px 4px 1px rgba(0,0,0,0.1);position:relative;overflow: hidden;}
.post-body a {text-decoration: none;}
.post-body img {display:block;width:100%!important;height:auto!important;max-width:800px!important;max-height:400px!important;min-width:200px!important;min-height:200px!important;border:none;outline:none;position:relative;margin: 0px;padding:0;}
.post-summary-text {display: none;}
a.comment-bubble {color:#fff;text-decoration:none;font-size:100%;width: 100%;text-align: center;position:absolute;top:175px;left: 0px;text-shadow:1px 2px 1px #333;font-family: &#39;Pacifico&#39;, cursive;z-index: 122;}
a.comment-bubble:before { content: &quot;Comments: &quot; url(https://blogger.googleusercontent.com/img/b/R29vZ2xl/AVvXsEhN4zKBy7uJUX_cRJ7b4Ulobam_lJPnoZ5yk-N-4DtcCXAK7Lb5vbYQ8Y3dIdNE7npZaoOBw8lGiK3HK9T2XqIfw0b04MqQEOPnpUEWvUvNuuW-4xAPweiN_R_MAcGHFNw7Di-8EHLW65MA/s1600/heart-active.png);}
.post-header,.post-footer {display:none;}
</style></b:if></b:if>
<link href='http://fonts.googleapis.com/css?family=Open+Sans+Condensed:300' rel='stylesheet' type='text/css'/>
<link href='http://fonts.googleapis.com/css?family=Pacifico' rel='stylesheet' type='text/css'/>

Step 4. Next, search for the following line:
<b:section class='main' id='main' name='Main' showaddelement='no'>
...in case you can't find it, search for this one instead:
<b:section class='main' id='main' name='Main' showaddelement='yes'>
Step 5. Just above this line, add the following code:
<b:if cond='data:blog.pageType != &quot;static_page&quot;'>
<b:if cond='data:blog.pageType!= &quot;item&quot;'>
<div id='list-view-button'><a class='grid-view-button' onclick='grid_view()'><img src='https://blogger.googleusercontent.com/img/b/R29vZ2xl/AVvXsEhwXf_1sxCLWa0yhnXfNacXRQ2xsz1UNz913opdLz5AvFKbl1qeZEuDu_KF9WCorISAB_1HihlZUvT3ChXmnf5CsscEXumfZcAHagUnT322tJMd_Ia4DkGU_lJFfw-CSj16C0iyAH1Tion0/s1600/search-grid-icon.png' style='margin: -8px 1px -3px -6px;width: 16px;'/> Grid View</a> <a class='list-view-button' onclick='list_view()'><img src='https://blogger.googleusercontent.com/img/b/R29vZ2xl/AVvXsEi4n2bC8BNVws1vfOWAdN5QKC_9c3ti92GNOJrFOgd_u3aXXoDy7oH33EPWN4Bnu6L-8EmpYpCcq2YSEvQbknjnMe6O8SvzE4jvXauuBMHQBsqc5IyZbkNwJYP4PPO1R2_4WhqzYPWt4sMG/s1600/icon-list-view.png' style='margin: -8px 1px -3px -6px;width: 16px;'/> List View</a></div>
</b:if></b:if>
Step 6. Now, search the tag below:
<data:post.body/>
Step 7. You will find 3 occurrences of this code... replace only the second and third one with this one below:
 <b:if cond='data:blog.pageType != &quot;static_page&quot;'>
    <b:if cond='data:blog.pageType != &quot;item&quot;'>
        <div expr:id='&quot;summary&quot; + data:post.id'>
            <data:post.body/>
        </div>
        <script type='text/javascript'>createSummaryAndThumb(&quot;summary<data:post.id/>&quot;,&quot;<data:post.url/>&quot;);</script>
        <b:if cond='data:post.allowComments'>
            <a class='comment-bubble' expr:href='data:post.addCommentUrl' expr:onclick='data:post.addCommentOnclick'>
                <data:post.numComments/>
            </a>
        </b:if>
    </b:if>
</b:if>
<b:if cond='data:blog.pageType == &quot;item&quot;'>
    <data:post.body/>
</b:if>
<b:if cond='data:blog.pageType == &quot;static_page&quot;'>
    <data:post.body/>
</b:if>

Important: if you already added the auto read more script, remove the previous one in order to make this work.

Step 8. Finally, click "Preview" to see if everything looks good and press the 'Save Template' button to save the changes...

That's it!

Adding a dynamic view switcher on a blog will make viewing content a lot easier for visitors. Whether using a list or grid view, a more compressed list of posts will eliminate the need to click on the next page, which could take time if loading takes a while to complete. For a blog archive, using the Auto Read More codes in Blogger will surely make everyone's viewing experience very convenient.

Considering the ease with which the codes can be customized, building a list/grid view switcher would be completed in no time. A real bonus is that Auto Read More works on all platforms, with cross-browser support as well.

Thursday, 5 March 2015

Add Masonry, Grid Layouts to Blogger Posts with CSS and Javascript

How a website's content is displayed can spell the difference between being popular and obscure. Anything that looks chaotic or hardly readable is never going to be anyone's favorite. This is why content must be displayed in an organized, easy to follow and straightforward manner. Nothing works better than a structured grid, in this case.

Posts listed in grid view provide an excellent viewing experience for both the blogger or website owner and the visitors. This is especially true if the grid comes with images that would play with a person's visual inclination. What is great about grids is the seamless and smooth layout, complemented with a structured yet simple architecture. This makes it easier to navigate through a blog archive or product page. The style also enables a website owner to present posts in a more artistic and informative manner, without delving into the details. Suffice to say that a grid view demands creativity to be effortlessly mixed with functionality.

How views can be switched depends on a number of changes in a blog's codes. Some are fairly easy to implement, while others can be a little complex. Not to worry, as there are guides that will be provided. Grid styles also come in huge varieties, with each one designed to cater to a specific audience. Now, are you ready to go on the grid?

Features

What features can you expect from a grid style post in Blogger?

  • All the posts will follow the grid style when switching to grid view.
  • While the codes are being customized, the posts are left untouched. Their length, however, could be changed accordingly.
  • Auto Read More will be applied on all posts.
  • Thumbnails are automatically added based on the first picture found in each post.
  • Code is secure and is used across the board. In fact, 99% of bloggers are using a similar code to enable grid style posts in blogger.

What are the benefits of grid style?

  • Quick loading time of posts. Since only the snippets are loaded in certain pages, or a thumbnail and a caption, pulling up a blog archive would be quicker. When loading time is decreased, user experience is greatly enhanced.
  • Professional-looking blog. Without the chaos and concerns on readability, a website can look really clean and professional. Combined with the right colors and images, it can also leave a visual impact.
  • Improved website ranking. Because visitors have to click in order to view the rest of the post, page views of a site will significantly increase. This makes for a better SEO strategy.
Although changes to the CSS codes have to be made to implement the grid style view and make it compatible with a blog's template, all the work will be worth it once it is up and running.

Important:
Before anything make sure that you backup your Blogger template! If have encounter any problems with your edits, you can revert the template back to its previous condition by restoring it from your backup. For this, go to 'Template' in the left menu > click on the 'Backup/Restore' button in the upper right corner and press the 'Download Full Template' button - choose where you want to save the file on your computer and click the 'Save' button.

Now we can safely proceed with editing our Blogger template. If you run into problems, just revert back to your saved template.

How to Create Masonry, Grid Style Posts in Blogger

Step 1. Log into your Blogger dashboard and click on the blog where you want to apply the grid style.

Step 2. Go to "Template" located on the left side of the screen and press the "Edit HTML" button.

Step 3. Click anywhere inside the code area and press the CTRL+F keys to open the search box, then type the following tag inside the box (hit Enter to find it):
</head>
Step 4. Now copy the script below and paste it just before the </head> tag:
<script type='text/javascript'>
posts_no_thumb_sum = 100;
posts_thumb_sum = 100;
</script>
<script type='text/javascript'>
//<![CDATA[
function removeHtmlTag(a,b){if(a.indexOf("<")!=-1){for(var c=a.split("<"),d=0;d<c.length;d++)c[d].indexOf(">")!=-1&&(c[d]=c[d].substring(c[d].indexOf(">")+1,c[d].length));a=c.join("")}for(b=b<a.length-1?b:a.length-2;" "!=a.charAt(b-1)&&a.indexOf(" ",b)!=-1;)b++;return a=a.substring(0,b-1),a+"..."}function createSummaryAndThumb(a,b,c){var d=document.getElementById(a),e="",f=d.getElementsByTagName("img"),g=posts_no_thumb_sum;f.length>=1?(e='<div class="posts-thumb" style="float:left;"><a href="'+b+'"><img src="'+f[0].src+'" /></a></div>',g=posts_thumb_sum):(e='<div class="posts-thumb" style="float:left;"><a href="'+b+'" title="'+c+'"><img src="https://blogger.googleusercontent.com/img/b/R29vZ2xl/AVvXsEjRxTAHky18TDXgB3eKtk8UKzZowN5bi2EU0VDHrJu1daSBRQUcetycKqSIAtRjyAhlDsMQjVJ3MQx-xrLokYO1HIP1DcCl-l62wAXLuVk9WQKl9pjzvHPDyUkbwlFH8AbDsfkq8Cu-czzk/s1600/sorry-image-not-available.png" /></a></div>',g=posts_thumb_sum);var h=e+'<div class="post-summary-text">'+removeHtmlTag(d.innerHTML,g)+"</div>";d.innerHTML=h}
//]]>
</script>
Step 5. Find the following code snippet using CTRL+F or Command + F:
<data:post.body/>
Step 6. After pressing the "Enter" key on your keyboard, you may find three occurrences of the above code, replace only the second and the third one with this code below:
<b:if cond='data:blog.pageType != &quot;static_page&quot;'>
    <b:if cond='data:blog.pageType != &quot;item&quot;'>
        <div expr:id='&quot;summary&quot; + data:post.id'>
            <data:post.body/>
        </div>
        <script type='text/javascript'>createSummaryAndThumb(&quot;summary<data:post.id/>&quot;,&quot;<data:post.url/>&quot;);</script>
        <b:if cond='data:post.allowComments'>
            <a class='comment-bubble' expr:href='data:post.addCommentUrl' expr:onclick='data:post.addCommentOnclick'>
                <data:post.numComments/>
            </a>
        </b:if>
    </b:if>
</b:if>
<b:if cond='data:blog.pageType == &quot;item&quot;'>
    <data:post.body/>
</b:if>
<b:if cond='data:blog.pageType == &quot;static_page&quot;'>
    <data:post.body/>
</b:if>

Step 7. Now choose one of the styles below, copy the code provided and paste it just above the </head> tag:

Simple Grid Design


<b:if cond='data:blog.pageType != &quot;static_page&quot;'>
<b:if cond='data:blog.pageType!= &quot;item&quot;'>
<style type="text/css">
#blog-pager{clear:both}.post{height:auto;width:30.8%;overflow:hidden;display:inline-block;text-decoration:none;float:left;margin:0 1.1% 2%;padding:0!important}h3.post-title a{font-size:75%;font-family:&#39;Open Sans Condensed&#39;,sans-serif;text-transform:uppercase;padding:0;color:#444}h3.post-title{height:26px;text-align:center;width:100%;margin:0!important;padding-bottom:4%}.date-header{display:none}.post-body a{text-decoration:none}.posts-thumb{width:100%;height:190px;overflow:hidden;position:relative}.posts-thumb img{position:absolute;left:-100%;right:-100%;top:-100%;bottom:-100%;margin:auto;width:auto;max-width:340px;height:auto;padding:0;border:none;outline:none;}.post-summary-text{color:#777;font-size:100%!important;font-family:&#39;Open Sans Condensed&#39;,sans-serif;text-align:center;clear:both;overflow:hidden;margin:5px 0 0;padding:7% 10%}a.comment-bubble{color:#fff;text-decoration:none;font-size:100%;font-weight:700;right:10px;position:absolute;top:165px;text-shadow:1px 2px 1px #333;font-family:&#39;Open Sans Condensed&#39;,sans-serif;}a.comment-bubble:before{content:&quot;Comments: &quot;;}.post-header,.post-footer{display:none}
</style></b:if></b:if><link href='http://fonts.googleapis.com/css?family=Open+Sans+Condensed:300' rel='stylesheet' type='text/css'/>

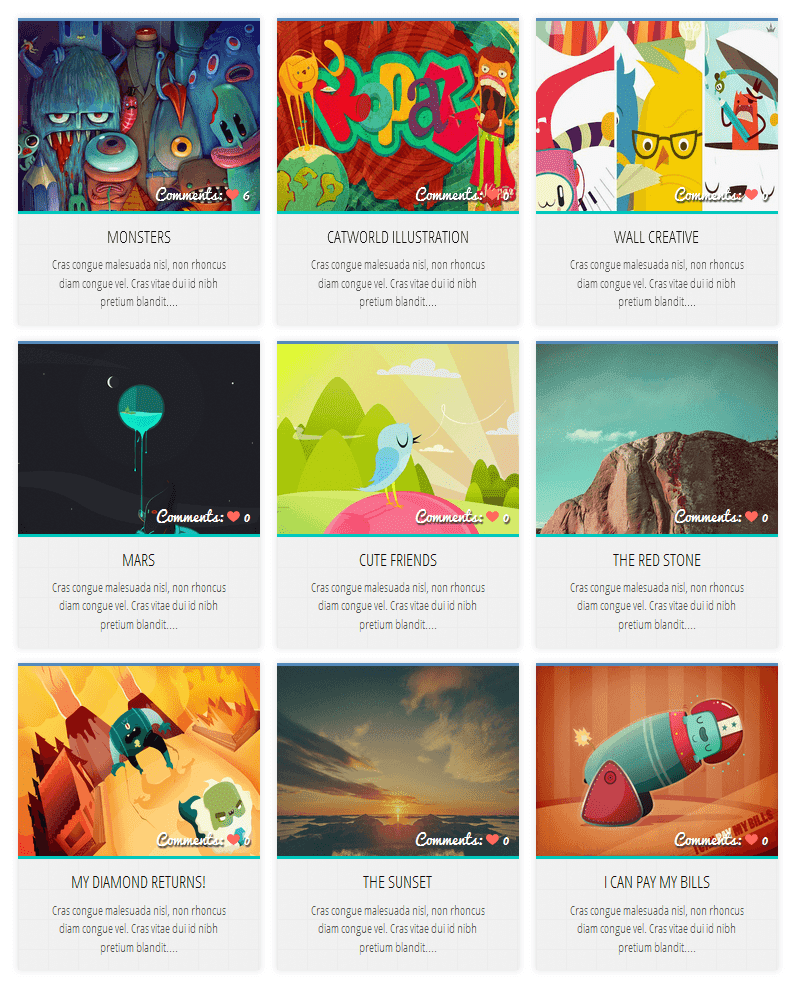
Grid Layout with Post Summary and Thumbnail

grid layout for blogger


<b:if cond='data:blog.pageType != &quot;static_page&quot;'>
<b:if cond='data:blog.pageType!= &quot;item&quot;'>
<style type="text/css">
#blog-pager{clear:both}.post{height:auto;width:31%;display:inline-block;text-decoration:none;float:left;margin:0 1.1% 2%;padding:0!important}h3.post-title a{font:75% &#39;Open Sans Condensed&#39;,sans-serif;text-transform:uppercase;color:#111;padding:0}h3.post-title{text-align:center;height:22px;position:absolute;bottom:23%;width:100%;z-index:101;overflow:hidden;margin:0!important;padding:10px 0 13px}.date-header{visibility:hidden;height:0!important;width:0!important;margin:0!important;padding:0!important}.posts-thumb{width:100%;height:190px;position:relative;overflow:hidden;clear:both;border-bottom:3px solid #00C8BD;border-top:3px solid #558ABB}.posts-thumb:hover{border-top:3px solid #FF664E;border-bottom:3px solid #FEBE36}.post-body{position:relative;height:auto}.post-body a{text-decoration:none}.posts-thumb img{position:absolute;left:-100%;right:-100%;top:-100%;bottom:-100%;margin:auto;width:auto;max-width:340px;height:auto;padding:0;border:none;outline:none}.post-summary-text{color:#555;background:#f5f5f5 url(https://blogger.googleusercontent.com/img/b/R29vZ2xl/AVvXsEgjMxTL4Xp7ctjLOalg4VQMDqM-zULmuo_xVMqZRNbz_bO1X86BtVM-CDH31Vd2_3oJmuFpADLA3pvyRQ2dS70rdx0NAFpExp89y8-bnWAlT6Ly4B-6cp4w94jH1tWTRabxNeafeWM870Nz/s1600/blueprint.png);font:100% &#39;Open Sans Condensed&#39;,sans-serif;text-align:center;clear:both;overflow:hidden;margin:5px 0 0;padding:17% 10% 6%}a.comment-bubble{color:#fff;text-decoration:none;right:10px;position:absolute;top:165px;text-shadow:1px 2px 1px #333;font:110% &#39;Pacifico&#39;,cursive;}a.comment-bubble:before{content:&quot;Comments: &quot; url(https://blogger.googleusercontent.com/img/b/R29vZ2xl/AVvXsEhN4zKBy7uJUX_cRJ7b4Ulobam_lJPnoZ5yk-N-4DtcCXAK7Lb5vbYQ8Y3dIdNE7npZaoOBw8lGiK3HK9T2XqIfw0b04MqQEOPnpUEWvUvNuuW-4xAPweiN_R_MAcGHFNw7Di-8EHLW65MA/s1600/heart-active.png);}.post-header,.post-footer{display:none}
</style></b:if></b:if>
<link href='https://fonts.googleapis.com/css?family=Open+Sans+Condensed:300' rel='stylesheet' type='text/css'/>
<link href='https://fonts.googleapis.com/css?family=Pacifico' rel='stylesheet' type='text/css'/>

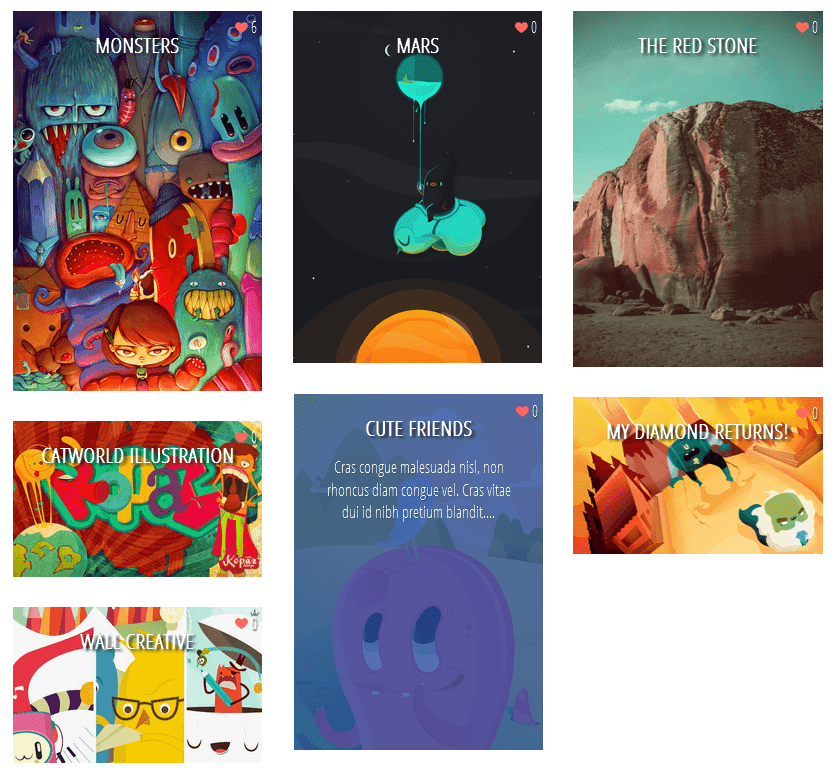
Grid Layout with Text Snippet on Hover

blogger posts


<b:if cond='data:blog.pageType != &quot;static_page&quot;'>
<b:if cond='data:blog.pageType!= &quot;item&quot;'>
<style type="text/css">
#blog-pager{clear:both}.post{height:auto;width:31%;display:inline-block;text-decoration:none;float:left;margin:0 1.1% 2%;padding:0!important;}h3.post-title a{font:95% &#39;Open Sans Condensed&#39;,sans-serif;text-transform:uppercase;color:#fff;padding:0;text-shadow:2px 2px 3px #222}h3.post-title{height:22px;text-align:center;position:absolute;top:1%;width:100%;z-index:101;overflow:hidden;margin:0!important;padding:10px 0}.date-header{visibility:hidden;height:0!important;width:0!important;margin:0!important;padding:0!important;}.posts-thumb{width:100%;height:190px;overflow:hidden;position:relative;}.post-body{position:relative;overflow:hidden}.post-body a{text-decoration:none;}.posts-thumb img{position:absolute;left:-100%;right:-100%;top:-100%;bottom:-100%;margin:auto;width:auto;max-width:340px;height:auto;padding:0;border:none;outline:none;}.post-summary-text{cursor:pointer;background-color:rgba(44,77,163,0.8);color:#fff;font:108% &#39;Open Sans Condensed&#39;,sans-serif;overflow:hidden;padding:45px 10px 0;left:0;position:absolute;text-align:center;text-shadow:1px 1px 0 rgba(0,0,0,0.1);top:0;opacity:0;height:100%;transition:all 300ms ease-out 0s;}.post-summary-text:hover{opacity:1;z-index:10;}a.comment-bubble{color:#fff;text-decoration:none;font:104% &#39;Pacifico&#39;,cursive;width:100%;text-align:center;position:absolute;top:160px;left:0;text-shadow:1px 2px 1px #333;z-index:11;}a.comment-bubble:before{content:&quot;Comments: &quot;}.post-header,.post-footer{display:none}
</style></b:if></b:if>
<link href='https://fonts.googleapis.com/css?family=Open+Sans+Condensed:300' rel='stylesheet' type='text/css'/>
<link href='https://fonts.googleapis.com/css?family=Pacifico' rel='stylesheet' type='text/css'/>

Masonry Layout (Pinterest Like Grid)

masonry layout for blogger


<b:if cond='data:blog.pageType != &quot;static_page&quot;'>
<b:if cond='data:blog.pageType!= &quot;item&quot;'>
<style type="text/css">
#blog-pager{clear:both;position:absolute;bottom:0;left:0}.blog-feeds{display:none}.post{height:auto;width:100%;padding:0!important;margin:0 0 30px;display:inline-block;text-decoration:none}h3.post-title a{font:bold 95% &#39;Open Sans Condensed&#39;,sans-serif;text-transform:uppercase;padding:0;color:#fff;text-shadow:3px 2px 2px #222;}h3.post-title,.comments h4{margin:0!important;text-align:center;padding:10px 0;position:absolute;top:10px;width:100%;z-index:200}.post-header{display:none}.date-header{visibility:hidden;height:0!important;width:0!important;padding:0!important;margin:0!important}.posts-thumb{width:100%;height:auto;overflow:hidden;clear:both}.post-body{overflow:hidden;position:relative}.post-body a{text-decoration:none}.post-body img{display:block;width:auto;height:auto;max-width:100%;max-height:none;min-width:100%;min-height:auto;margin:0;padding:0;border:none;outline:none;position:relative}.post-summary-text{cursor:pointer;background-color:rgba(44,77,163,0.8);color:#fff;font:120% &#39;Open Sans Condensed&#39;,sans-serif;padding:84px 10% 0;left:0;position:absolute;text-align:center;vertical-align:bottom;text-shadow:1px 1px 0 rgba(0,0,0,0.1);top:0;opacity:0;z-index:10;height:100%;transition:all 300ms ease-out 0s;}.post-summary-text:hover{opacity:1}.post-footer{display:none}a.comment-bubble{color:#fff;text-decoration:none;font:120% &#39;Open Sans Condensed&#39;,sans-serif;right:5px;z-index:222;position:absolute;top:5px;text-shadow:1px 2px 1px #333;}a.comment-bubble:before{content:url(https://blogger.googleusercontent.com/img/b/R29vZ2xl/AVvXsEhN4zKBy7uJUX_cRJ7b4Ulobam_lJPnoZ5yk-N-4DtcCXAK7Lb5vbYQ8Y3dIdNE7npZaoOBw8lGiK3HK9T2XqIfw0b04MqQEOPnpUEWvUvNuuW-4xAPweiN_R_MAcGHFNw7Di-8EHLW65MA/s1600/heart-active.png);}.main-inner .column-center-inner{-moz-column-count:3;-moz-column-gap:1px;-webkit-column-count:3;-webkit-column-gap:1px;column-count:3;column-gap:1px;width:100%;padding:0!important}
</style></b:if></b:if>
<link href='https://fonts.googleapis.com/css?family=Open+Sans+Condensed:300' rel='stylesheet' type='text/css'/>

Please note that the masonry layout might not work if you have a customized template, also older posts will appear vertically (from top to bottom) instead of left to right.

Step 8. Click "Preview" and if everything looks fine, press the "Save Template" button.

That's it!
Implementing a grid style view has its pros and cons, but the benefits clearly outweigh the disadvantages. The fact that a website will look visually appealing and professional when set in grid style, is already enough to boost its online reputation. An increase in page views is just the beginning. With the right images and content, a blog will also have better SEO. Most importantly, implementing the changes is not as complex as some might think. With a step-by-step guide available, adding a dynamic view switcher would be completed in no time.

Monday, 12 May 2014

Responsive CSS Timeline with 3D Effect for Blogger

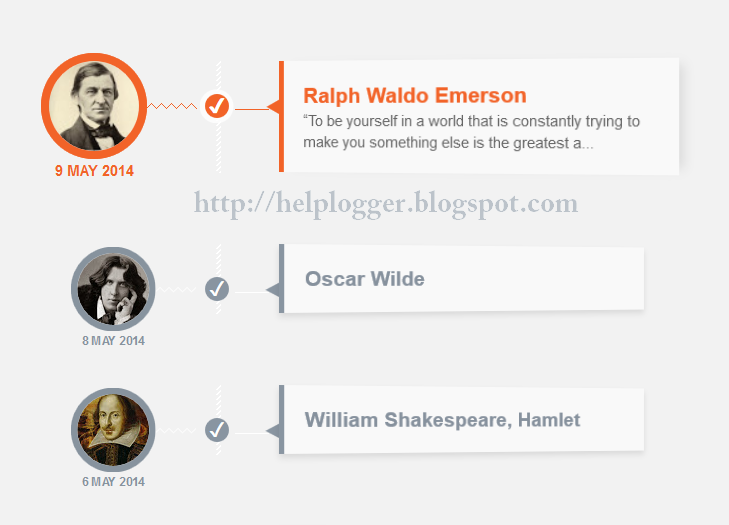
Here's another amazing way to display the Blogger posts. By applying the following Responsive CSS Timeline View with 3D Effect on Blogger Posts, we will have a responsive timeline-like structure of our most recent posts with thumbnails, plus some cool CSS effects. When clicking on the associated radio input, the posts snippet/summary will expand by changing their style and size and will rotate in 3D. The main structure of this CSS timeline with 3D effect is an unordered list.

To get an idea of how it looks like, you can visit this demo blog.

responsive CSS timeline, customize blogger posts

How to Add Responsive CSS Timeline View to Blogger Posts

Step 1. Go to Blogger dashboard > "Template" > click on the "Edit HTML" button:

blogger template, edit html

Step 2. Click anywhere inside the code area and press the CTRL + F keys to open the search box:

blogger search box

Step 3. Type or paste the following tag inside the search box and hit Enter to find it:
</head>
Step 4. Just above the </head> tag, copy and paste the following style:
<b:if cond='data:blog.pageType != &quot;static_page&quot;'>
<b:if cond='data:blog.pageType != &quot;item&quot;'>
<style type='text/css'>
.post-body img, .post-body .tr-caption-container, .Profile img, .Image img,
.BlogList .item-thumbnail img {padding: 0px; border: 0px;}
.post-footer {display: none;}
.post {margin-bottom: 50px; padding-bottom: 0px; background: none; border: none;}
.jump-link a {display: none;}
  h3.post-title a {display: none;}
 .date-header {display: none;}
*,
.timeline:after,
.timeline:before {box-sizing: border-box;padding: 0; margin: 0;}
.timeline {position: relative;padding: 30px 0 50px 0;font-family: Arial, sans-serif;}
.timeline:before {content: &#39;&#39;;position: absolute;width: 5px;height: 100%;margin:0px;top: 0;left: 200px;background: url(data:image/png;base64,iVBORw0KGgoAAAANSUhEUgAAAAUAAAAFCAYAAACNbyblAAAAJUlEQVQIW2NkQAP/gYARWQwkAOLDBeECjEAAkkEWAKtEFwAJAgAZEBP+oM1IkwAAAABJRU5ErkJggg==);}
.event {position: relative;margin-bottom: 80px;padding-right: 40px;}
.thumb {position: absolute; width: 90px; height: 90px;box-shadow:
        0 0 0 8px #87939E,
        0 1px 1px rgba(255,255,255,0.5);background-repeat: no-repeat;border-radius: 50%;-webkit-transform: scale(0.8) translateX(24px);-moz-transform: scale(0.8) translateX(24px);-o-transform: scale(0.8) translateX(24px);-ms-transform: scale(0.8) translateX(24px);transform: scale(0.8) translateX(24px);}
.thumb:before {content: &#39;&#39;;background: transparent url(data:image/png;base64,iVBORw0KGgoAAAANSUhEUgAAAAoAAAAICAYAAADA+m62AAAAPElEQVQYV2NkQAP/gYARCNDFUQRgirAphitEl0TngxXisg5ZnBGXIpgbYfIYjkb3BNxGbBLYxIgyEaQRAA8KKAWYsZtjAAAAAElFTkSuQmCC);position: absolute;height: 8px; z-index: -1; width: 50px;top: 42px; left: 100%;margin-left: 8px;
}
.thumb span {color: #87939E;width: 100%;text-align: center;font-weight: 700;font-size: 15px;text-transform: uppercase;position: absolute;bottom: -30px;}
.event label,.event input[type=&quot;radio&quot;] {width: 24px;height: 24px;left: 158px;top: 36px;position: absolute;display: block;}
.event input[type=&quot;radio&quot;] {opacity: 0;z-index: 10;cursor: pointer;}
.event label:after{content: &quot;\2713&quot;;background: #8995A1;border-radius: 50%;color: #fff;font-size: 20px;height: 100%;width: 100%;font-weight: bold;left: -2px;top: -3px;line-height: 24px;position: absolute;text-align: center;}
.content-perspective { margin-left: 230px;position: relative;perspective: 600px;-webkit-perspective: 600px;-moz-perspective: 600px;-o-perspective: 600px;-ms-perspective: 600px;}
.content-perspective:before { content: &#39;&#39;; width: 34px; left: -44px; top: 48px;position: absolute;height: 1px; z-index: -2;background: #fff;}
.post-content {transform: rotateY(10deg);transform-origin: 0 0;transform-style: preserve-3d;}
.blog-post-body {position: relative;padding: 20px;color: #333; border-left: 5px solid #8995A1;box-shadow: 0 4px 6px rgba(0,0,0,0.1);background: #F9F9F9;}
.blog-post-body h3 {border: none;margin: 0px;}
.blog-post-body h3 a{font-size: 21px;padding: 5px 0 5px 0;color: #86919D;margin: 0px;text-decoration: none;border: none;}
.event input[type=&quot;radio&quot;]:checked ~ .content-perspective .blog-post-body h3 a{color: #F26328;}
.blog-post-body p,.thumb span,.event label {-webkit-backface-visibility: hidden;}
.blog-post-body p {font-size: 15px;max-height: 0px; overflow: hidden; color: rgba(0,0,0,0);text-align: left;}
.blog-post-body:before {content: &#39;\25c2&#39;;font-weight: normal; line-height: 86px; font-size: 86px;position: absolute;color: #8995A1; left: -41px;width: 100%;height: 100%; top: 3px;z-index: -1;}
.thumb,.thumb span,.blog-post-body h3 {transition: all 0.6s ease-in-out 0.2s;-webkit-transition: all 0.6s ease-in-out 0.2s;-moz-transition: all 0.6s ease-in-out 0.2s;-o-transition: all 0.6s ease-in-out 0.2s;-ms-transition: all 0.6s ease-in-out 0.2s;transition: all 0.6s ease-in-out 0.2s;}
.blog-post-body { transition: box-shadow 0.8s linear 0.2s;-webkit-transition: box-shadow 0.8s linear 0.2s;-moz-transition: box-shadow 0.8s linear 0.2s;-o-transition: box-shadow 0.8s linear  0.2s;-ms-transition: box-shadow 0.8s linear 0.2s;}
.post-content {transition: transform 0.8s cubic-bezier(.59,1.45,.69,.98) 0.2s;-webkit-transition: -webkit-transform 0.8s cubic-bezier(.59,1.45,.69,.98) 0.2s;-moz-transition: -moz-transform 0.8s cubic-bezier(.59,1.45,.69,.98) 0.2s;-o-transition: -o-transform 0.8s cubic-bezier(.59,1.45,.69,.98) 0.2s;-ms-transition: -ms-transform 0.8s cubic-bezier(.59,1.45,.69,.98) 0.2s;}
.blog-post-body p { transition: max-height 0.5s linear, color 0.3s linear;-webkit-transition: max-height 0.5s linear, color 0.3s linear;-moz-transition: max-height 0.5s linear, color 0.3s linear;-o-transition: max-height 0.5s linear, color 0.3s linear;-ms-transition: max-height 0.5s linear, color 0.3s linear;}
.event input[type=&quot;radio&quot;]:checked + label:after {content: &#39;\2714&#39;;color: #fff;background: #F26328;box-shadow: 0 0 0 5px rgba(255, 255, 255, 0.8);}
.event input[type=&quot;radio&quot;]:checked ~ .content-perspective:before {background: #F26328;}
 .event input[type=&quot;radio&quot;]:checked ~ .content-perspective .blog-post-body h3 { color: #F26328;}
.event input[type=&quot;radio&quot;]:checked ~ .content-perspective .post-content {transform: rotateY(-5deg);-webkit-transform: rotateY(-5deg);-moz-transform: rotateY(-5deg);-o-transform: rotateY(-5deg);-ms-transform: rotateY(-5deg);}
.event input[type=&quot;radio&quot;]:checked ~ .content-perspective .blog-post-body {border-color: #F26328;box-shadow: 10px 0px 10px -6px rgba(0, 0, 0, 0.1);}
.event input[type=&quot;radio&quot;]:checked ~ .content-perspective .blog-post-body p {max-height: 460px; color: rgba(0,0,0,0.6); transition-delay: 0s, 0.6s;-webkit-transition-delay: 0s, 0.6s;-moz-transition-delay: 0s, 0.6s;-o-transition-delay: 0s, 0.6s;-ms-transition-delay: 0s, 0.6s;}
.event input[type=&quot;radio&quot;]:checked ~ .content-perspective .blog-post-body:before {color: #F26328;}
.event input[type=&quot;radio&quot;]:checked ~ .thumb {transform: scale(1);box-shadow: 0 0 0 8px rgba(242,99,40,1), 0 1px 1px rgba(255,255,255,0.5); -webkit-transform: scale(1);-moz-transform: scale(1);-o-transform: scale(1);-ms-transform: scale(1);}
.event input[type=&quot;radio&quot;]:checked ~ .thumb span {color: #F26328;}
.event input[type=&quot;radio&quot;]:checked ~ .thumb:before {
background: transparent url(data:image/png;base64,iVBORw0KGgoAAAANSUhEUgAAAAoAAAAICAYAAADA+m62AAAAPUlEQVQYV2NkQAOfUjX+882+wYgujiIAU4RNMVwhuiQ6H6wQl3XI4oy4FMHcCJPHcDS6J2A2EqUQpJhohQBbNyaHFmzEqgAAAABJRU5ErkJggg==);}
@media screen and (max-width: 850px) {.blog-post-body h3 {font-size: 20px;}
 .blog-post-body p { font-size: 14px; text-align: justify; }
 .event input[type=&quot;radio&quot;]:checked ~ .content-perspective .blog-post-body p { max-height: 500px; }}
@media screen and (max-width: 540px) {.timeline:before { left: 50px;}
.event {padding-right: 0px; margin-bottom: 100px; }
 .thumb { transform: scale(0.8); -webkit-transform: scale(0.8);-moz-transform: scale(0.8);-o-transform: scale(0.8);-ms-transform: scale(0.8);}
 .event input[type=&quot;radio&quot;] { width: 100px;height: 100px;left: 0px;top: 0px; }
.thumb:before,.event input[type=&quot;radio&quot;]:checked ~ .thumb:before {background: none;width: 0;}
 .event label {display: none;}
 .content-perspective {margin-left: 0px;top: 80px;}
 .content-perspective:before {height: 0px; }
 .post-content { transform: rotateX(-10deg);-webkit-transform: rotateX(-10deg);-moz-transform: rotateX(-10deg);-o-transform: rotateX(-10deg);-ms-transform: rotateX(-10deg);}
 .event input[type=&quot;radio&quot;]:checked ~ .content-perspective .post-content { transform: rotateX(10deg);-webkit-transform: rotateX(10deg);-moz-transform: rotateX(10deg);-o-transform: rotateX(10deg);-ms-transform: rotateX(10deg);}
.blog-post-body {border-left: none;border-top: 5px solid #8995A1;}
.event input[type=&quot;radio&quot;]:checked ~ .content-perspective .blog-post-body {border-color: #F26328;box-shadow: 0 10px 10px -6px rgba(0, 0, 0, 0.1);}
.blog-post-body:before {content: &#39;\25b4&#39;;left: 33px; top: -32px;}
.event input[type=&quot;radio&quot;]:checked ~ .content-perspective .blog-post-body p {max-height:300px; }}
ul.timeline {list-style-type: none;}
</style>
</b:if>
</b:if>

Step 5. Search for the SECOND instance of this code below (hit Enter two times):
<data:post.body/>
Note: depending on the template you are using, you could find more lines like this one above. Thus, if you don't see any changes after saving the template, try to replace the last one, as well.

Also, please note that if you are using the Read more function, you will need to remove it in order to make it work.

Step 6. After you found <data:post.body/>, replace it this HTML code:
<b:if cond='data:blog.pageType != &quot;static_page&quot;'>
<b:if cond='data:blog.pageType != &quot;item&quot;'>
<ul class='timeline'><li class='event'><input checked='checked' name='tl-group' type='radio'/><label/>
<b:if cond='data:post.thumbnailUrl'><img class='thumb' expr:alt='data:post.title' expr:src='data:post.thumbnailUrl'/></b:if><div class='thumb'><b:if cond='data:post.dateHeader'><span><data:post.dateHeader/></span></b:if></div>
<div class='content-perspective'><div class='post-content'><div class='blog-post-body'><h3><b:if cond='data:post.link'><a expr:href='data:post.link'><data:post.title/></a><b:else/><b:if cond='data:post.url'><b:if cond='data:blog.url != data:post.url'><a expr:href='data:post.url'><data:post.title/></a><b:else/><data:post.title/></b:if><b:else/><data:post.title/></b:if></b:if></h3><p><b:if cond='data:blog.pageType != &quot;item&quot;'>
<b:if cond='data:blog.pageType != &quot;static_page&quot;'><data:post.snippet/></b:if></b:if></p></div></div></div></li></ul></b:if></b:if>
<b:if cond='data:blog.pageType == &quot;item&quot;'><data:post.body/></b:if>
<b:if cond='data:blog.pageType == &quot;static_page&quot;'><data:post.body/></b:if>
Step 7. Finally, click on the "Save template" button to save the changes.

Now, we will need to make some small adjustments in order to make the posts date appear correctly:
Go to "Layout" and click on the "Edit" link just below the Blog posts area. When the pop-up window appears, check the date option and choose to display the date in the following order (date/month/year):


Note that you can also hide the posts date by unchecking this option.

Finally, click on the "Save" button and that's it! View your blog and enjoy this Responsive Timeline view with 3D Effect on Blogger posts.

Credit: tympanus.net

Friday, 2 May 2014

Display Blogger Posts in Grid View with Thumbnails

Grid View with Thumbnails is a script for self-hosted Blogger blogs which will display blog posts as a thumbnail grid of images in homepage and archive pages. Instead of sending your blog visitors to a page that displays all the posts in full length with a large image which takes up too much space and requires too much scrolling, now we can have a clean page that displays a gallery grid, with thumbnails and post titles, linking back to the source post for that thumbnail.

Let's take a look at how it will look like in this demo blog.

grid view on blogger posts

If you have a wallpaper or photo blog that would benefit from displaying a thumbnail grid style layout, look no further. Here's how you can add Grid (gallery) View to Blogger posts.

Adding Grid (Gallery) View to Blogger Posts

Step 1. Log into your Blogger account and go to "Template", then click on the "Edit HTML" button

blogger template html

Step 2. Click anywhere inside the code area and press the CTRL + F keys to open the search box


Step 3. Type </head> inside the search box and hit Enter to find it.

Step 4. Just above the </head> tag, add the following script and CSS codes:
<script src='http://code.jquery.com/jquery-1.9.1.js'/>
<b:if cond='data:blog.pageType != &quot;item&quot;'><b:if cond='data:blog.pageType != &quot;static_page&quot;'>
<script type='text/javascript'>//<![CDATA[
function hideLightbox(){for(var a=document.getElementsByTagName("img"),b=0;b<a.length;++b)a[b].onmouseover=function(){var a=this.parentNode.innerHTML;this.parentNode.innerHTML=a,this.onmouseover=null}}$(document).ready(function(){var a=200,b=170,c="https://blogger.googleusercontent.com/img/b/R29vZ2xl/AVvXsEjKzAQnvF-xCCP_HWZy4rDICpNqmFJRFwYu_hXf-Pu-RbtrlFrMIQfeVqhnYXsWHg6FZzgu1P4Xen6cNGW4WtQJom5zBFky6_-HLyiv6Q3ERAAEmg_RtRzpauKEt-hSe2hHpKsiRlN5Bbs/w500-c-h330/no-thumb.png",d=1;$(".post-body").each(function(e,f){var f=$(f),g=$(f).find("img").first(),h=f.parent().find("h3 a"),i=h.attr("href"),j=h.text();if($(h).remove(),f.empty(),g.attr("src")){var k=g.attr("height"),l=g.attr("width"),m=$(g).parent();if(f.append(m),d)g.attr({src:g.attr("src").replace(/s\B\d{3,4}/,"w500-h330-c")}),g.removeAttr("width").removeAttr("height");else{g.attr({src:g.attr("src").replace(/s\B\d{3,4}/,"s"+a)}),g.removeAttr("width");var n=(k/l*a).toFixed(0);g.attr("height",n)}}else var g=$("<img>").attr("src",c),m=$("<a>").append(g).appendTo(f);m.attr("href",i).css("clear","none").css("margin-left","0").css("margin-right","0").addClass("postThumbnail");var o=$("<div>").prepend(j).css("opacity","0.9").css("filter","alpha(opacity=0.9)").appendTo(m);o.height();o.css("margin-top","-28px"),f.css("height",b).css("overflow","hidden")}),$("#blog-pager").css("clear","both")}),window.addEventListener?window.addEventListener("load",hideLightbox,void 0):window.attachEvent("onload",hideLightbox);
//]]>
</script>
<style type='text/css'>
.post {
width:31.3%;
float:left;
display:inline-block;
border-bottom: medium none;
margin: 0 1% 2%;
padding-bottom: 0;
}
h2.date-header,.post-footer {
display: none;
}
h3.post-title, .comments h4,.post-header{margin:0;}
.postThumbnail:hover {text-decoration:none;}
a.postThumbnail div {
text-decoration: none;
color: #fff;
padding:0 5px;
height:24px;
font:bold 12px/25px &quot;Trebuchet MS&quot;,Trebuchet,Verdana,sans-serif;
text-transform: capitalize;
background: rgb(125,126,125);
background: -moz-linear-gradient(top,  rgba(125,126,125,1) 0%, rgba(14,14,14,1) 100%);
background: -webkit-gradient(linear, left top, left bottom, color-stop(0%,rgba(125,126,125,1)), color-stop(100%,rgba(14,14,14,1)));
background: -webkit-linear-gradient(top,  rgba(125,126,125,1) 0%,rgba(14,14,14,1) 100%);
background: -o-linear-gradient(top,  rgba(125,126,125,1) 0%,rgba(14,14,14,1) 100%);
background: -ms-linear-gradient(top,  rgba(125,126,125,1) 0%,rgba(14,14,14,1) 100%);
background: linear-gradient(to bottom,  rgba(125,126,125,1) 0%,rgba(14,14,14,1) 100%);
filter:progid:DXImageTransform.Microsoft.gradient(startColorstr=&#39;#7d7e7d&#39;,endColorstr=&#39;#0e0e0e&#39;,GradientType=0 );
}
.postThumbnail{width:100%;}
.postThumbnail:hover div {
display: block;
}
.postThumbnail img {
width:100%;
background-color: transparent;
border: medium none;
padding: 0px;
-webkit-border-radius: 12px;
-moz-border-radius: 12px;
border-radius: 12px;
transition: opacity .25s ease-in-out;
-moz-transition: opacity .25s ease-in-out;
-webkit-transition: opacity .25s ease-in-out;
}
.postThumbnail img:hover {
-ms-filter: &quot;progid: DXImageTransform.Microsoft.Alpha(Opacity=70)&quot;;
filter: alpha(opacity=70);
-moz-opacity: 0.7;
-khtml-opacity: 0.7;
opacity: 0.7;
}
</style>
</b:if></b:if>
Note: If there's too much space below the posts, modify the 170 height value.

Step 5. Click on the "Save template" button to save the changes and View your blog. Now you should have a nice grid view on your Blogger posts. Enjoy!

Friday, 7 February 2014

Advanced Random posts widget for Blogger with image thumbnails and snippets

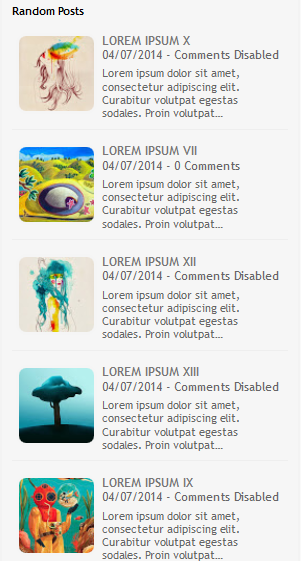
When your blog has too many posts, visitors don't always have the time or desire to go through all the posts written there in order to make an idea of the blog's content. Thus, a random posts widget that will allow visitors to find content more easily could be really useful. This tutorial will show you how to add a random posts widget to display a list of posts in a random order with thumbnails and excerpts.

random posts widget for blogger


Adding Random Posts with Thumbnails and Posts Summary on Blogger

Step 1. Login to your blogger account, select your blog and go to "Layout".

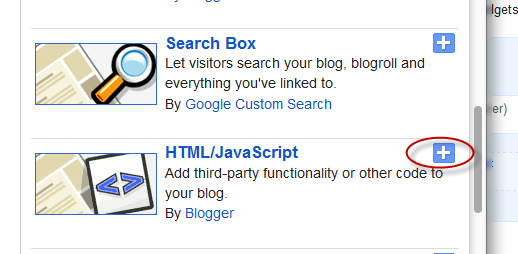
Step 2. Add new widget by clicking on the "Add a gadget" link and select "Html/JavaScript" from the popup window.
html javascript widget, blogger gadgets

Step 3. After adding the HTML/JavaScript, copy and paste the following script inside the empty Content box.
<style>
#random-posts img {
    border-radius: 10px;
    float: left;
    margin-right: 5px;
    width: 75px;
    height: 75px;
    background-color: #F5F5F5;
    padding: 3px;
    transition: all 0.2s linear 0s;
}

#random-posts img:hover {
    opacity: 0.6;
}

ul#random-posts {
    list-style-type: none;
    padding: 0px;
}

#random-posts a {
    font-size: 12px;
    text-transform: uppercase;
    padding: 0px auto 5px;
}

#random-posts a:hover {
    text-decoration: none;
}

.random-summary {
    font-size: 11px;
    background: none;
    padding: 5px;
    margin-right: 8px;
}

#random-posts li {
    margin-bottom: 10px;
    border-bottom: 1px solid #EEEEEE;
    padding: 4px;
}
</style>
<ul id='random-posts'>
<script type='text/javaScript'>
var randomposts_number = 5;
var randomposts_chars = 110;
var randomposts_details = 'yes';
var randomposts_comments = 'Comments';
var randomposts_commentsd = 'Comments Disabled';
var randomposts_current = [];
var total_randomposts = 0;
var randomposts_current = new Array(randomposts_number);

function randomposts(json) {
    total_randomposts = json.feed.openSearch$totalResults.$t
}
document.write('<script type=\"text/javascript\" src=\"/feeds/posts/default?alt=json-in-script&max-results=0&callback=randomposts\"><\/script>');

function getvalue() {
    for (var i = 0; i < randomposts_number; i++) {
        var found = false;
        var rndValue = get_random();
        for (var j = 0; j < randomposts_current.length; j++) {
            if (randomposts_current[j] == rndValue) {
                found = true;
                break
            }
        };
        if (found) {
            i--
        } else {
            randomposts_current[i] = rndValue
        }
    }
};

function get_random() {
    var ranNum = 1 + Math.round(Math.random() * (total_randomposts - 1));
    return ranNum
};
</script>
<script type='text/javaScript'>
function random_posts(json) {
    for (var i = 0; i < randomposts_number; i++) {
        var entry = json.feed.entry[i];
        var randompoststitle = entry.title.$t;
        if ('content' in entry) {
            var randompostsnippet = entry.content.$t
        } else {
            if ('summary' in entry) {
                var randompostsnippet = entry.summary.$t
            } else {
                var randompostsnippet = "";
            }
        };
        randompostsnippet = randompostsnippet.replace(/<[^>]*>/g, "");
        if (randompostsnippet.length < randomposts_chars) {
            var randomposts_snippet = randompostsnippet
        } else {
            randompostsnippet = randompostsnippet.substring(0, randomposts_chars);
            var whitespace = randompostsnippet.lastIndexOf(" ");
            randomposts_snippet = randompostsnippet.substring(0, whitespace) + "&#133;";
        };
        for (var j = 0; j < entry.link.length; j++) {
            if ('thr$total' in entry) {
                var randomposts_commentsnum = entry.thr$total.$t + ' ' + randomposts_comments
            } else {
                randomposts_commentsnum = randomposts_commentsd
            }; if (entry.link[j].rel == 'alternate') {
                var randompostsurl = entry.link[j].href;
                var randomposts_date = entry.published.$t;
                if ('media$thumbnail' in entry) {
                    var randompoststhumb = entry.media$thumbnail.url
                } else {
                    randompoststhumb = "https://blogger.googleusercontent.com/img/b/R29vZ2xl/AVvXsEjO3TfJdaB3LmrhRmMEgEHsbkRfWWPPf4OP9Jl3s_LMMBCkeixFW7HvkVzyLqAvbs4EizWw55w1YV4_lY_RIZudS_M1J9JgCj1lS9d4twq8U8eC1hsCRuqUG4DO_5PC24qGtypjrN0EaWM/s1600/no_thumb.png"
                }
            }
        };
        document.write('<li>');
        document.write('<a href="' + randompostsurl + '" rel="nofollow"><img alt="' + randompoststitle + '" src="' + randompoststhumb + '"/></a>');
        document.write('<div><a href="' + randompostsurl + '" rel="nofollow">' + randompoststitle + '</a></div>');
        if (randomposts_details == 'yes') {
            document.write('<span><div  class="random-info">' + randomposts_date.substring(8, 10) + '.' + randomposts_date.substring(5, 7) + '.' + randomposts_date.substring(0, 4) + ' - ' + randomposts_commentsnum) + '</div></span>'
        };
        document.write('<br/><div class="random-summary">' + randomposts_snippet + '</div><div style="clear:both"></div></li>')
    }
};
getvalue();
for (var i = 0; i < randomposts_number; i++) {
    document.write('<script type=\"text/javascript\" src=\"/feeds/posts/default?alt=json-in-script&start-index=' + randomposts_current[i] + '&max-results=1&callback=random_posts\"><\/script>')
};
</script>
</ul>

Random Posts Options

  • Thumbnail dimensions: to change the size of the thumbnails in pixels, replace the 75px value.
  • Summary length: you can control the the length of the summary (in characters) by changing the 110 value from var randomposts_chars=110;
  • Post info: if you want to hide the post date and comment count change 'yes' from var randomposts_details='yes'; to 'no';
  • Font Size for Posts Titles and Summary: to modify the font size for the post snippet modify the 11px value and for the posts title, the 12px value;
Click on the "Save" button and View your blog. The sidebar will display a random posts widget on each of your blog pages.