Showing posts with label how to. Show all posts

Monday, 3 October 2016

How to Create a Static Home Page in Blogger

When it comes to home pages, most websites can be divided into two: static and non-static. As their name implies, static home pages stay permanent no matter how many times the website is updated, while non-static home pages reflect the changes that are made to the site and show the latest posts first.

The latter has become well-known nowadays due to the rising popularity of personal and even corporate blogs. However, there are still many people who prefer static home pages because it makes their websites look more organized and professional. It also gives them more control over the readers' experience on their site and helps them create stronger brand awareness through the uniform message that their home page presents.

Fortunately, if you own a Blogger site and want to make your home page static, you'll find that creating one isn't as difficult as it seems. You can create a static home page in Blogger by taking these steps:

static pages in Blogger

1. Create your static home page

The first thing you should do is to create a new page for your blog. This will serve as your static home page but, for now, it will look and act like any other page in your site.

To make this page, you'll need to go to the main menu of the Blogger dashboard and click on the "Pages" option on the left side on the screen. Doing this will lead you to the "All Pages" menu window. Here, click on the "New Page" button and you'll enter an editor that looks similar to the Blogger Post editor that you use when publishing a new blog post.

static home page

At the top box, enter the title that you want for this page - in this case, let's call it the "Welcome" page. In the larger text box, type the content that you want to appear on your home page; this can be a paragraph, or two about yourself or your business and what your site is all about.


Once you're done, click "Publish". The window will return to the main "All Pages" menu, and you'll see the new "Welcome" page you've created. Copy the URL of the "Welcome" page since you'll need it later on. To do this, right click on the 'View' link and select 'Copy Link Location' from the menu.


2. Redirect the default home page to the static one

Once your "Welcome" page is up, the next thing you should do is to change Blogger's default homepage. This involves redirecting from your site's original home page to the static homepage that you've created so it would be the first thing that people see when they visit your website.

Related: How to Set Custom Redirects in Blogger

To do this, you'll need to go to main Blogger editor menu, click on "Settings" on the left side of the screen, and choose "Search Preferences". Under the "Errors and redirections" section, you'll see the "Custom Redirects" option with an "Edit" link beside it. Click on the "Edit" link to open another window, where you'll see two boxes named "From" (with your blog's URL beside it) and "To".


In the "From" box, enter only a forward slash symbol "/". In the "To" box, paste the URL that you copied earlier and add the latter part of the URL of the "Welcome" page. For instance, the page's URL of our demo blog is static-home-page.blogspot.com/welcome.html, so we'll remove the "http://static-home-page.blogspot.com" address and add only "/p/welcome.html" in the "To:" box. The "/p" signifies that it's a static page.


Next, check the little box beside "Permanent", click on the "Save" text link, and press the "Save changes" button. Doing these will redirect your site's main URL to its new static home page. Access your blog on a separate browser to see if it works.


3. Make tabs for your site

If you're not planning to make tabs visible in your blog, you can stop at Step #2. But, if you want your site to have tabs that indicate the home page, the main blog page, and other pages you may have (such as the FAQs and Contact Us pages), you'll need to take another step.

Why is this important? Basically, when visible tabs are enabled in your site, they will show that you have two existing pages: the default home page and the new "Welcome" page you've created - both of which redirect to the same static page. This can be confusing for your readers and may even affect your search engine rankings.

To fix this, you first need to enable tabs by going to the "Layout" menu item and click on the "Add a Gadget" link. You can choose to add it below your blog header or sidebar. In many cases, it's advisable to add it below blog's header since they're more visible and give your website a sleek, professional look.


Once the pop-up window opens, scroll down and click on the 'Pages' link:


This will open another window named "Configure Page List". Here, under the "Pages to show" section, you'll see the default home page and your new static homepage with small boxes beside them. Uncheck the box beside the default home page to hide it from view, check the pages that you want to display in the menu and then click on the "Save" button to save the changes.


You can stop at this point but, if you want, you can also create a specific tab that will lead to your main blog post page. To do this, edit the "Pages" gadget that you just saved and click "+ Add external link".


On the new window that would open, enter the title you'd like for the page (such as "Blog") along with /index.html web address, then hit "Save Link" and click the "Save" button on the "Configure Page List" window.


Now, view your site and you will see the pages menu containing the "Welcome" page and "Blog" tabs. To see how this works, you can also visit our demo blog. Enjoy!
Final Note

Having a static home page can be beneficial for your blog. Follow the steps above now to create a static home page in Blogger!

Wednesday, 14 October 2015

Stop Blogger from Redirecting Blogspot to Country Specific URLs

Let's say you're from France and have set up - just for examples sake - a blog called frenchlitgeek.blogspot.com where you share your thoughts and insights on French literature. Now, with Google's country specific redirection in Blogger, you might be redirected to frenchlitgeek.blogspot.fr when you try to access your site. The thing is, you perfectly liked the .com and didn't sign up for the .fr but you find yourself being directed there. Sure, your blog works and all but you also wonder why.
blogger country specific redirection

Why Did Google Do This?

Google has always supported the expression of views, and they stated as much on their official blog. In the post Free expression and controversial content on the web, which was published in 2007, it said "Our world would be a very boring place if we all agreed all the time. So, while people may strongly disagree with what someone says, or think that a particular newspaper is total nonsense, we recognize that each of us have the right to an opinion."

The post continued, "We also know that letting people express their views freely has real practical benefits. Allowing individuals to voice unpopular, inconvenient or controversial opinions is important. Not only might they be right (think Galileo) but debating difficult issues in the open often helps people come to better decisions".

blogspot country redirection

While the company is clearly on the side of people freely expressing their opinions, they also believe that a line has to be drawn somewhere. Then again, for a company providing services in over 100 countries around the world and each with their own national laws and cultural norms, it's surely difficult for a company like Google to decide where to draw boundaries.

However, there are cases like child pornography which is illegal in just about any country where decisions are clear cut.

For a company whose products are "specifically designed to help people create and communicate, to find and share information and opinions across the world", how does Google deal with this challenge?

One of the most challenging areas where Google deals with issues regarding free expression is in Blogger, their content generation platform. Since Google can't check what you've written before you publish, they rely on active vocal users who are diligent in alerting the proper if a post borders on offensive. Then again, that in itself is a tricky issue as well because what one person may view as offensive, another might not.

In other words, it's always a work in progress with Google.

Fast forward to January 9, 2012 when Google announced it was making changes to the Blogger platform with regards to censorship. That said change would make use of a country specific domain to the Blogger platform. Doing this would allow Google to censor and remove content specific to a certain country.

In their announcement, Google said: "Migrating to localized domains will allow us to continue promoting free expression and responsible publishing while providing greater flexibility in complying with valid removal requests pursuant to local law. By utilizing ccTLDs, content removals can be managed on a per country basis, which will limit their impact to the smallest number of readers."

The move by Google come after pressure from countries like India that are working on hunting down content on social media sites which are considered inappropriate. Also, the move followed closely on the heels of Twitter's new censorship policies.

Since Google aims to "help people create and communicate, to find and share information and opinions across the world", it would be strange to take down a post that was just banned in a certain area. In essence, with country specific redirection, a piece of content can still be accessible by the world save for the country where it was blocked.

How Would Country Specific Redirection Affect Your Site?

Of course, not all site owners greeted the country specific URL change with open arms. A few of the issues brought up in regard to the change include:

1. A reduction in social stats. These are your Facebook Likes, Google +1s and so on from your blog posts. They might be reduced because the URLs from one blog post will be different depending on where your readers are from.

2. A problem with external commenting platforms. If you use Disqus - for example - for your comments section, then you might run into trouble because blog URLs will be different even if essentially the page being accessed is just the same.

3. A slight problem with AdSense earnings. Some users have complained about seeing a dip in their earnings when their pages are served through country specific domains.

4. An issue with link juice. You want external sites to link to you and not your country specific URL. But the issue here is that you can't control how others link to your page. They might use the top level domain or they might use the country code top-level domain.

Stop Blogger from Redirecting to Country-Specific Domains

If country specific redirection affects important factors such as traffic and link juice, and you need those in order to rank well, what can you possibly do? Well, thankfully, Google has provided a way to get around this. All you have to do is add an ncr/ to the end of the URL - ncr here stands for No Country Redirect. So basically, it goes frenchlitgeek.blogspot.com/ncr/.

That solution is great but do you want your users to always have to do that every time they visit your blog? To eliminate that hassle, and for the good of your site statistics, a simple redirection script will do the trick. Here's how:

1. Log in to your Blogger account.

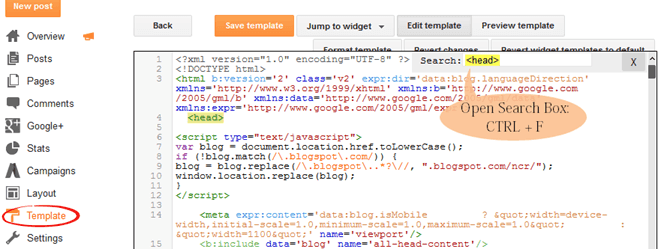
2. Click on Template ? Edit HTML.

3. Find the <head> tag in the HTML editor by opening the search box using Ctrl + F.

blogger country redirection

4. Copy the redirection code seen below after the <head> tag.
<script type="text/javascript">
var blog = document.location.href.toLowerCase();
if (!blog.match(/\.blogspot\.com/)) {
blog = blog.replace(/\.blogspot\..*?\//, ".blogspot.com/ncr/");
window.location.replace(blog);
}
</script>

5. Click on "Save Template".

Credit: labnol.com

And that's it! Whenever someone accesses your Blogger, they'll be taken to the top level domain rather than the country specific one.

Thursday, 4 September 2014

How To Host Blogger CSS and JavaScript Files in Google Drive

Anyone that has ever worked on a web design or development can tell you that where you decide to store your files is important. Every time someone visits your site, the server or host will access this location and bring up the relevant files that need to be displayed. Wherever you decide to store your files, this will have an impact on some important aspects like the speed that your site loads, your overall SEO ranking and your ability to make necessary adjustments to the site.

Things To Think About

When you are designing your online structure and where to store your important CSS and JavaScript files, here is a run down on how this decision might impact your site later on:

Site Loading Speed

By combining some of the style sheets and website files, the Blogger server only has to collect information from a single location. When you split up your files or decentralize the file system, it takes a longer time for all the data to come together to make your site possible.

Slow loading speeds can negatively impact your SEO ratings because the slower the site is, the less likely that visitors are going to wait around for it to load. If someone visits your site and immediately clicks the 'back' button because it's taking too long to load, that is going to increase your bounce rate and provide Google with statistics that show your site is either low quality or irrelevant to the search keywords.

File Storage Affects SEO

In addition to increasing your bounce rate, storing your files in a central location and managing the name of your files can affect SEO site wide. Web crawlers enlisted by Google, or some of the other search engines, index both the code on your site, and the name and directory of your files. If file names are random or not placed in the proper categories, the web crawlers aren't going to know what to do with the information.

Clear file structure and a central location provide you with incentive to organize everything and name them appropriately. All the content that is relevant to the subject of your website or blog will be in the same location for web crawlers to review.

Storage Locations Affect Editing Abilities

Shuffling through files and folders or opening up FTP connections just to make some simple edits can be a hassle, and take up a lot of time that could have otherwise have been spent writing new content.

If you're a Blogger site owner, this is something you need to think about. When you need to make alterations to things like social media sharing buttons, popular posts, recent posts and related posts widgets, you have to know where everything is intended to go, or risk losing both available content and money.

Some of the larger sites that produce hundreds of unique articles each month can't afford to have content in different locations. When articles start to get lost out of order, they run the risk of duplicating content on their site, or forgetting to post it altogether. Things should be right at your fingertips to minimize mistakes and reduce the amount of time spent editing the site while it's still live.

Storing Javascript/CSS Files With Google Drive

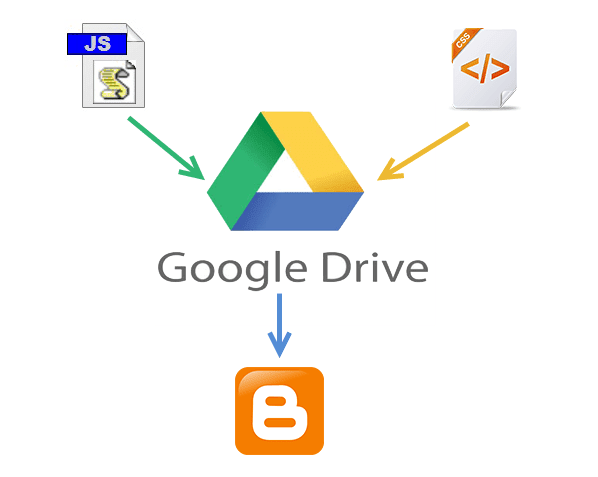
Storing Blogger CSS and JavaScript files with Google Drive will help to eliminate any of the problems mentioned above and reduce the clutter among your services. Taking this method can increase your site speed, increase the opportunities for a successful SEO campaign, and make your life so much easier.

Google Drive provides ample amount of space to store large files, and offers collaboration services so that you can work among different team members on the same project. Some of the files that you upload into the cloud services can remain unpublished and stay within the private site, whereas other files like blog posts can be published or stored to the public site.

Another beneficial feature of storing all your Blogger files on Google Drive is that it is highly secure. Google comes with the backing of one of the leading companies in the technical world so that you can be sure your content is safe from hackers and those looking to compromise your site.

This guide will provide you with step-by-step instructions on how to setup your Blogger site using Google Drive. It's completely free to take advantage of this strategy, and will provide you with a solid platform from which to build your blog.
host blogger css javascript files

Step 1. Prepare the CSS/JavaScript Files

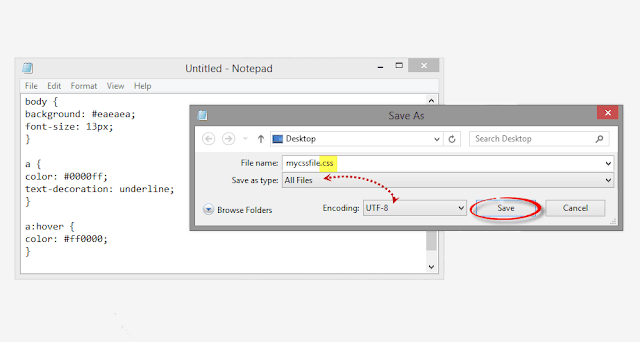
  • First, we need to create the file that we need to host. To host a CSS file, open the Notepad and paste the CSS code (if it is enclosed within the <style> and </style> tags, remove them). 
  • In the Notepad menu, select 'File' > 'Save as' and type the file name with the .css extension just like I did with mycssfile.css - see the screenshot below.
create a css file
  • In the same window, choose "All files" in the "Save as type" option and set the Character Encoding to UTF-8.
  • If you want to host a JavaScript file, add the .js extension (instead of .css) at the end of your file name (remove the <script>...</script> tags if you see them). Click "Save" and navigate to the location where you want to save the file.

Step 2. Upload Your File on Google Drive

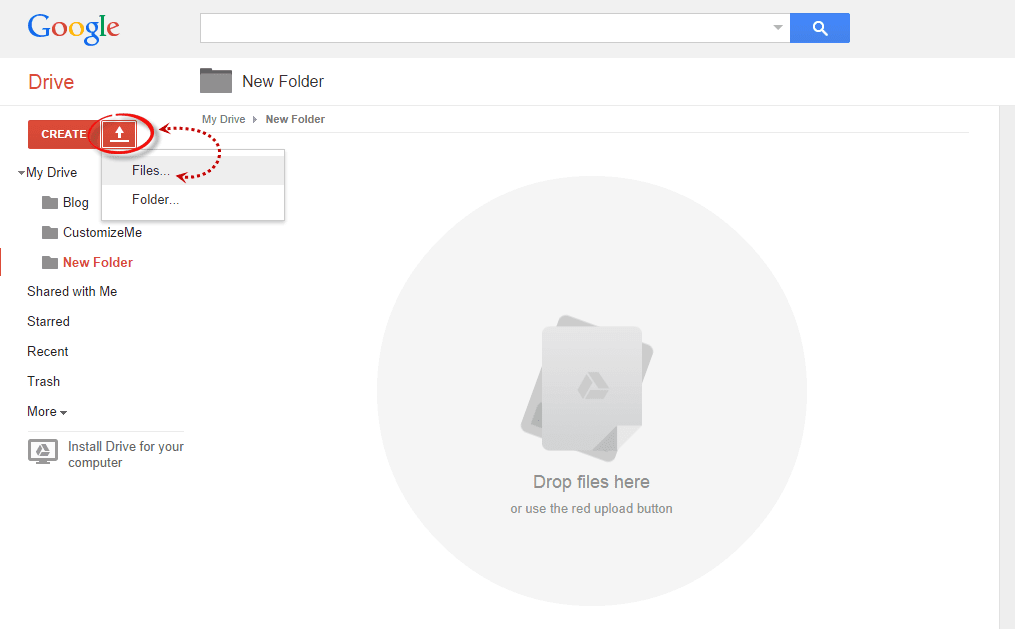
  • Access https://drive.google.com and log in with your Gmail account. After you logged in, click on the 'Create' button and add a new separate folder to upload your JavaScript and CSS files.
create folder in Google drive
  • Open the newly created folder, and click on the Upload button with the upward arrow to choose the files that you need to upload.
upload files using google drive
  • Now, navigate to the location where you saved the files, select them (to select multiple files, press and hold down the Ctrl key on your keyboard and then click on them) and press the Open button.
  • After the files have been successfully uploaded, right click on the file names (to select all your files in the folder, click on the checkbox) and select 'Share':
share google drive files
  • In the 'Sharing settings' window, click on the 'Change' link and choose the 'Public on the web' option. Press 'Save' and copy the link(s) of your uploaded file(s) from the 'Links to share' box highlighted in blue, then paste it into a Notepad to use it later.
javascript css file sharing

Step 3. How to Add an External CSS/JavaScript file to Blogger

Before you can use the links, you must replace 'https://drive.google.com/file/d' to 'https://googledrive.com/host' and remove '/edit?usp=sharing' in the link.

For example, the link to mycssfile.css that I copied looks like this:
https://drive.google.com/file/d/0B4n9GL3eVuV-TkphMkc3SFR2Slk/edit?usp=sharing
Notice the part in blue after the "/file/d/" part. That is the file ID which is used to access it via the new hosting service. It should start with the following URL:
https://googledrive.com/host/
Add the file ID like this (remove the '/edit?usp=sharing' part):
https://googledrive.com/host/0B4n9GL3eVuV-TkphMkc3SFR2Slk
Now log into your Blogger account, select your blog and go to Template > Edit HTML. Click anywhere inside the code area and press the CTRL + F keys to open the search box:

open blogger search box

If you want to add a CSS file, type the following tag inside the search box and hit Enter to find it:
<head>
Just BELOW the <head> tag, add this line:
<link rel="stylesheet" type="text/css" href="https://googledrive.com/host/0B4n9GL3eVuV-TkphMkc3SFR2Slk" />
And replace https://googledrive.com/host/0B4n9GL3eVuV-TkphMkc3SFR2Slk with the link of your CSS file:

add external css to blogger

If you want to add a Javascript file, search for the following tag:
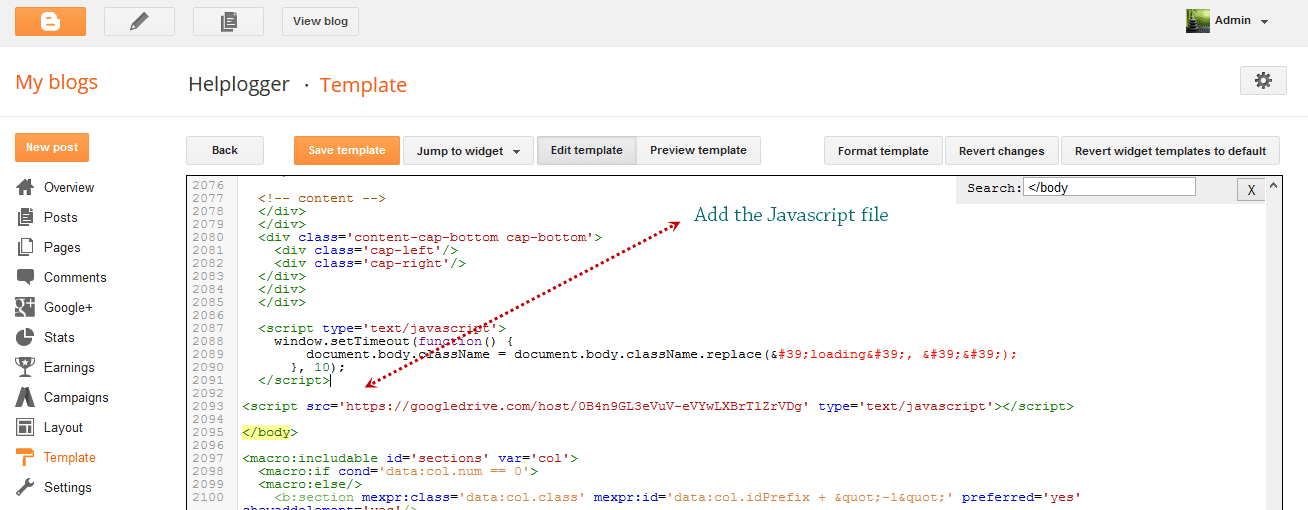
</body>
And add this line just ABOVE it:
<script src='https://googledrive.com/host/0B4n9GL3eVuV-eVYwLXBrTlZrVDg' type='text/javascript'></script>
Replace the line in blue with your URL:

add external javascript js to blogger

Finally, press the 'Save template' button to save the changes. And you're done!

In Conclusion

Once you have saved all your file folders and closed out of the drive, open your site in a browser and make sure that all the changes have completed successfully.

Next time you want to edit any of the information or move internal files, all you have to do is open up the Google Drive folder on your account and make the modifications from that location. Those files will then automatically sync to the online folder and make updates to your site. This works the same if you want to change the appearance by modifying the CSS code to extend the header, footer, or make customizations.

As you can see, changing your file storage out so that is CSS and JavaScript is stored on your Google Drive account is easy to do and only takes a few minutes. After you make the change, you can begin benefiting from faster loading speeds, higher SEO rankings, and overall a more convenient platform to work from to increase the efficiency of your work.

Tuesday, 26 August 2014

How Firebug Helps You Design Your Blogger Blog

For most bloggers, the idea of adjusting the coding of their blog to improve the user experience is daunting at best and often quite frightening. HTML5, CSS, and other coding elements are their own virtual language and for the average Blogger user looking to update a personal blog, the automatic settings are about as good as it gets. What if there was a better way to code a blog, whether a beginner or a pro, that could be done within the browser itself?

If you're using Firefox or Chrome, then you should also be using Firebug. It allows you to code your website in real time, so you can maximize the UX of your blog in no time at all.

You No Longer Need To Edit Through Blogger!

If you've ever tried to update a Blogger theme through the editing functions of the website, then you know how difficult it can be. You can preview your designs, but you can't save any changes to officially see what is going to happen with your site until you publish the edits. If you've missed just one line of code or forgotten one small element, you're going to have to go back into the editing matrix, find the error, update it again, and repeat until you have a responsive blog once again.

What Firebug allows you to do is see all of those elements that make up a website in real time. Instead of editing and then publishing, you can edit in real time and see updates happen, all without affecting the user experiences of visitors that are coming to your site while you're editing. You can change the fonts, colors, or virtually anything else within the design of the site quickly and see the results of your work as it happens. Don't like it? Just undo your changes.

It's really that easy.

Using Firebug to Customize CSS in Blogger

This guide will show you how to modify the CSS code of a Blogger template. Usually, the Blogger Template CSS style declarations are editable through the style.css file, found between the <b:skin> and </b:skin> tags.

To download Firebug and get more details regarding its powerful features, visit: Firebug for Firefox, or if you are using Chrome, get the Firebug Lite app. I would recommend to use Firefox, which is more complete and quick, but, nevertheless, both work the same.

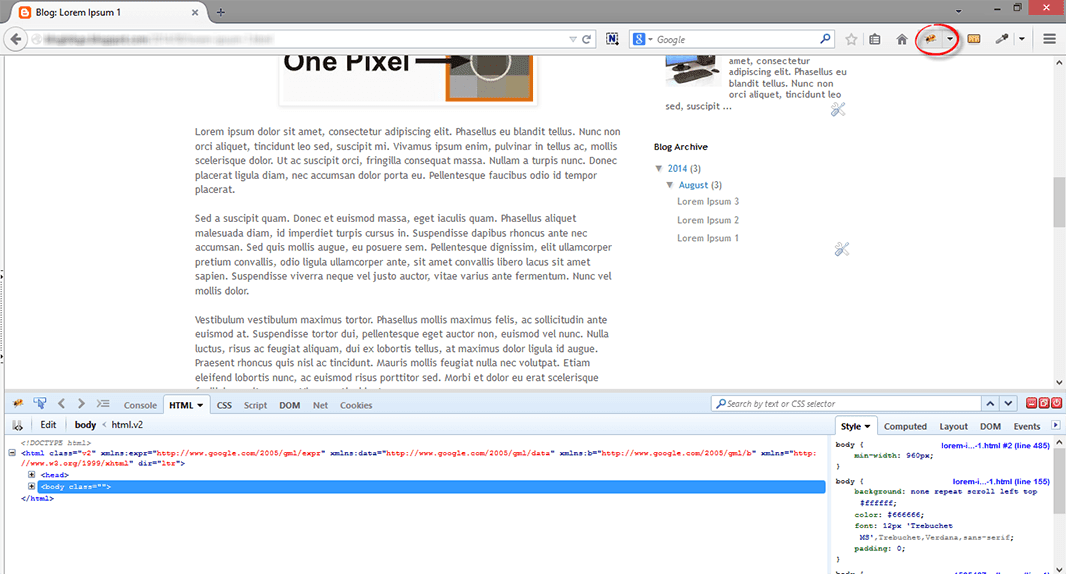
Once Firebug is installed, a small bug icon will be available in the upper right of your Web browser's address bar. Clicking it, a horizontally split screen will be shown at the bottom of the browser's window. The page will continue to show in the upper half, while the lower half will show the HTML of the current web page.

firebug

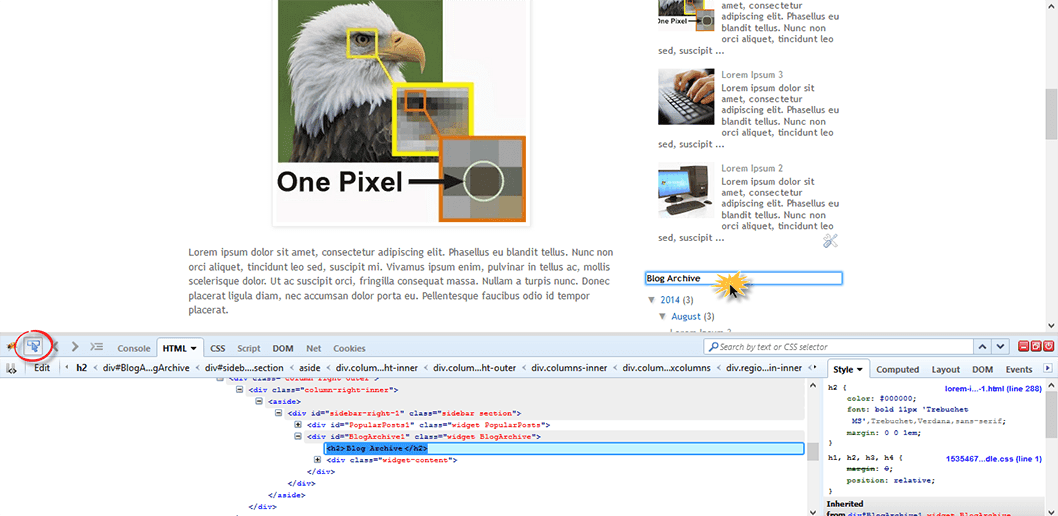
To customize any web element from a Blogger template, just click either on the Firebug icon in the toolbar, or the "Inspect Element with Firebug" item in the context menu. Next, click the blue cursor button to Inspect and place the cursor right over the element to customize.

For example, let's say that we want to change the title of the "Blog Archive" gadget. After we clicked the inspect button, mouse over the "Blog Archive" title which will be highlighted as shown in the screenshot below. To change this element, click on it:

inspect element using firebug

Now that we decided which element we want to change, right click on the "Style" panel and select the "Add rule" option:

add CSS rule in firebug

This will give the class or the id of the highlighted element - in our case, the heading of the Blog Archive (#BlogArchive1 > h2). To edit this rule that we just added, click anywhere near the left curly bracket that will open a text box, so that we can type a new CSS declaration:

firebug css declaration

And here comes the fun part. Let's say that we want to make the title red. We will type color and hit Enter, then we will type the color value or the red text and hit Enter. We will also set the set the font size to 20px, text alignment to center (text-align: center) and make the text underlined (text-decoration: underline):

modify blogger css with firebug

The cool thing about Firebug is that when modifying any CSS property, you can see the results directly applied on the page. So, after adding these declarations, we'll see a big red underlined title for our Blog Archive gadget (see in the screenshot above).

To apply this CSS rule on a Blogger template, just select it beginning from the right curly bracket and to the #(id) or .(class) symbol, then right click it and Copy the CSS code.

copy firebug css rule

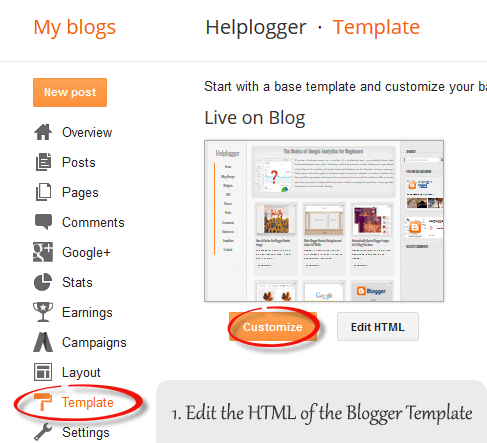
Before making any change, it's highly recommended to make a backup of your current template. Go to "Template" and click the "Backup/Restore" button on the upper right side. On the same "Template" location, click on the "Customize" button and navigate to "Advanced" > "Add CSS". Paste the CSS rule that you just copied into the CSS box:

add firebug css to blogger template

Click the "Apply to blog" button on the upper right corner to save the changes and view your blog.

Firebug Also Gives You One Distinct Advantage...

One of the best reasons to install Firebug into Chrome or Firefox is that it allows you to emulate some of your favorite website designs quickly and easily. Instead of hiring a web designer to do the work, which could cost you thousands, you can simply start Firebug and see what the CSS styles are for your favorite site. This allows you to create a similar widget.

From there, all you've got to do is change the coding to make the design elements work under the rules of your own custom.css. This means you can make easy design changes to your Blogger blog without having to go through all of the menus and editing functions so that your template can truly be your own. Do you have some work to do? Sure - but Firebug does all of the primary work for you.

All you've got to do is have a creative mind and a few minutes to make changes to the coding design. Whether you've been coding for years or are just starting your first blog, this is definitely the best way to make sure that your visitors have the best experience possible!

Monday, 25 August 2014

Add a Pinterest Pin It Mouseover Button on Blogger Images

Images have always played a prominent role in attracting new visitors through search engines like Google and Bing. But when Pinterest decided to enter the social media mix, it upped the ante in a big way.

Pinterest lets blog owners use their service to add a 'pin' to photos or content images on the site. When visitors of that site see a photo they like, they can choose to click on the red Pinterest button for Blogger, and add it to their Pinterest account.

The person who pressed your Pinterest button for Blogger can now see your photo on their dashboard, and share it with friends or followers on the service. They can also come across this photo when users add keywords or category tags to the image. More importantly, that photo links to your site when clicked on and will contain a description title of your blog name or post.

Therefore, adding the Pinterest button for Blogger will help you to benefit from tons of new traffic coming from Pinterest and people who had found your photos and post links using the service. Here are some steps to add your very own Pinterest button.

1. Access your Blogger Template

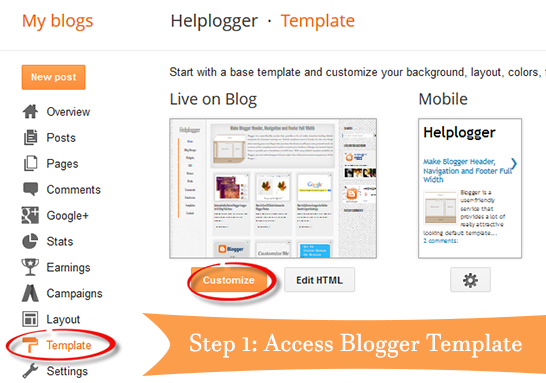
The first thing to do is to edit the code of your template so that it knows when to display this Pinterest Button for Blogger with the content. You can do this by logging into your Blogger Dashboard and finding your way to "Template" > "Edit HTML".

blogger template html

When the editor opens up, it may look a bit foreign to you if you don't have much experience using HTML. Click anywhere inside the code area and search by pressing the CTRL + F keys for the </body> tag - hit Enter to find it:
</body>
The body tags makes up the general content in your webpage. Think of it like the settings panel of a website. If you were to delete everything in this section your site would turn into a blank white page.

2. Add The Pinterest Pin it Script

Once you found the </body> tag, insert the following script just above it:
<script>
//<![CDATA[
var custom_pinit_button = "https://blogger.googleusercontent.com/img/b/R29vZ2xl/AVvXsEj2VfjtXWNxNcqiEnuoZCYow03DrraKE3KSh1msIYJeISlwb_G7BLblJ7FWDbiB4-xaA1sxz1-xjaPUC0jGdkO3IrJ3EZdz-_8NbnsrdvWVD8cUKYPoML7gP0Eq8oLgFoE7Fx5DlqFQwP3F/s1600/pinit-button.png";
var pinit_button_position = "center";
var pinit_button_before = "";
var pinit_button_after = "";
//]]>
</script>
<script src='http://ajax.googleapis.com/ajax/libs/jquery/1.8.2/jquery.min.js' type='text/javascript'></script>
<script id='pinit-img-button' type='text/javascript'>
// Visit helplogger.blogspot.com for more widgets and tricks.
//<![CDATA[
eval(function(p,a,c,k,e,r){e=function(c){return(c<a?'':e(parseInt(c/a)))+((c=c%a)>35?String.fromCharCode(c+29):c.toString(36))};if(!''.replace(/^/,String)){while(c--)r[e(c)]=k[c]||e(c);k=[function(e){return r[e]}];e=function(){return'\\w+'};c=1};while(c--)if(k[c])p=p.replace(new RegExp('\\b'+e(c)+'\\b','g'),k[c]);return p}('1i(1j).1k(r($){$(\'M\').1l(\'<6 p="4:D;" N="A" O="\'+13+\'" >\');$(\'#7-6-P\').1m();3 l;3 m;3 n;$(\'.A\').1n(r(){m=$(\'.A\').E(F);n=$(\'.A\').G(F);$(\'.A\').1o()});3 o=$(\'#7-6-P\').1p().1q("1r.1s.14");o!=-1&&15();r 15(){$(\'.s-16 6,.H-M 6,.s-17 6\').1t(\'.18,.18 6\').1u(r(){$(\'.7-4\').t("4","D");19(l);3 a=$(q);3 b=1a(a.t("Q-u"));3 c=1a(a.t("Q-v"));3 d;3 e;1v(1w){B\'1x\':d=a.9().u+a.G(F)/2-n/2;e=a.9().v+a.E(F)/2-m/2;C;B\'1y\':d=a.9().u+b+5;e=a.9().v+c+a.E()-m-5;C;B\'1z\':d=a.9().u+b+5;e=a.9().v+c+5;C;B\'1A\':d=a.9().u+b+a.G()-n-5;e=a.9().v+c+a.E()-m-5;C;B\'1B\':d=a.9().u+b+a.G()-n-5;e=a.9().v+c+5;C}3 f=a.1C(\'O\');3 g=a.1D(\'.H,.1E,.s\').R(\'.H-S,.s-S,.s-1F\');3 h=g.1G();w(T U===\'V\'){U=\'\'}w(T W===\'V\'){W=\'\'}w(g.R(\'a\').1H){X=g.R(\'a\').I(\'Y\').1b(/\\#.+\\b/1c,"")}Z{X=$(1I).I(\'Y\').1b(/\\#.+\\b/1c,"")}3 i=\'<1d N="7-4" p="1e:x;9: 1J;z-1K: 1L;" ><a Y="1M://1N.14/1O/1P/P/?1Q=\'+X+\'&1R=\'+f+\'&1S=\'+U+h+W+\'" p="1e:1T;1U:x;" 1V="1W"><6 N="1X" p="-1Y-J-K:x;-1Z-J-K:x;-o-J-K:x;J-K:x;10: 0.8;20:21;Q: 0;22: 0;23:0;" O="\'+13+\'" S="24 1f 25" ></a></1d>\';3 j=a.11().26(\'a\')?a.11():a;w(!j.y().27(\'7-4\')){j.28(i);w(T l===\'V\'){j.y(\'.7-4\').I("1g","q.p.10=1;q.p.4=\'12\'")}Z{j.y(\'.7-4\').I("1g","q.p.10=1;q.p.4=\'12\';19(29)")}}3 k=j.y(".7-4");k.t({"u":d,"v":e});k.t("4","12");k.L().1h(2a,1.0,r(){$(q).2b()})});$(\'.s-16 6,.H-M 6,.s-17 6\').1f(\'2c\',r(){w($.2d.2e){3 a=$(q).y(\'.7-4\');3 b=$(q).11(\'a\').y(\'.7-4\');l=2f(r(){a.L().t("4","D");b.L().t("4","D")},2g)}Z{$(\'.7-4\').L().1h(0,0.0)}})}});',62,141,'|||var|visibility||img|pinit||position||||||||||||||||style|this|function|entry|css|top|left|if|none|next||loadpinitbutton|case|break|hidden|outerWidth|true|outerHeight|post|attr|box|shadow|stop|body|class|src|button|margin|find|title|typeof|pinit_button_before|undefined|pinit_button_after|pinitURL|href|else|opacity|parent|visible|custom_pinit_button|com|hoverCheck|content|summary|nopin|clearTimeout|parseInt|replace|gi|div|display|on|onmouseover|fadeTo|jQuery|document|ready|append|hide|load|remove|html|indexOf|helplogger|blogspot|not|mouseenter|switch|pinit_button_position|center|topright|topleft|bottomright|bottomleft|prop|closest|hentry|header|text|length|location|absolute|index|9999|http|pinterest|pin|create|url|media|description|block|outline|target|_blank|pinimg|moz|webkit|background|transparent|padding|border|Pin|Pinterest|is|hasClass|after|pinitOnHover|300|show|mouseleave|browser|msie|setTimeout|3000'.split('|'),0,{}))
//]]>
</script>

adding pinterest script

3. Changing the Position of the Pin it! button

The cool thing about this code is that you have some freedom over where the Pinterest button for Blogger will go over the image. Take a look at the code that you just copied and pasted into the HTML for the word 'center'.
var pinit_button_position = "center";
To move the pin to a different area of the photo, replace center with one of these settings:
topleft
topright
bottomleft
bottomright
And to change the Pin it! button that appears on mouse over, replace the address in blue from above with your own:
var custom_pinit_button = "https://blogger.googleusercontent.com/img/b/R29vZ2xl/AVvXsEj2VfjtXWNxNcqiEnuoZCYow03DrraKE3KSh1msIYJeISlwb_G7BLblJ7FWDbiB4-xaA1sxz1-xjaPUC0jGdkO3IrJ3EZdz-_8NbnsrdvWVD8cUKYPoML7gP0Eq8oLgFoE7Fx5DlqFQwP3F/s1600/pinit-button.png";

pinit script

4. Save The Template

Make sure that you added everything correctly, then save the template and navigate to a recent post that you made that contain images. Hover your mouse over the image and you should now see a red Pinterest button for Blogger displayed on the image. Test it out and see it how it works.

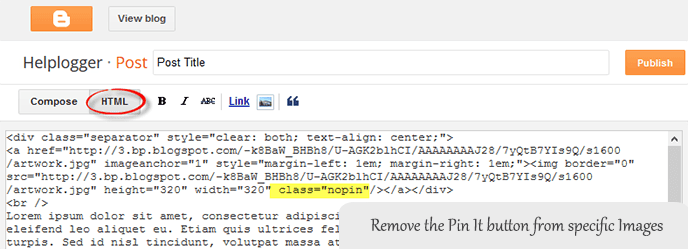
If you want to hide the pinit button from a specific image, when you create a post, switch to the HTML tab of your post editor and type class="nopin" right before the closing slash and angle bracket of your image element, like this:

nopin pinterest

The only downside of this button is that it doesn't take the information from your custom image titles. It's automatically set to take the title of the blog post where the image is located. So, you'll need to pay closer attention to the title of the posts so that it fits closely with the images being shown.

Remember that when you have this code activated, you have to label your titles so that they are relevant to the photos you are posting. This might sound obvious, but sometimes you create a post with an image as a joke that won't make sense in the context of viewing it on Pinterest.

If you use Google Analytics, you can start to see traffic flooding into your site from Pinterest. You should also create your own Pinterest account so that you can manage the content and track how it's being shared. That's it. Enjoy and happy blogging!

Thursday, 14 August 2014

How to Center the Blogger Header Image

The header of a website is what distinguishes your blog; it's your identity or digital fingerprint. Whenever a visitor accesses your blog for the first time, the header is one major aspect that is used to determine who you are and the type of content that they can expect to read. Therefore, it's important to develop a header that is both prominently placed and telling of your brand name.

What would seem to be counterintuitive to that idea is the default Blogger settings for header positioning. Whenever you upload a header to the site, it will automatically be aligned to the left of the page. Some Blogger users may be okay with this setting, especially if they are using a header design that doesn't contain a background. Others may find that their background headers appear cut off, incomplete, or indistinguishable from the rest of their content.

If you find yourself in the second category of users, there is a way to adjust the positioning of your header so that it is displayed as a center Blogger header. By centering your site header, you have greater flexibility over the overall design, and it allows you to really shine light on this content. It's hard to miss a header that is placed smack dab in the middle of the screen on every page that someone navigates to.

Center Header Image with Blogger Template Designer


center blogger header

Making the change is relatively easy. You'll be able to make these adjustments on every page of your Blogger blog without having to change them individually. All you need to do is to modify the CSS of your blog that can be found directly through your Blogger dashboard. Even if you have little to no experience in web design or coding, you can center Blogger header by following these next few steps.

Step 1. Log in your blogger account and select your blog, then go to "Template" and click the "Customize" button on the right side.

center blogger header

Step 2. Navigate to "Advanced" > "Add CSS" tab and paste the code in the empty box:
#header-inner {
background-position: center !important;
width: 100% !important;
text-align: center;
}
#header-inner img {
margin: auto;
}
If you have a small image and you want it to become full width, add this CSS instead:
#header-inner {
 background-size: cover;
 width: 100% !important;
 text-align: center;
 }
 #header-inner img {
 width: 100%;
 height: 100%;
 }

Step 3. Hit the ENTER key after you paste the code snippet, then click the "Apply to Blog" button.

blogger header centered

Here are some other aligning options for your headers:

Align Blogger Header Banner and Text Side by Side

Image on the right and title on the left

#header-inner {
background-position: right !important;
width: 100% !important;
}
.titlewrapper, .descriptionwrapper {
float: left;
clear: both;
margin-left: 20px;
}

Image on the left and title on the right

#header-inner {
background-position: left !important;
width: 100% !important;
}
.titlewrapper, .descriptionwrapper {
float: right;
clear: both;
margin-right: 20px;
}
Note: for larger images, you may need to resize them in order to make them appear side by side with the text.

That's it!
After making the changes to the CSS and saving your modifications, you may navigate back to your homepage. Refresh the page and you'll notice that the header is now centered, instead of on the left. Click on a few of your page links and make sure that this modification has been made to every page or post on the blog.

If by chance you don't see the changes to the header, go back through the code that you modified and make sure that you have copied and pasted the information into the file exactly as instructed. Even minor modifications in the code, or a missing semicolon may fail to make the changes you are trying to achieve, or come away with different results than what's expected.

The great thing about CSS is that it is your site's central hub for all things design. From the CSS file, you can modify just about any appearance on your site to give the blog a custom look and feel. Once you're comfortable performing minor adjustments to the appearance of your site, you can start to get creative and come up with your very own modifications.

Wednesday, 6 August 2014

Make Blogger Header, Navigation and Footer Full Width

Blogger is a user-friendly service that provides a lot of really attractive looking default templates for those just starting out. Default templates come in handy, but the nice things about owning your own blog is that you have the chance to add your own personal touch. As a matter of fact, templates aren't made to restrict your freedom of design, but instead they're there to provide you a foundation to build from. With every default template available on Blogger, you can make changes to fit your style.

One of the most common requests out of the Blogger community when making alterations is how to change the look of some of the key sections like header, navigation, and footer. Initially, these items are designed to fit within just 1/3 of the page, surrounded by padding and margins on either side. These margins are used to give the page a slim fitting appearance, but could also cause your content to look compressed.

Important: Backup your Template

Making the changes to a full screen Blogger navigation, footer, or header can be done and won't take you much time. Before you can make any changes, you should save extra copies of the template .xml file in case anything goes wrong. That way, if you don't like it or it doesn't come out looking like it should, you can reuse the contents of the original file to restore your blog to working condition.

Demo

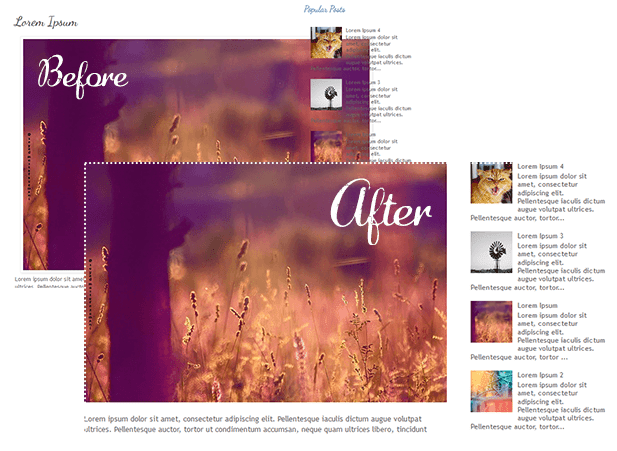
Hover your mouse over the image to see a before and after example:


How to Make Header, Navigation and Footer Full Width in Blogger

Step #1: Access Your CSS File

If you've never opened up your CSS file before, log in to your Blogger account, select your blog and navigate to Template > Edit HTML. This will bring up the code of your template containing all your blog's internal files in one place.

Step #2: Modify the Background

Click anywhere inside the code area > press CTRL + F keys and type the following line > hit Enter to find it (stop at the first occurrence of it):
body {
Just below body { you should see some lines that will look like this:
body {
font: $(body.font);
color: $(body.text.color);
background: $(body.background);
padding: 0 $(content.shadow.spread) $(content.shadow.spread) $(content.shadow.spread);
$(body.background.override)
}
Where you see the highlighted line above in the code, remove the line and replace it with:
padding: 0px;
Different templates will have minor variations, but you should still be able to find these lines within every template.

Step #3: Change the Content Section

Next, search using the CTRL+F keys for this part:
.content-inner {
Just below it, you will see this line:
.content-inner {
padding: $(content.padding) $(content.padding.horizontal); 
}
Remove the line in red and replace it with:
padding: 0px;
This will remove any of the padding around the inner content, so it won't leave any room on both sides.

Now find this part:
$(content.background.color.selector){
Just below it you will see this line:
$(content.background.color.selector){
background-color: $(content.background.color);
}
Replace the line in red with:
background-color: $(body.background);
Finally, search for this tag:
]]></b:skin>
And just above it, add this CSS:
.main-outer {
background: $(content.background.color);
}

Step #4: Make the Content Outer Full Width

Content is displayed differently between browsers, so you'll next want to fix this so that it alters the width across the board. This code can be found searching for:
.content-outer, .content-fauxcolumn-outer, .region-inner {
And just below it you will see the following lines:
.content-outer, .content-fauxcolumn-outer, .region-inner {
min-width: $(content.width);
max-width: $(content.width);
_width: $(content.width);
}
Delete the line in red and replace that line with:
max-width: 100%;

Step #5: Finish It Up

Now you have just two more lines you need to change. Look for:
</b:template-skin>
And click on the right arrow to expand the styles. Note: you will need to search for </b:template-skin> tag again, and just before it you'll see these symbols highlighted in yellow:
]]>
</b:template-skin>
Above this ]]></b:template-skin> section of code, add the following:
.main-outer {
max-width: $(content.width);
margin: 0 auto;
}
Then run a search for:
]]></b:skin>
Add these lines of code just before/above it:
.tabs-inner {
padding: 0px;
}
.section {
margin: 0px;
}
.header-inner .widget {
margin: 0px;
}
Save the template and exit out of the editor.

Finished!

Following along with this tutorial won't affect or alter the pictures you are using on the blog, just the design of the content area. If you have a logo that stretches across the screen and fits perfectly for 1/3 page header, you will need to resize and re-upload this content so that it is able to work with the new adjustments.

Sunday, 3 August 2014

Automatically Resize Blogger Images to Fit Blog Post Area

resize blogger images automatically
Blogger offers most of the tools you would need to add and resize Blogger images quick and easy. You can upload photos directly on the platform and even change the dimensions based on the type of content that you are attempting to produce.

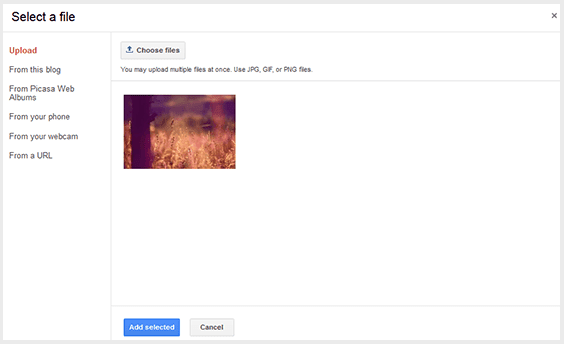
In order to do this, create a post and click on the small photo icon on the top toolbar next to the font style settings. A pop-up will show up on your screen asking you where you'd like to upload the image source. You have a choice between adding pictures from:
  • Your local computer
  • Previously uploaded images on the blog
  • Picasa Web Albums
  • An image URL
upload blogger image

Once you select the image that you want to use, you'll see four image sizes to choose from - small, medium, large, and x-large; it also gives you the option to determine the alignment. If you find that the four preset dimensions aren't providing the outcome you desire, there are easy ways to resize Blogger images to custom dimensions in order to fit your blog post area.

Step #1: Retain the Image Quality

If you know that you are going to need to resize Blogger images once you post them to your blog, make sure that you start with a photo larger than the 640px dimensions of the x-large option. It's easy to bring an image down in size, but if you try to make a small image bigger, you'll lose some of the quality. Just make sure that you watch out for the file size containing the image; the larger the file, the slower it will load on your website.

Photoshop is a powerful image editor that can help you to resize Blogger images or modify your images before you post, but it is also an expensive investment. There are also many other freeware image editors that can perform the simple task of resizing the photo. Determine what size you'd like the photo to display on the page and manually resize Blogger images to those dimensions; other users have found that 700px is a pretty flexible width size that works well on posts.

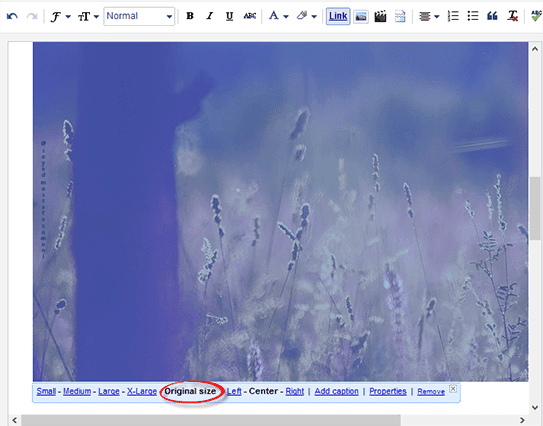
Once you've got your photo resized and added to your post, click on it and choose the 'Original size' option. If your photos are going to exceed the post editor, it probably means that they are larger than the body of your post, so let's fix that and make them fit exactly.

set image to original size

Step #2: Modify The Site's CSS

Next, you'll want to modify the CSS of your Blogger template to accommodate the adjustments. Don't worry; you won't need much coding experience to complete this task.

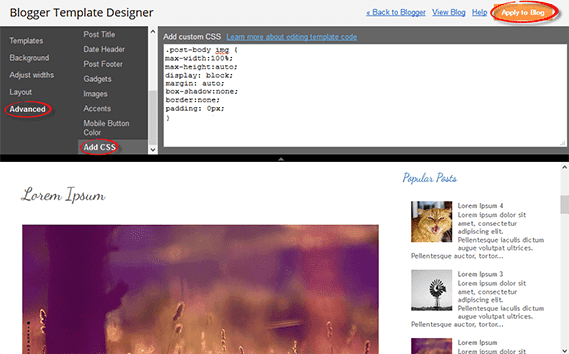
Open up the Blogger dashboard and go to 'Template' > 'Customize'. You'll see the option for 'Advanced', click on it and find your way to the 'Add CSS' tab... paste the following CSS code inside the empty box:
.post-body img {
max-width: 100%;
max-height: auto;
display: block;
margin: auto;
}
Adding the code to this section, automatically adds it between the <b:skin>....<b:skin> tags of your Template (Template > Edit HTML, above the ]]></b:skin> tag). So, no matter whether you add it above ]]></b:skin> or within the Add CSS box, the effect should be the same.

Remember that when you make changes to the CSS of the blog's Template, these changes will affect every post previously added, using the "Original size" dimension option.

To spruce up the post even more, add the last three lines shown in green below:
.post-body img {
max-width: 100%;
max-height: auto;
display: block;
margin: auto;
box-shadow: none;
border: none;
padding: 0px;
}

resize blogger pictures

This code will get rid of any borders and padding around the image and give it a much more natural look within the post. Hit the "Apply to Blog" button once you've finished adding it.

Note: This will only change the images set to Original size. To resize images with different sizes and apply this change on ALL the pictures added to your posts, add this CSS instead:
.post-body img {
width:100%;
height:100%;
display: block;
}
Please consider that, if you have posts with photos floating either on the right or left side of the content, they will automatically go full width.

Step #3: Create A Post

After making the adjustments to both file size and CSS, you may go back to the post editor and repeat the Step 1 to add an image. When you return to the screen that asks for size, click on the "Original size" option and confirm your choice. Your newly added image will then be displayed with the adjustments that you created, so that it fits nicely the width of the post area.

Tuesday, 29 July 2014

How to Turn Off Auto Enhance for Blogger Photos

When you go to upload photos on Blogger, look closely for changes between the picture you uploaded on your computer and how it looks on Blogger. If you notice any darkening of the pictures themselves, especially in light-colored areas of the photo, you are seeing the results of a Blogger auto-enhancing feature.

This Blogger auto-enhancing feature is packaged within the service and is intended to give your photos a more professional feel. It works by smoothing out fuzzy photos and removing any imperfections in personal photos, so that you see your best looking you. However, you may realize that not every picture that you upload needs to undergo this enhancement. In fact, it may even cause your site to look dull or outdated as it can turn white photos gray.

auto enhance on off
The first picture was auto-enhanced, while the second one was not

Turning Off Picture Auto-Enhancement on Google Plus

Fortunately, there is a way to adjust these settings so that you're able to turn them on and off at will. You may be surprised to know that the root cause of these changes actually lies with the Google uploader and your decision to link your Google+ and Blogger accounts together.

Step 1: Access Your Google Account

Blogger is just one of the many services that make up the Google network. When the company released Google+, this Blogger auto-enhancing feature came with it because adjustments were made to the Google uploading service. These same changes take place when you're adding pictures from your library in Picasa. The good thing about Google is that they allow you to make adjustments to your settings from one central location by navigating over to your Google account.

In order to turn the "Auto Enhance" feature off, go to your Blogger dashboard, and click your icon in the top right corner, then the blue "View Profile" button (if you are not using Google+, click the "Account settings" link). Now you'll be taken over to your Google+ profile or settings.

google blogger profile

Step 2: Find The Enhancement Settings

Once opening your Google account, look for the tab on the top left corner of the page that says Profile > navigate to Settings - or if you are using a Blogger profile, click the "Edit settings" link under "Google+ settings". This will bring up a list with "Photos and Videos" options including "Show geo location�" and "Allow viewers to download my photos...". Look toward the bottom of the list for the 'Auto Enhance' heading and check the "Off" option to turn this feature off.

auto enhance off

Step 3: Auto Enhance on Photos You've Already Uploaded

Any picture that you upload from here on out will no longer be subject to this Blogger auto-enhancement feature; however, this will not revert any pictures that have already been uploaded. If you want to make any changes to photos that were uploaded during this period, do the following: from the same panel, click on the 'Photos' tab which it will take you to the albums for each blog > click on the blog where you wish to disable the auto enhance effect and press the down arrow > go to the "Apply Auto Enhance" option and choose 'Off'.

pictures auto enhancement

Notice The Results?

Now that the auto-enhancement feature is turned off, you may start to see different results when uploading. Remember that this change will affect all of your Google services across the board such as Google+ and YouTube. You may turn this feature back on, at any time, by repeating the steps list above and re-checking the account settings box. When you're done, just turn it back off. Understanding these changes gives you the power to decide for yourself which pictures you'd like enhanced, and which you don't.