Showing posts with label recent posts. Show all posts

Tuesday, 19 November 2013

Recent Rotating Post Gadget with Excerpt For Blogger

This JavaScript code will display the latest posts of any feed, the difference being that it has two parts which can be used individually or combined. The top of this widget will show a single post along with the title (link), author, date and a brief summary of its content. In addition, this post will rotate automatically within a list whose number of elements will be decided by us. At the bottom, we'll find a full list with recent posts that, on mouse over, will replace the post above, thus breaking the automatic cycle.

Before adding anything, let's see it in action to decide if it does what we want.
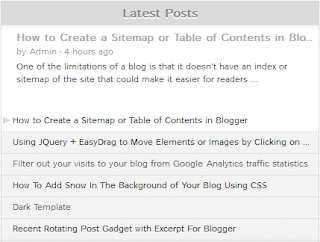

recent posts widget for blogger

How to Add Recent Rotating Posts Widget to Blogger

Step 1. Go to "Layout" > click on the "Add a Gadget" link.


Step 2. From the pop-up window, choose the "HTML/JavaScript" gadget


Step 3. Paste this code inside the empty box:
<style>
.gfg-root {
width: 100%;
height : auto;
position : relative;
overflow : hidden;
margin: 0 auto;
text-align : center;
font-size: 12px;
border: 1px solid #DBDBDB;
}
.gfg-title {
font-size: 16px;
font-weight : bold;
color : #6B6B6B;
background:#F3F3F3;
background-repeat: repeat;
line-height : 1.4em;
overflow : hidden;
white-space : nowrap;
padding: 5px;
text-shadow: 0px 2px #fff;
}
.gfg-entry {
background-color: #FFFFFF;
width : 100%;
height : 9.2em;
position : relative;
overflow : hidden;
text-align : left;
margin-top : 3px;
}
.gf-title a {
text-transform: capitalize;
color: #0000ff;
font-size: 14px;
}
.gfg-subtitle {
display: none;
}
.gfg-list {
position : relative;
overflow : hidden;
text-align : left;
}
.gfg-listentry {
line-height : 1.5em;
overflow : hidden;
white-space : nowrap;
text-overflow : ellipsis;
padding-left : 15px;
padding-right : 5px;
}
.gfg-listentry-odd {
background-color : #F3F3F3;
border-bottom : 1px dotted #CCCCCC;
padding: 5px;
}
.gfg-listentry-even {
background-color : #F3F3F3;
border-bottom : 1px dotted #CCCCCC;
padding: 5px;
}
.gfg-listentry-odd a{
color: #595959;
padding: 0 0px 0 10px;
}
.gfg-listentry-even a{
color: #242424;
padding: 0 0px 0 10px;
}
.gfg-listentry-highlight {
background: #FFFFFF;
}
.gfg-listentry-highlight:before {
position: absolute;
left: 0;
content: '\25BA ';
font-size: 14px;
color: #DBDBDB;
}
.gfg-listentry-highlight a {
color: #242424;
}
.gfg-root .gfg-entry .gf-result {
position : relative;
background-color: #ffffff;
width : auto;
height : 100%;
padding-left : 20px;
padding-right : 5px;
}
.gfg-root .gfg-entry .gf-result .gf-title {
font-size: 14px;
line-height : 1.2em;
overflow : hidden;
white-space : nowrap;
text-overflow : ellipsis;
margin-bottom : 2px;
margin-top: 5px;
}
.gfg-root .gfg-entry .gf-result .gf-snippet {
height : 3.8em;
color: #000000;
margin-top : 3px;
}
.clearFloat {
clear : both;}</style>
<script src="http://www.google.com/jsapi" type="text/javascript"></script><script src="http://www.google.com/uds/solutions/dynamicfeed/gfdynamicfeedcontrol.js" type="text/javascript"></script>
<script type="text/javascript">
function showGadget() {var feeds = [{title:'List',url:'http://helplogger.blogspot.com/feeds/posts/default?redirect=false&start-index=1&max-results=10'},];
new GFdynamicFeedControl(feeds, 'feedGadget',{title: 'Latest Posts', numResults : 10, displayTime : 5000, hoverTime : 500});} google.load("feeds", "1");
google.setOnLoadCallback(showGadget);
</script>
<div id="feedGadget">Loading...</div>

How to Customize the Recent Rotating Post Gadget

The URL in blue is for the feed. So, the http://helplogger.blogspot.com URL should be replaced with the feed URL of your blog.

Next is start-index=1. This number indicates which post will appear first on the list. By default, it is the latest post published on your blog, so if you want to begin displaying older posts, change the 1 value.

max-results=10 indicates the maximum number of posts that we will be reading from the feed, beginning from the one that we have set up before in the start-index=1. This number always needs to be equal or greater to what we should see later and what it does is to set the number of posts that will be shown in the gadget. The easiest way would be to put 500 in order not to fail, but the higher the number is, the longer this gadget will take to load, so it's better to adjust to what we need to show.

Finally, here are some other script parameters:
  • title: 'Latest Posts', is the widget's title that appears on top.
  • numResults: 10, number of posts that will show in the list.
  • displayTime: 5000, the delay time between posts in the rotator (in milliseconds).
  • hoverTime: 500, minimum time for an item in the list to be displayed at the top.
If you want to hide the list and show only the posts, change this part:
.gfg-list {
position : relative;
overflow : hidden;
text-align : left;
}
To:
.gfg-list {
display:none;
}
If you want to display only the list, change this:
.gfg-entry {
background-color: #FFFFFF;
width : 100%;
height : 9.2em;
position : relative;
overflow : hidden;
text-align : left;
margin-top : 3px;
}
To:
.gfg-entry {
display: none; }

Step 4. Save the gadget and you're done adding the recent rotating post widget with excerpt in Blogger.

Monday, 1 April 2013

Show Recent Posts With Thumbnails For Particular Label or Category in Blogger

Sometimes we want to have everything organized, so that our readers can find topics of interest more easily. To accomplish this, instead of putting a widget with the latest posts, we can put together the latest entries sorted by category, so that we'll be able to show the latest posts for each label we want and also display a thumbnail for our category.

recent posts by labels

To add this recent posts widget for labels or categories in a Blogger blog, follow the next steps:

Recent Posts with Thumbnails Sorted by Labels

Step 1. From your Blogger Dashboard, go to 'Template' and click the 'Edit HTML' button


Step 2. Click anywhere inside the code area and search (CTRL + F) for this piece of code:
]]></b:skin>

Just above ]]></b:skin>, paste this CSS style:
/* Recent posts by labels
--------------------------------- */
img.label_thumb{
float:left;
margin-right:10px !important;
height:65px; /* Thumbnail height */
width:65px; /* Thumbnail width */
border: 1px solid #fff;
-webkit-border-radius: 10px;
-moz-border-radius: 10px;
border-radius: 10px;
-webkit-box-shadow: 0 1px 1px rgba(0, 0, 0, .4);
-moz-box-shadow: 0 1px 1px rgba(0, 0, 0, .4);
box-shadow: 0 1px 1px rgba(0, 0, 0, .4);
}

#label_with_thumbs {
float: left;
width: 100%;
min-height: 70px;
margin: 0px 10px 2px 0px;
padding: 0;
}
ul#label_with_thumbs li {
padding:8px 0;
min-height:65px;
margin-bottom:0px;
border-bottom: 1px dotted #999999;
}

#label_with_thumbs li{
list-style: none ;
padding-left:0px !important;
}

#label_with_thumbs a { text-transform: uppercase;}
#label_with_thumbs strong {padding-left:0px; }
Step 3. Now try to find this tag:
</head>
... just above </head> add this script:
<script type='text/javascript'>
//<![CDATA[
function labelthumbs(json){document.write('<ul id="label_with_thumbs">');for(var i=0;i<numposts;i++){var entry=json.feed.entry[i];var posttitle=entry.title.$t;var posturl;if(i==json.feed.entry.length)break;for(var k=0;k<entry.link.length;k++){if(entry.link[k].rel=='replies'&&entry.link[k].type=='text/html'){var commenttext=entry.link[k].title;var commenturl=entry.link[k].href;}
if(entry.link[k].rel=='alternate'){posturl=entry.link[k].href;break;}}var thumburl;try{thumburl=entry.media$thumbnail.url;}catch(error)
{s=entry.content.$t;a=s.indexOf("<img");b=s.indexOf("src=\"",a);c=s.indexOf("\"",b+5);d=s.substr(b+5,c-b-5);if((a!=-1)&&(b!=-1)&&(c!=-1)&&(d!="")){thumburl=d;}else thumburl='https://blogger.googleusercontent.com/img/b/R29vZ2xl/AVvXsEjfIgnSq1UpYlVpoInNZacCe-fNNKxiQM2nSqC468Os-Goi-CZMDXl2C83pXe0ohglAdWdICoSkwBInpQ3o7ESoK5iIZy33iy6jPXHD_-M9go-lyjP3_G6v4alNAbARzpOycPdgFaJabIw/s1600/picture_not_available.png';}
var postdate=entry.published.$t;var cdyear=postdate.substring(0,4);var cdmonth=postdate.substring(5,7);var cdday=postdate.substring(8,10);var monthnames=new Array();monthnames[1]="Jan";monthnames[2]="Feb";monthnames[3]="Mar";monthnames[4]="Apr";monthnames[5]="May";monthnames[6]="June";monthnames[7]="July";monthnames[8]="Aug";monthnames[9]="Sept";monthnames[10]="Oct";monthnames[11]="Nov";monthnames[12]="Dec";document.write('<li class="clearfix">');if(showpostthumbnails==true)
document.write('<a href="'+posturl+'" target ="_top"><img class="label_thumb" src="'+thumburl+'"/></a>');document.write('<strong><a href="'+posturl+'" target ="_top">'+posttitle+'</a></strong><br>');if("content"in entry){var postcontent=entry.content.$t;}
else
if("summary"in entry){var postcontent=entry.summary.$t;}
else var postcontent="";var re=/<\S[^>]*>/g;postcontent=postcontent.replace(re,"");if(showpostsummary==true){if(postcontent.length<numchars){document.write('');document.write(postcontent);document.write('');}
else{document.write('');postcontent=postcontent.substring(0,numchars);var quoteEnd=postcontent.lastIndexOf(" ");postcontent=postcontent.substring(0,quoteEnd);document.write(postcontent+'...');document.write('');}}
var towrite='';var flag=0;document.write('<br>');if(showpostdate==true){towrite=towrite+monthnames[parseInt(cdmonth,10)]+'-'+cdday+' - '+cdyear;flag=1;}
if(showcommentnum==true)
{if(flag==1){towrite=towrite+' | ';}
if(commenttext=='1 Comments')commenttext='1 Comment';if(commenttext=='0 Comments')commenttext='No Comments';commenttext='<a href="'+commenturl+'" target ="_top">'+commenttext+'</a>';towrite=towrite+commenttext;flag=1;;}
if(displaymore==true)
{if(flag==1)towrite=towrite+' | ';towrite=towrite+'<a href="'+posturl+'" class="url" target ="_top">More �</a>';flag=1;;}
document.write(towrite);document.write('</li>');if(displayseparator==true)
if(i!=(numposts-1))
document.write('');}document.write('</ul>');}
//]]>
</script>
Note: to add your own pic for the posts with no thumbnail, replace the image url in blue with your own

Update! For a better image resolution add this script above the </body> tag:
<script type='text/javascript'>                  
function changeThumbSize(id,size){
var blogGadget = document.getElementById(id);
var replacement = blogGadget.innerHTML;
blogGadget.innerHTML = replacement.replace(/s72-c/g,"s"+size+"-c");
var thumbnails = blogGadget.getElementsByTagName("img");
for(var i=0;i&lt;thumbnails.length;i++){
thumbnails[i].width = size;
thumbnails[i].height = size;
}
}
changeThumbSize("label_with_thumbs",210);             
</script>
Now Save the template to finish with your changes.

So, what we have added, is the CSS to style the widget and the script to make it work. Now all we have to do is to add the widget's code to the blog sidebar in a HTML/JavaScript gadget:

Step 4. Go to Layout - click on Add a Gadget

blogger layout, add a gadget

Step 5. From the pop-up window, choose the HTML/Javascript widget and paste this script inside the empty box:
<script type='text/javascript'>var numposts = 3;var showpostthumbnails = true;var displaymore = false;var displayseparator = true;var showcommentnum = false;var showpostdate = false;var showpostsummary = true;var numchars = 100;</script>
<script type="text/javascript" src="/feeds/posts/default/-/Name-of-the-label?published&alt=json-in-script&callback=labelthumbs"></script>

Note: Where it says Name-of-the-label should be the name of the label that you want to display, and if your label is case sensitive, like in my example, then you should type it that way.

Within the last code, there are these parts which can be customized - change true with false or vice versa:
var numposts ? Number of posts to display
var showpostthumbnails ? Show/hide thumbnails
var displaymore ? Show or hide the read more link
var displayseparator ? Show/hide separator
var showcommentnum ? Show/hide the number of comments
var showpostdate ? Show/hide the posts dates
var showpostsummary ? Show or not the posts summaries
var numchars ? Number of posts characters (here you have to change the 100 value)
Remember that the gadget displays the latest posts from a particular label... therefore, if you want to display the latest posts from other labels, repeat step 5 for each additional category that you want to add.

That's it :) Enjoy!