Tuesday, 27 September 2016

Share Blogger Post Automatically to Facebook using IFTTT

Automatically posting a blog post to Facebook used to be a challenge. The idea was simple, which is to notify Facebook that you have a blog you want posted on your wall, and the social media will do as you command. The implementation, however, was more complicated than that.

Even with Facebook's post-by-email feature, only the blog name and title will appear on the wall, leaving behind the content or link. There are other plugins available, but they don't work as straightforward as they're supposed to be. There is always something missing.
How to Share Blogger post automatically to Facebook using IFTTT

Here is an online utility IFTTT (If This, Then That), which is capable of moving social postings between sites. Setting it up is fairly easy, and just as easy to use. So, let's see how we can share Blogger posts automatically to Facebook using IFTTT.

Step 1. Sign up for a free IFTTT account

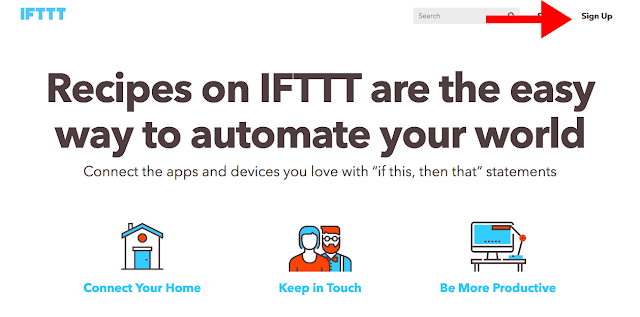
Visit IFTTT.com and set up an account by creating a username and password.

sign up IFTTT to connect Blogger with Facebook

Now, IFTTT will take you through a mini-tutorial - click on the word 'this', 'that' and 'Continue' button several times. Finally, select 3 channels that interest you and click 'Continue' to finish with the registration.

Step 2. Create a new recipe

Once registered, we need to 'Create a Recipe'. A recipe is basically the process of combining two platforms together - in our case, we will combine Blogger with Facebook. This shouldn't take more than five minutes.

To get started, click the 'My Recipes' link and then click the 'Create a Recipe' button, as shown below:
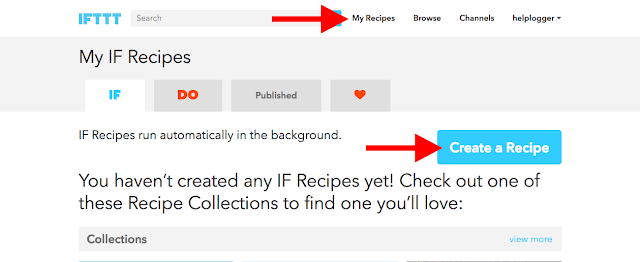
create IFTTT Blooger to Facebook recipe

Start creating the recipe by clicking the blue 'this' word and select a "trigger channel". The trigger you need to choose is Blogger - search for it in the box, as illustrated below:
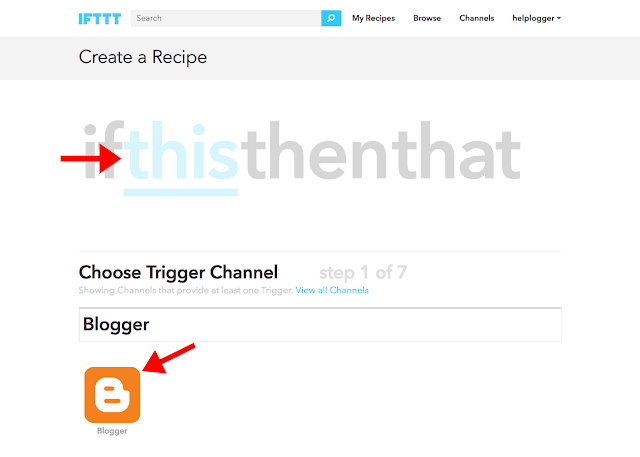
create Blogger recipe using IFTTT


Step 3. Connect Blogger blog with IFTTT

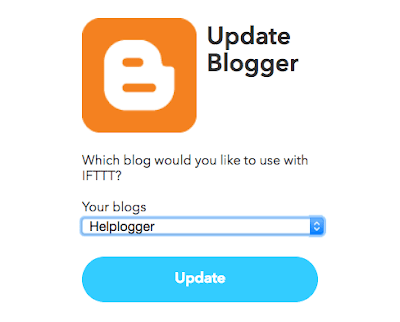
Connect your Blogger account in order to tie it with your IFTTT account. A 'Request for Permission' pop-up will appear > click the 'Allow' button and choose which blog you want to use with IFTTT from the drop-down menu, then click the 'Update' button.

add Blogger blog to IFTTT for automatic posting

After our Blogger blog has been connected, 'Choose a Trigger' that allows you to specify what kind of posts will be published to Facebook. You can choose 'Any new post' or 'New posts labeled'.
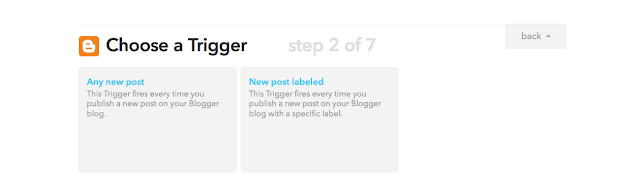
automatically publish new Blogger post using IFTTT

Finally, press the blue 'Create Trigger' button to proceed to the next step.
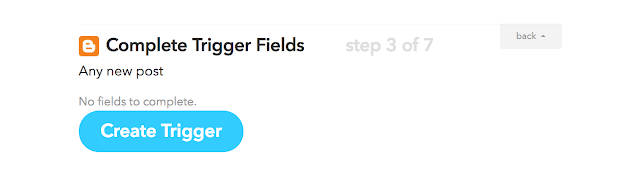
connect Facebook to Blogger to post automatically

Step 4. Creating the 'That' trigger

After registration, Create a Recipe that will specify the direction with which your blog posting will take. Since you want to link Blogger to Facebook, then the Recipe will be - if Blogger, then Facebook. What you're doing is replacing 'this' to Blogger, which is the source, and 'that' to Facebook, which is the target destination.

if Blogger then Facebook IFTTT

To set up 'that', click on the blue-colored 'that'. This will bring up a window that contains a list of social media sites. Search for 'Facebook' in the box and select the 'Facebook Pages' option (select the plain 'Facebook' option if you want to post to your personal profile).
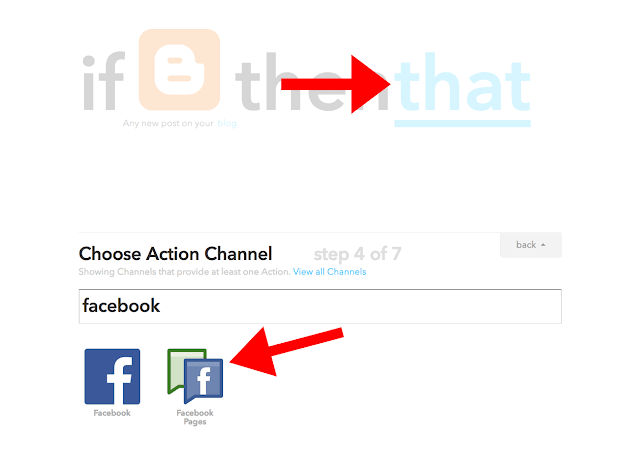
choose action channel IFTTT facebook

Step 5. Connect Facebook page with IFTTT

Connect your Facebook account. Make sure you are logged into your Facebook account, before you connect. Pressing the 'Connect' button will open a pop-up window to allow IFTTT post on your Facebook page, then select your Facebook page.

connect facebook pages channel on IFTTT

Hit the 'Done' and 'Continue to the next step' buttons and we're almost done...

You will be prompted to 'Choose an Action', where you get to specify if you only want to 'Create a status message', 'Create a link post', or 'Update a photo from URL'. Choose 'Create a link post' as shown below:
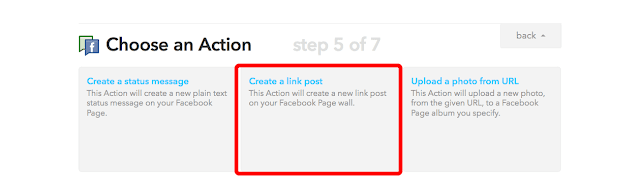
post Blogger automatically to facebook

Step 6. Choosing the ingredients

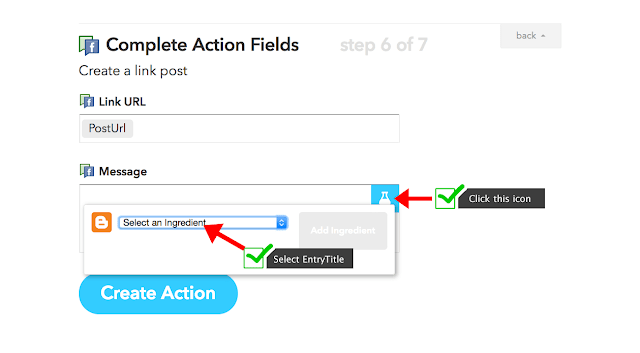
Once you choose an action, a 'Complete Action Fields' window will appear with 'Link URL' and 'Message' box. To add an ingredient, click on the 'Message' field and you'll see a test tube icon on the right hand side. If you click it, a drop-down menu will appear which will let you choose a field to include - select 'PostTitle' and click 'Add Ingredient' blue button on the right side.

IFTTT Blogger recipe ingredients for Facebook

If you are unsure of what each ingredient does, please visit this page.
Step 7. Finish creating the recipe

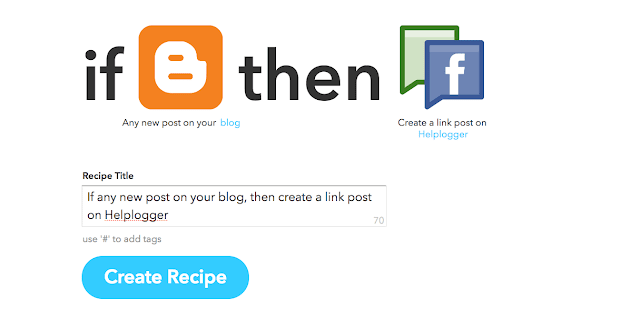
Finally, click the blue 'Create Action' button and your recipe should look something like this:

share blogger post automatically to facebook

To complete your recipe, hit the 'Create Recipe' button.

And that's it! This is how IFTTT recipes are created. Next time you publish a Blogger post, it will be automatically shared to Facebook.

Tuesday, 13 September 2016

Customizable Related Posts Widget for Blogger

We already posted a few tutorials on how to add related posts widget with thumbnails in Blogger with summaries or only titles, which can be compiled into a single All-In-One Widget with powerful options. This new customizable related posts widget for Blogger integrates all the features we've seen before and more, such as thumbnails (square or round), post dates, excerpts, display only titles / thumbnails.

Now let's see what this related posts blogger widget has to offer.

related posts widget, blogger widget

Related Posts Widget Features:

  • 9 attractive styles to match your needs
  • Show Title, excerpt & thumbnails
  • Display simple related posts with titles / summaries / post date
  • Choose whether to display the post thumbnails or not
  • Ability to control the thumbnail image size
  • Option to choose square or round thumbnails
  • Show post text excerpts
  • Control the length of the post excerpt / title
  • Determine the number of related posts to display

Requirements:

  1. The related posts widget recognizes post thumbnails uploaded through Blogger itself (or Picasa Web Albums), other images from Photobucket, Flickr, or other non-Blogger hosts will not be supported.
  2. This widget is compatible with the standard desktop Blogger templates except Dynamic Views, which does not accept customization.
  3. The script does not work on private blogs, so your blog / site must be open to the public in order to show.

Adding Customizable Related Posts Widget in Blogger

Log into your Blogger dashboard, go to 'Template' and open template editor by clicking the 'Edit HTML' button below 'Live On Blog' preview.

Next, we're going to use the template search feature, be sure to follow these directions exactly:

1. Place your cursor on the template code.
2. Click once.
3. Press CTRL and F at the same time (PC) or Command and F (Mac).

The search box will open in the upper right corner of the template editor.


Type </head> in the search box, then press ENTER. This will take you to the </head> tag in your template and highlight it in yellow.

Select and copy the entire CSS style below and paste it directly ABOVE the </head> tag:
<style type='text/css'>
.related-posts-container{margin:55px 0px;}.related-posts-container h4{font:20px &#39;Open Sans&#39;, sans-serif;margin-bottom:20px;}.related-posts-container ul,.related-posts-container ul li{list-style: none;margin: 0;padding: 0;}.related-posts-container ul li a{text-transform:capitalize !important;font:bold 13px &#39;Open Sans&#39;, sans-serif;outline: 0;}.related-snippets{margin-top:5px;font:italic 12px &#39;Open Sans&#39;, sans-serif;}.related-posts-1 li{list-style:inside none disc !important;}.related-posts-1 li,.related-posts-2 li{border-top:1px solid rgba(0,0,0,0.04);padding:0.8em 0 !important;}.related-posts-1 li:first-child,.related-posts-2 li:first-child{border-top:medium none;}li.related-post-item{margin:0 3% 3% 0 !important;width:22.7%;float:left;list-style:none;position:relative;}li.related-post-item:last-child{margin:0 0 2% !important;}.related-thumb-large{width:100%;height:auto;border:none;margin:0px auto 10px;padding:0 !important;}.related-posts-8 li .related-title,.related-posts-9 li .related-title,.related-posts-9 li .related-snippets{padding-left:74px;}.related-posts-8 li:nth-child(even),.related-posts-9 li:nth-child(even){margin:0 0 4% !important;}.related-posts-8 li,.related-posts-9 li{background-color:#ffffff;box-shadow:0 0 4px rgba(180, 180, 180, 0.55);width:42% !important;float:left;margin:0 4% 4% 0 !important;padding:3% !important;}.related-thumb{float:left;height:64px;margin-right:10px;object-fit:cover;width:64px;}.related-posts-6 li,.related-posts-6 a{line-height:0 !important;}.related-posts-6 .related-thumb-large{margin-bottom:0;}.related-posts-7 li.related-post-item{margin:0 !important;width:25% !important;}.related-wrapper{position:absolute;left:0px;right:0;top:0px;bottom:0;margin:0 auto;z-index:4;background:rgba(77,77,77,0.2);}.related-wrapper-inner{position:relative;height:100%;z-index:99;width:100%;display:table;vertical-align:middle;text-align:center;-moz-box-sizing:border-box;-webkit-box-sizing:border-box;box-sizing:border-box;}.related-wrapper .related-title{vertical-align:middle;display:table-cell;color:#ffffff;font:bold 16px &#39;Open Sans&#39;, sans-serif;padding:0 20px;}.related-date{margin-top:5px;font:italic 11px &#39;Open Sans&#39;, sans-serif;color:#999999;}
</style>

Next, we need to add the script  - search for the following line:
<b:includable id='postQuickEdit' var='post'>

Once you found it, click the small arrow not beside it but with one level above to expand code and scroll down until you see </b:includable> - right below this tag, you should see the line including the "postQuickEdit" id.

See the screenshot for more help:


Just ABOVE the </b:includable> tag, add the following script:
<b:if cond='data:blog.pageType == &quot;item&quot;'>
<div class='related-posts-container' id='related-posts-widget'/>
<div style='clear: both;'/>
<script type='text/javascript'>
var labelArray = [<b:if cond='data:post.labels'><b:loop values='data:post.labels' var='label'>&quot;<data:label.name/>&quot;<b:if cond='data:label.isLast != &quot;true&quot;'>,</b:if></b:loop></b:if>];
var relatedSettings = {
blogURL:&quot;<data:blog.homepageUrl/>&quot;,
relatedHeading:&quot;&lt;h4&gt;&lt;span&gt;Related Posts&lt;/span&gt;&lt;/h4&gt;&quot;,
relatedPosts:4,
relatedStyle:4,
thumbnailSize:&quot;w300-h200-p-nu&quot;,
defaultThumb:&quot;https://blogger.googleusercontent.com/img/b/R29vZ2xl/AVvXsEiyCD8ctBK_QgHoEWR7Ph_przbYdFK2dJx8ObGaAP56qcQnRdzkg6kSfrgpOp19dh33wMFX1kdpdV6LeRivfhNFYhlV4XKSFU9POi8vz_H-FUEzmMkzo5oUPPOW7akB8mbfYdMnWm8LLeHp/300-h200-c/no-thumb.png&quot;,
roundThumbs:false,
titleLength:&quot;auto&quot;,
snippetLength:45,
centerText:false,
openNewTab:false
};</script>
<script type='text/javascript'>
//<![CDATA[
var randomRelatedIndex,startRelated;!function(a,b,c){var d={callBack:function(){}};for(var e in relatedSettings)d[e]="undefined"==relatedSettings[e]?d[e]:relatedSettings[e];var f=function(a){var d=b.createElement("script");d.type="text/javascript",d.src=a,c.appendChild(d)},g=function(a,b){return Math.floor(Math.random()*(b-a+1))+a},h=function(a){var c,d,b=a.length;if(0===b)return!1;for(;--b;)c=Math.floor(Math.random()*(b+1)),d=a[b],a[b]=a[c],a[c]=d;return a},i="object"==typeof labelArray&&labelArray.length>0?"/-/"+h(labelArray)[0]:"",j=function(a){var b=a.feed.openSearch$totalResults.$t-d.relatedPosts,c=g(1,b>0?b:1);f(d.blogURL.replace(/\/$/,"")+"/feeds/posts/summary"+i+"?alt=json-in-script&orderby=updated&start-index="+c+"&max-results="+d.relatedPosts+"&callback=startRelated")},k=function(a){var l,m,n,o,p,q,b=document.getElementById("related-posts-widget"),c=h(a.feed.entry),e=d.relatedStyle,f=d.relatedHeading+'<ul class="related-posts-'+e+'">',g=d.openNewTab?' target="_blank"':"",i=d.centerText?"text-align:center;":"",j=d.roundThumbs?"-webkit-border-radius:50%;-moz-border-radius:50%;border-radius:50%;":"",k='<span style="display:block;clear:both;"></span>';if(b){for(var r=0;r<d.relatedPosts&&r!=c.length;r++){n=c[r].title.$t,o="auto"!==d.titleLength&&d.titleLength<n.length?n.substring(0,d.titleLength)+"&hellip;":n,p="media$thumbnail"in c[r]&&d.thumbnailSize!==!1?c[r].media$thumbnail.url.replace(/\/s[0-9]+(\-c)?/,"/"+d.thumbnailSize):d.defaultThumb,l=h(c[r].published.$t);for(var s=[1,2,3,4,5,6,7,8,9,10,11,12],t=["January","February","March","April","May","June","July","August","September","October","November","December"],u=l.split("-")[2].substring(0,2),v=l.split("-")[1],w=l.split("-")[0],x=0;x<s.length;x++)if(parseInt(v)==s[x]){v=t[x];break}postdate=v+" "+u+" "+w,q="summary"in c[r]&&d.snippetLength>0?c[r].summary.$t.replace(/<br ?\/?>/g," ").replace(/<.*?>/g,"").replace(/[<>]/g,"").substring(0,d.snippetLength)+"&hellip;":"";for(var y=0,z=c[r].link.length;y<z;y++)m="alternate"==c[r].link[y].rel?c[r].link[y].href:"#";1==e?f+='<li><a href="'+m+'" '+g+">"+o+"</a></li>":2==e?f+='<li><a href="'+m+'" '+g+'><div class="related-title">'+o+'</div></a><div class="related-snippets">'+q+"</div></li>":3==e?f+='<li class="related-post-item" style="'+i+'"><a href="'+m+'" '+g+'><img alt="" class="related-thumb-large" src="'+p+'" style="'+j+'"><div class="related-title">'+o+'</div></a><div class="related-snippets">'+q+"</div></li>":4==e?f+='<li class="related-post-item" style="'+i+'"><a href="'+m+'" '+g+'><img alt="" class="related-thumb-large" src="'+p+'" style="'+j+'"><div class="related-title">'+o+'</div></a><div class="related-date">'+postdate+"</div></li>":5==e?f+='<li class="related-post-item" style="'+i+'"><a href="'+m+'" '+g+'><img alt="" class="related-thumb-large" src="'+p+'" style="'+j+'"><div class="related-title">'+o+"</div></a></li>":6==e?f+='<li class="related-post-item"><a href="'+m+'" '+g+'><img alt="" class="related-thumb-large" src="'+p+'" style="'+j+'"><div class="related-wrapper" style="'+j+'"><div class="related-wrapper-inner"><div class="related-title">'+o+"</div></div></div></a></li>":7==e?f+='<li class="related-post-item"><a href="'+m+'" '+g+'><img alt="" class="related-thumb-large" src="'+p+'" style="'+j+'"></a></li>':8==e?f+='<li class="related-post-item"><a class="related-post-item-wrapper" href="'+m+'" '+g+'><img alt="" class="related-thumb" src="'+p+'" style="'+j+'"><div class="related-title">'+o+'</div></a><div class="related-date">'+postdate+"</div></li>":9==e&&(f+='<li><a href="'+m+'" '+g+'><img alt="" class="related-thumb" src="'+p+'" style="'+j+'"><div class="related-title">'+o+'</div></a><div class="related-snippets">'+q+"</div></li>")}b.innerHTML=f+="</ul>"+k,d.callBack()}};randomRelatedIndex=j,startRelated=k,f(d.blogURL.replace(/\/$/,"")+"/feeds/posts/summary"+i+"?alt=json-in-script&orderby=updated&max-results=0&callback=randomRelatedIndex")}(window,document,document.getElementsByTagName("head")[0]);
//]]>
</script>
</b:if>

How to Customize the Related Posts Widget for Blogger?

To change the 'Related Posts' text that appears above the widget, modify the text in red:
relatedHeading: &quot;&lt;h4&gt;&lt;span&gt;Related Posts&lt;/span&gt;&lt;/h4&gt;&quot;,

To change the number of posts to display, change the '4' value from this line:
relatedPosts: 4,

Note: you may need to change the percentages in the CSS styles above in order to make posts fit the related container. Just follow the values in red and play with them until you get the best results.

To change the style of the related posts widget, modify the '4' value from:
relatedStyle: 4,

Available Related Posts Styles

  1. simple related posts widget that will show post titles only
  2. display post titles and snippets
  3. display post thumbnails, titles and snippets
  4. display related posts thumbnails, titles and post date (shows by default)
  5. display related posts thumbnails and titles
  6. post titles in front of thumbnails, instead of having them below the thumbnail
  7. display thumbnails only
  8. small thumbnail with titles on the right and date below
  9. small thumbnails with post titles and excerpts on the right

Customizing the Related Post Thumbnail Size & Style

By default, thumbnails are resized and cropped automatically to be 300px wide by 200px tall. If you want to change the width and height of the thumbnails, modify the '300' and '200' values from:
thumbnailSize: &quot;w300-h200-p-nu&quot;,
defaultThumb: &quot;https://blogger.googleusercontent.com/img/b/R29vZ2xl/AVvXsEiyCD8ctBK_QgHoEWR7Ph_przbYdFK2dJx8ObGaAP56qcQnRdzkg6kSfrgpOp19dh33wMFX1kdpdV6LeRivfhNFYhlV4XKSFU9POi8vz_H-FUEzmMkzo5oUPPOW7akB8mbfYdMnWm8LLeHp/300-h200-c/no-thumb.png&quot;,
Note: 'w' comes from width, 'h' comes from height. To make the thumbnails square, change the 'h' (height) value and make it equal with 'w' (width) value. A higher value will result in more high-res images.

If you want thumbnails have rounded corners, change 'false' with 'true':
roundThumbs:false,

Customizing Related Titles & Excerpts

To shorten the post title, change auto with the number of characters to show:
titleLength: &quot;auto&quot;,

To reduce or add more characters to the snippets, change the "45" value:
snippetLength: 45,

If you want to center text (title and summary), change 'false' to 'true':
centerText:false,

To open links in a new tab when visitors click on a related post, change "false" to "true":
openNewTab: false

Once you're done with the settings, click the 'Save Template' button and now you can see the related posts widget live on your Blogger blog.

Final words

That's it! With the new customizable Related Posts widget for Blogger you will be able to add unique features to the related content section of your blog. However, all of these styles look and work slightly different, so take your time, and pick your favorite.

Friday, 9 September 2016

Add Load More Posts or Infinite Scrolling to Blogger

You might have seen the implementation of infinite scrolling at Facebook, Twitter or Google+. Instead of showing Older / Newer posts links, we can load posts dynamically whenever a "Load more posts" button is clicked, or by scrolling down the page. This tutorial will show you how to implement Ajax based loading script that will add Load More Posts or Infinite Scrolling to Blogger, so that visitors can easily navigate without reloading the page.

How it works?

- You have the option to add a 'Load More Posts' button or load automatically the older posts as visitors scroll down the page.
- Once implemented, Load More Posts / Infinite Scrolling applies to all Blogger posts on index pages (homepage, archive, label pages). It can't be added on individual posts.

Demo

To see it live, check out the demo below. When you scroll down to the bottom of the page, you will see the "Load More Posts" button. Once you click it, the next 3 posts set to display will load below.


Adding Load More Posts or Infinite Scrolling to Blogger

1. Log into your Blogger account and click on your blog where you want to add it.
2. Go to 'Template' and click the 'Edit HTML' button to open the Template editor > click anywhere in the code area and press CTRL + F keys (or Command + F) to open the search box.


3. Type the tag below in the search box and press ENTER to find it:
</head>
4. Just above the </head> tag, add the following scripts/css styles:

a. If you want to load posts with 'Load More Posts' button like in the demo blog:
<script src='https://ajax.googleapis.com/ajax/libs/jquery/2.2.0/jquery.min.js'/>
<b:if cond='data:blog.pageType != &quot;static_page&quot;'>
<b:if cond='data:blog.pageType != &quot;item&quot;'>
<script type='text/javascript'>
//<![CDATA[
!function(a){function b(){h||(h=!0,d?(f.find("a").hide(),f.find("img").show(),a.ajax(d,{dataType:"html"}).done(function(b){var b=a("<div></div>").append(b.replace(k,"")),c=b.find("a.blog-pager-older-link");c?d=c.attr("href"):(d="",f.hide());b=b.find(g).children();a(g).append(b),window._gaq&&window._gaq.push(["_trackPageview",d]);window.gapi&&window.gapi.plusone&&window.gapi.plusone.go&&window.gapi.plusone.go();window.disqus_shortname&&a.getScript("http://"+window.disqus_shortname+".disqus.com/blogger_index.js");window.FB&&window.FB.XFBML&&window.FB.XFBML.parse&&window.FB.XFBML.parse();f.find("img").hide();f.find("a").show();h=!1})):f.hide())}function c(){var a=Math.max(i.height(),j.height(),document.documentElement.clientHeight),c=i.scrollTop()+i.height();0>a-c&&b()}var d="",f=null,g="div.blog-posts",h=!1,i=a(window),j=a(document),k=/<script\b[^<]*(?:(?!<\/script>)<[^<]*)*<\/script>/gi;a(document).ready(function(){if("item"!=_WidgetManager._GetAllData().blog.pageType&&(d=a("a.blog-pager-older-link").attr("href"))){var g=a('<a href="javascript:;" >LOAD MORE POSTS</a>');g.click(b);i.scroll(c);f=a('<div class="load-more"></div>');f.append(g);f.append(e);f.insertBefore(a("#blog-pager"));a("#blog-pager").hide()}})}(jQuery);//]]>
</script>
<style type="text/css">
.load-more{display:block;text-align:center;margin:20px auto;}.load-more a,.load-more a:hover{text-decoration:none;font:bold 11px Open Sans, sans-serif;letter-spacing:1px;padding:10px 20px;background:#000000;color:#ffffff;}
</style>
</b:if>
</b:if>

b. If you want to add the infinite scrolling without button, paste this instead:
<script src='https://ajax.googleapis.com/ajax/libs/jquery/2.2.0/jquery.min.js'/>
<b:if cond='data:blog.pageType != &quot;static_page&quot;'>
<b:if cond='data:blog.pageType != &quot;item&quot;'>
<script type='text/javascript'>
//<![CDATA[
!function(a){function b(){h||(h=!0,d?(f.find("a").hide(),f.find("img").show(),a.ajax(d,{dataType:"html"}).done(function(b){var b=a("<div></div>").append(b.replace(k,"")),c=b.find("a.blog-pager-older-link");c?d=c.attr("href"):(d="",f.hide());b=b.find(g).children();a(g).append(b),window._gaq&&window._gaq.push(["_trackPageview",d]);window.gapi&&window.gapi.plusone&&window.gapi.plusone.go&&window.gapi.plusone.go();window.disqus_shortname&&a.getScript("http://"+window.disqus_shortname+".disqus.com/blogger_index.js");window.FB&&window.FB.XFBML&&window.FB.XFBML.parse&&window.FB.XFBML.parse();window.twttr&&window.twttr.widgets&&window.twttr.widgets.load&&window.twttr.widgets.load();f.find("img").hide();f.find("a").show();h=!1})):f.hide())}function c(){var a=Math.max(i.height(),j.height(),document.documentElement.clientHeight),c=i.scrollTop()+i.height();150>a-c&&b()}var d="",f=null,g="div.blog-posts",h=!1,i=a(window),j=a(document),k=/<script\b[^<]*(?:(?!<\/script>)<[^<]*)*<\/script>/gi;a(document).ready(function(){if("item"!=_WidgetManager._GetAllData().blog.pageType&&(d=a("a.blog-pager-older-link").attr("href"))){var g=a('<a href="javascript:;" >LOAD MORE POSTS</a>');g.click(b);i.scroll(c);f=a('<div class="load-more"></div>');f.append(g);f.append(e);f.insertBefore(a("#blog-pager"));a("#blog-pager").hide()}})}(jQuery);
//]]>
</script>
</b:if></b:if>

Note: This code uses jQuery library, so if you already have jQuery on your page, please remove the line in red highlighted above.

5. Click 'Save template' button and check the 'Load More Posts' button / Infinite Scrolling in your Blogger blog.

Conclusion

That's it! So this is how we can easily add Load More Posts / Infinite Scrolling to Blogger. From now on, our visitors can stay in same page and navigate through infinite number of posts on the fly!

Tuesday, 31 May 2016

How to Add AdSense Page-level ads in Blogspot

Recently, page-level ads were made available for blogspot bloggers and webmasters which means that you can now display AdSense Ads right on your mobile templates. You can now monetize your efforts on the templates as you do with mobile apps thanks to the Google Admob Ads.

Why Choose AdSense Page-level ads?

There are a number of reasons why you choose page-level ads from AdSense to bolster your revenue stream.
  • Increase Revenues
  • Provide Better User Experience
  • Two New Formats
  • Doesn't Count Against 3 Ad Limit
  • Optimized and Responsive to Mobile Needs

Page-level Ad Formats

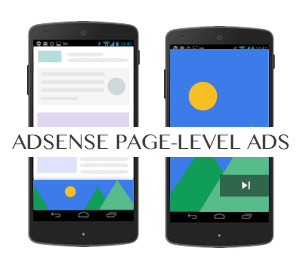
Today, the two types of page-level ads available include Anchors which are ads places at the bottom of the screen and Vignettes which are full screen ads that work similar to Admob's Interstitial adverts.
Vignettes tend to be more effective for mobile advertising.

how to add adsense page-level ads in blogspot

How to Setup Page-Level Ads in Blogspot Blogs

The good news is that you can install these ads from AdSense fairly quickly and easily thanks to the process which guides you through.

1. Log into your AdSense Account
2. Click on this link
3. Click the two toggle buttons to switch on "Anchor/overlay ads" and "Vignette ads"

enable adsense page-level ads in blogger

4. Scroll down and click the "Get Code" button

enable adsense page-level ads in blogger

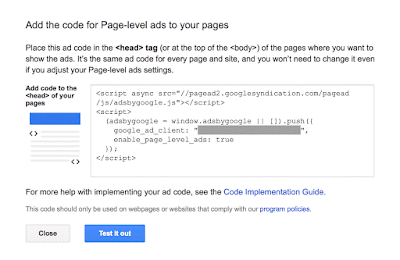
5. Copy the code

google adsense page-level ads code

6. Go to Blogger, then Template and Backup your Template
7. Click the 'Edit HTML' button and search for the </head> tag
8. Paste the page-level ad code above the </head> tag

Note: You will also need to replace the attribute async with async="async" in order to help complete the process, otherwise Blogger will give you an error message. Once you have completed these steps, all you need to do is save it to your template.

Test Page-level ads in your Blogger template

After installation, get out your mobile device so you can test the AdSense page-level ads and see if they are working correctly. You will need to be a visitor to your site in order to check out the ads.
  • Type #googleads at the end of the URL so you can access them
  • Select the ad format from the tabbed box that will appear above the body of the blog
  • Check out the ads
You will get to see the ads in action before the public does so that you can tell if they are working fine. If you are impressed with what you see, then it is ready to go. However, if you see something that you want to change or if the ads are not present, you'll need to start over again.

The Effectiveness of Page-level ads

Since October, 2015 when these ads were first rolled out the effectiveness that they have demonstrated is considerable. Today, the ads have been used in countries all over the world and they continue to impress. For those who have already used these mobile ads on WordPress or other blogger blogs you can see just how effective they have been in terms of reaching all of your visitors. In addition, the effect on your revenue may be considerable depending on the popularity of your blog.

In the end, AdSense page-level ads are remarkably effective for mobile use and will help you build a stronger income base for your blog.

How to Fix Mixed Content Errors in Blogspot Blogs

With HTTPS now automatic in Blogger the benefits have been considerable. However, there are some issues that are now facing bloggers thanks to this change in policy and one of the most common is mixed content errors.

What are mixed content errors?

This is when a web page becomes secured by SSL, but it contains both secure HTTPS and also the non-secure HTTP which is usually links, scripts, style sheets, video, and images. This results in browser errors that negatively affect the performance of your website and cause security issues. This means that source codes such as template, layout gadget, and post and paste may be causing the issues in the HTML side of the equation.

http to https

How to identify mixed content errors?

This is a fairly straightforward process that you can use through Google Chrome:

1. Visit blog using HTTPS, for example - https://yourblog.blogspot.com
2. Access the Chrome Menu at the top-right of your browser window and go to "More Tools" > "Developer Tools" and switch to the "Console" tab or use the CTRL + SHIFT + J keys to open the JavaScript console
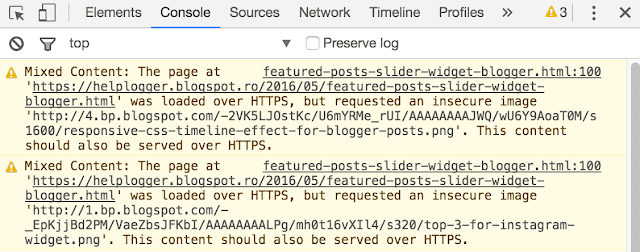
3. Look in the Console for mixed content errors which will look similar to these:

mixed content, chrome console

Examples of mixed content errors include, but are not limited to the following:

- Insecure Script Request
- Insecure Image Request
- Insecure URL Request

You should list all unsecured URLs and visit the other pages on your blog to check for other mixed content errors.

Fix the mixed content errors in a Blogger template

To fix the errors encountered which may be found in the template or layout, you will need to do the following:

1. Go to Blogger and select your blog, then click on "Template" and press the "Edit HTML" button
2. Click anywhere in the code area and press CTRL + F to search for http://

http:// to https:// blogger

3. Replace all http:// prefixes with https://

Verify that the new URLs using the HTTPS addresses work by opening them in a new window on your browser. If the links you are receiving provide the same results, then you can Save Template.

To check for layout errors:

Go to Blogger and click on 'Layout' > check for any HTML/JavaScript gadget and click 'Edit' on each gadget. Replace all http:// prefixes with https:// then verify that they are working and hit Save.

Fix the mixed content errors in Blogger posts and pages

To check for post and page errors, do the following:

1. Log into your Blogger Dashboard and select your blog, then click on 'Posts' or 'Pages' and select any post or page > hit the "Edit" link below the Post/Page title.

2. Once the Post editor opens, switch to the "HTML" tab and press CTRL + F keys to look for http:// prefixes. After you found them, replace http:// with https://

fix mixed content errrors

Be sure to verify that the new link works by opening up your browser and testing them. After you've tested them, hit Update.

Update to the Blogger post editor to fix mixed content

To find and fix mixed content errors automatically, Blogger has released a warning tool that alerts you to possible mixed content issues in your posts. All you need to do is go to "Edit" inside a post, switch to the "HTML" tab and hit the Update button. All of the errors will be presented along with the ability to fix them. Once they have been corrected, hit Update.

mixed content error

In the end, fixing these types of errors will greatly improve the performance of your blog, particularly when it comes to pages that may have this particular issue with mixed content generating errors. It also applies to custom domains as well as long as you have an SSL certificate. All it takes is a few minutes and you can greatly improve your blog site that has been impeded with mixed content errors.

Sunday, 29 May 2016

Automatic Featured Posts Slider Widget for Blogger

Anyone with a blog wants readers to stay rather than move on to another. It's not being selfish but after someone has read one post, you'd definitely want them to read another, right? After all, isn't it one of the tenets of SEO to make people stay longer on your blog if it has to have a fighting chance at the rankings game?

The question now is: how exactly do you entice them to read a few more of your blog posts?

First off, you don't know exactly what brought a reader to your site. Well, you sort of do, if you have Google Analytics and all that. But that's beside the point. It wouldn't be productive for you to stare at GA the entire day hoping that it will tell you that yes, someone has been perusing your blog.

The point being driven at here is that you have to offer more on your blog. It's not enough that you get traffic from search engines and other sites; you also have to add some extras that will entice visitors to stay longer.

How exactly do you do that?

The Tactics of Persuading Users to Stay

Bloggers have employed a variety of tactics to persuade readers to stay. For one, they load the sidebar with widgets for Popular Posts, for example. Of course, it would be in the interest of your readers to know which other posts on your blog are gaining traction. Maybe those pieces are of interest to them as well. As a result, you've got one surefire way of making readers stay.

Now, what if you want to highlight Featured Posts, for example? Let's say that your blog has been around for a number of years and in that span, it has produced some great content that received quite the number of shares, likes, +1s, comments on so on. Wouldn't that be the kind of post you want featured? Unless your reader was looking for that topic specifically, there's little chance that they might uncover that gem if you don't bring it to their attention.

Thankfully, it's quite possible to add a Featured Posts slider for Blogger. And if you don't know how to make one yourself, this is exactly what this post is for. Here's an awesome Featured Posts slider widget that you can use on your blog.


How to Add Featured Posts Slider Widget in Blogger

1. Go to 'Layout' > click the 'Add a gadget' link in the sidebar area and select 'HTML/JavaScript' gadget from the pop-up window.

2. Add the code below inside the empty box:
<style type="text/css">
ul.featured-widget-list,ul.featured-widget-list li{margin:0;padding:0;list-style:none;position:relative }ul.featured-widget-list li{display:none}ul.featured-widget-list li:nth-child(1){display:block;line-height:0}ul.featured-widget-list img{border:0;width:100%;height:auto}ul.featured-widget-list .featuredbg{width:100%;height:100%;position:absolute;z-index:2;left:0;top:0;opacity:.6;background-image:url(https://blogger.googleusercontent.com/img/b/R29vZ2xl/AVvXsEgCawSzXus0uoCdA9wY4eU6AsLZ7u7W0sLqbK8PwCc040Ib2fFC2sOFoDcQM8nCiuSqpyr0OjHxO4unlKujkQhs0hj3R_KGLuQnngRkX-CJ6OhJvG0DS_adnCseGWsIkyay_oDvY6MBGG8/s400/overlay-bg.png);background-position:0% 100%;background-repeat:repeat-x}ul.featured-widget-list .featuredbg:hover{opacity:.1}ul.featured-widget-list h5{position:absolute;left:0;right:0;text-align:center;bottom:10px;z-index:2;color:#fff;margin:0;text-transform: capitalize;padding:10px 20px;line-height:1.9em;letter-spacing:0.3px;font: 600 16px 'Abel', sans-serif;overflow:hidden}ul.featured-widget-list li:hover h5{bottom:30px}ul.featured-widget-list .featured-meta{font: 11px 'Abel', sans-serif;letter-spacing:0.3px;position:absolute;bottom:0;left:0;right:0;text-align:center;z-index:2;color:#fff;opacity:0}ul.featured-widget-list h5, ul.featured-widget-list .featured-meta {-webkit-transition: all 0.3s;-moz-transition: all 0.3s;-o-transition: all 0.3s;transition: all 0.3s;}ul.featured-widget-list li:hover .featured-meta{bottom:20px;opacity:1}.feat-buttons{position:absolute;top:50%;left:0;z-index:5;width:100%}
.feat-buttons a{text-indent:-9999px;margin:0 7px;width:15px;height:15px;padding:5px;background:#000;-ms-filter:"progid:DXImageTransform.Microsoft.Alpha(Opacity=60)";filter: alpha(opacity=60);-moz-opacity:0.6;-khtml-opacity:0.6;opacity:0.6;position:relative;-webkit-border-radius: 50%;-moz-border-radius: 50%;border-radius: 50%;}.feat-prev{float:left;}.feat-next{float:right;}.feat-buttons a.feat-prev::before, .feat-buttons a.feat-next::before{content:"";width:0;height:0;border-width:6px 7px;border-style:solid;border-color:transparent #fff transparent transparent;position:absolute;top:50%;margin-top:-6px;margin-left:-11px;left:50%}
.feat-buttons a.feat-next::before{border-color:transparent transparent transparent #fff;margin-left:-3px}
</style>
<div id="featuredbwidget"></div>
<link href='https://fonts.googleapis.com/css?family=Abel' rel='stylesheet' type='text/css'/>
<script src="http://ajax.googleapis.com/ajax/libs/jquery/1.8.0/jquery.min.js" type="text/javascript"></script>
<script type='text/javascript'>
//<![CDATA[
featuredbwidget({
listURL:"https://helplogger.blogspot.com/",
featuredNum:9,
listbyLabel:false,
feathumbSize:350,
interval:3000,
autoplay:true,
featuredID:"#featuredbwidget"
});
function featuredbwidget(a){(function(e){var h={listURL:"",featuredNum:3,featuredID:"",feathumbSize:300,interval:5000,autoplay:false,loadingFeatured:"nextfeatured",pBlank:"https://blogger.googleusercontent.com/img/b/R29vZ2xl/AVvXsEiEDR-2W__n0yZo2NhDx4QgpwNOX3tm2vFgu4M50q1N2q1atLliJl_XHosjX-EW5WAxSGxLk-F8qziojcn925d5Kj0X_ioe_2O00Pa9-1knXyENr0ybQZKVPnj0o9rWSIuz6oX7qyxhnrE/s500/no-image.png",byMonth:["Jan","Feb","Mar","Apr","May","Jun","Jul","Aug","Sep","Oct","Nov","Dec"],listbyLabel:false};h=e.extend({},h,a);var g=e(h.featuredID);var d=h.featuredNum*200;g.html('<div class="featslider"><ul class="featured-widget-list"></ul><div class="feat-buttons"><a href="#" class="feat-prev">Prev</a><a href="#" class="feat-next">Next</a></div></div>');var f=function(w){var q,k,m,u,x,p,t,v,r,l="",s=w.feed.entry;for(var o=0;o<s.length;o++){for(var n=0;n<s[o].link.length;n++){if(s[o].link[n].rel=="alternate"){q=s[o].link[n].href;break}}if("media$thumbnail" in s[o]){u=s[o].media$thumbnail.url.replace(/\/s[0-9]+\-c/g,"/s"+h.feathumbSize+"-c")}else{u=h.pBlank.replace(/\/s[0-9]+(\-c|\/)/,"/s"+h.feathumbSize+"$1")}k=s[o].title.$t;r=s[o].published.$t.substring(0,10);m=s[o].author[0].name.$t;x=r.substring(0,4);p=r.substring(5,7);t=r.substring(8,10);v=h.byMonth[parseInt(p,10)-1];l+='<li><a href="'+q+'"><div class="featuredbg"></div><img class="featuredthumb" src="'+u+'"/><h5>'+k+'</h5></a><div class="featured-meta"><span class="fdate"><span class="fday">'+t+'</span> <span class="fmonth">'+v+'</span> <span class="fyear">'+x+'</span></span> - <span class="fauthor">'+m+"</span></div></li>"}e("ul",g).append(l).addClass(h.loadingFeatured)};var c=function(){e(h.featuredID+" .feat-next").click()};var b=function(){e.get((h.listURL===""?window.location.protocol+"//"+window.location.host:h.listURL)+"/feeds/posts/summary"+(h.listbyLabel===false?"":"/-/"+h.listbyLabel)+"?max-results="+h.featuredNum+"&orderby=published&alt=json-in-script",f,"jsonp");setTimeout(function(){e(h.featuredID+" .feat-prev").click(function(){e(h.featuredID+" .featslider li:first").before(e(h.featuredID+" .featslider li:last"));return false});e(h.featuredID+" .feat-next").click(function(){e(h.featuredID+" .featslider li:last").after(e(h.featuredID+" .featslider li:first"));return false});if(h.autoplay){var i=h.interval;var j=setInterval(c,i);e(h.featuredID+" .featslider li:first").before(e(h.featuredID+" .featslider li:last"));e(h.featuredID+" .featslider").hover(function(){clearInterval(j)},function(){j=setInterval(c,i)})}e("ul",g).removeClass(h.loadingFeatured)},d)};e(document).ready(b)})(jQuery)};
//]]>
</script>

Automatic Featured Posts Slider Settings

  • listURL - replace "https://helplogger.blogspot.com/" with your blog URL
  • featuredNum - add the number of posts to display in the slider
  • listbyLabel - if you want to display posts by category / label, such as the tag fashion, it will be written as listbyLabel: "fashion"
  • feathumbSize - the size or dimension of the image in pixels
  • interval - time taken to change the slides position in milliseconds
  • autoplay - replace true with false if you don't want the slides to change automatically.
3. Once you are done with the settings, click the 'Save' button.

Now, this code is for a slider widget which means that instead of just a random list of Featured Posts, you get to display them with images (if they have one) and you can include effects too. You can also control how many slides should be shown because it just wouldn't be prudent to feature your entire oeuvre, right?

Plus, being a slider widget, it adds a nice little visual to your site. And we all know how visuals are important in enticing people to stay, don't we?

Wednesday, 6 April 2016

Blogger.com turns on HTTPS on all blogspot domain blogs

For many bloggers, enabling the free HTTPS support for your blog on blogspot offers a number of benefits. However, if the latest news from Blogger.com is true you may not need to manually enable the HTTPS support from now on. Every current non-HTTPS blogs are going to be automatically changed to HTTPS and this means a whole new world for bloggers and webmasters who use this particular domain.

First, this means that all blogs on blogspot will be granted a free SSL Certificate whether it is something that you want or not. Before, the webmaster was the one who decided whether the HTTPS was right for your site. Today, it has become mandatory which means that you will need to be prepared for the benefits and potential consequences.

Blogger.com turns on HTTPS on blogspot blogs

The Blogger.com HTTPS Notification

The notification that was sent out by Blogger.com essentially stated that everyone who visits a blog on their domain would be able to view it through an encrypted connection. In addition, all bookmarks and links will still work on your site, but the HTTPS Availability setting will no longer be present and your blog will always use the HTTPS version that is available.


Those who log into their Blogger account will see the message and can interpret for themselves the ramifications of what it truly means. It should be noted that this is only for domains on Blogger.com that are free and that the custom ones will continue to go on functioning as they have in the past. That means there will be no support provided by free SSL HTTPS to custom domains.

While this will naturally cause some concern for webmasters because Blogger.com does have some limitations that are well known, the truth is that this particular change may bring about a better, more secured experience to those visiting the sites as well as have a positive impact on search engine optimization (SEO).

What is HTTPS?

The use of Hyper Text Transfer Protocol Secure (HTTPS) is basically a secure version of HTTP. This means that the data which is transferred between the user and server is now encrypted and protected from access or hacking from unwanted third parties.

HTTPS as a ranking signal

Perhaps the most notable impact is how it will affect the SEO of your site. With Google in particular placing a higher importance of HTTPS as compared to HTTP sites, the secured connection actually makes a positive impact thanks to the additional security. Better security means higher ratings for your blog.

In addition, your blog might actually run a little better with a secured connection as compared to your competition, some of which might not enjoy such a connection.

Since all of your traffic will now be automatically diverted, there will not be a negative effect in terms of loss or lowering of your SEO. In fact, this is actually a good move for blogspot.com and is certainly a worthwhile addition to all of their blogs as the support offers solid benefits for every blogger who uses their domain.