Monday 23 December 2013

Popular Posts Widget for Christmas

The Christmas countdown has begun and while homes are decorated with colorful lights and the sweet smell of pine trees, there's no reason why we wouldn't decorate our Blogspot blog with Christmas bells next to the Popular Posts widget for Blogger!

So, today I was playing around a bit with CSS and I was thinking that it would be cool to add some fresh styles to the Popular Posts widget in such a way to look just ready for the forthcoming Christmas holiday.

popular posts widget, blogger gadgets

To see a demo for the Popular Posts widget for Christmas, please visit the demo blog:


How to Add Popular Posts Widget with Christmas Bells in Blogger

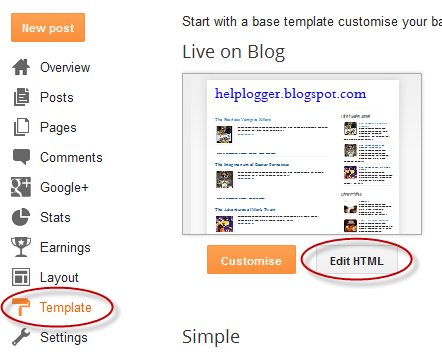
Step 1. Log in to your Blogger Dashboard, then go to 'Template' and click the 'Edit HTML' button:


Step 2. Click anywhere inside the code area and press the CTRL + F keys, then search for this tag:
</head>
Step 3. Just above the </head> tag, add the following CSS code:
<style>
#PopularPosts1 .item-thumbnail:before{
display: block;
content: url('https://blogger.googleusercontent.com/img/b/R29vZ2xl/AVvXsEjY_kKokwEjZvRP3oK3GLONP23wYkVxtYVuz_a_VBHUj8G5pC2DUc3iI4uLzqRdfkdK9tjfl8EWEzqBphr37WP7QZQpXSlsjw_4CXSru_Pjw0EN9iLTY1T-nCDirIWdogCu-83siy-TYVcd/s1600/bells.png');
margin-left: -15px;
margin-top: -5px;
z-index: 2;
position: absolute;
}
#PopularPosts1 .item-thumbnail img{
float:left;
margin:5px;
padding: 2px;
border: 6px solid #FED74C;
height: 72px;
width: 92px;
position: relative;
background: #F11C25;
-webkit-box-shadow: 2px 2px 5px rgba(0,0,0,0.3);
-moz-box-shadow: 2px 2px 5px rgba(0,0,0,0.3);
box-shadow: 2px 2px 5px rgba(0,0,0,0.3);
transition: opacity 1s ease;
}
#PopularPosts1 ul li:nth-child(odd){
  -ms-transform:rotate(20deg); /* IE 9 */
  -moz-transform:rotate(20deg); /* Firefox */
  -webkit-transform:rotate(20deg); /* Safari and Chrome */
  -o-transform:rotate(20deg); /* Opera */
 -webkit-transition: all 0.2s ease-in-out;
-moz-transition: all 0.2s ease-in-out;
-o-transition: all 0.2s ease-in-out;
transition: all 0.2s ease-in-out;
}
#PopularPosts1 ul li:nth-child(even){
  -ms-transform:rotate(-40deg); /* IE 9 */
  -moz-transform:rotate(-40deg); /* Firefox */
  -webkit-transform:rotate(-40deg); /* Safari and Chrome */
  -o-transform:rotate(-40deg); /* Opera */
 -webkit-transition: all 0.2s ease-in-out;
-moz-transition: all 0.2s ease-in-out;
-o-transition: all 0.2s ease-in-out;
transition: all 0.2s ease-in-out;
}
#PopularPosts1 ul li:nth-child(odd):hover{
  -ms-transform:rotate(0deg); /* IE 9 */
  -moz-transform:rotate(0deg); /* Firefox */
  -webkit-transform:rotate(0deg); /* Safari and Chrome */
  -o-transform:rotate(0deg); /* Opera */
}
#PopularPosts1 ul li:nth-child(even):hover{
  -ms-transform:rotate(0deg); /* IE 9 */
  -moz-transform:rotate(0deg); /* Firefox */
  -webkit-transform:rotate(0deg); /* Safari and Chrome */
  -o-transform:rotate(0deg); /* Opera */
}
#PopularPosts1 ul li{
display: inline-block;
float: left;}
#PopularPosts1 .item-thumbnail{
width: 70px;
}
#PopularPosts1 li{
margin-right: 15px;
}
#PopularPosts1 .item-snippet, .item-title{
display: none;
} </style>
Step 4. Click the 'Save Template' button to save the changes and you're done. Enjoy!

Also, please check out this tutorial on how to add falling snowflakes in the background of a Blogger blog.

Sunday 22 December 2013

How to Use Character Entities in CSS, HTML and JavaScript

Sometimes, when using scripts, we must write special characters like accents by using a special set of codes called character entities. However, these don't always look good or we get a question mark or other strange symbols. Usually, this is solved if the character encoding is done right but the logic may not always work.

In Blogger, special characters most of the time appear correctly, but when it is about other services, like external files, things can get complicated.

For example, this usually looks good and when you click on this link, you should see the letters in the right way:
alert(" � � � � �  ? ? ? ");
If we are trying to use other method and we want to use this type of characters, sometimes we need to write them in a special format called escape sequence which is nothing but a backslash followed by a letter and a number in hexadecimal format. In the case of common characters or accents, it would be \x followed by two hex digits:
\xe1 is the letter �
\xe9 is the letter �
\xed is the letter �
\xf3 is the letter �
\xfa is the letter �
Other combinations generate special characters:
\n is a line break
\t is the tab character
\' is single quote
\" is double quote
\\ is a back slash
Or we can use \u followed by the Unicode character code expressed as four hexadecimal digits:
\u00e1 is the letter �
\u00e9 is the letter �
\u00ed is the letter �
\u00f3 is the letter �
\u00fa is the letter �
This will allow us to see correctly what we couldn't before if we were using some other services:
alert(" \u263a \u2764 \u271b ");
On this page you can find a comprehensive list of all the characters, both symbols and different alphabets.

Although rare characters are not often used in the CSS, there is a case when they are necessary as well, like when using the content property with the :after and :before pseudo-elements.

The same criteria applies there, but we only need to add a backslash followed by the four-digit hexadecimal code. For example:
content: ":\24d1\24d4\24d5\24de\24e1\24d4";

content: ":after  \263a  \2724  \2602";
:??????
:after ? ? ?

Remember that IE doesn't understand the :before pseudoclass with content, and you would have to set the list-style-type property as none, or you would get 2 bullets in CSS compliant browsers.

Saturday 21 December 2013

How to Create a Sitemap or Table of Contents in Blogger

One of the limitations of a blog is that it doesn't have an index or sitemap of the site to make it easier for readers to find the content that they are searching for. While the blog archive and labels have all the information about the published post, these do not appear on a single page completely, so searching for more posts is not always easy.

Luckily, this gadget will help you to add a table of contents or sitemap on Blogger showing the index of all posts separated by categories that have been published. It will also show the latest posts with a text saying New!

table of contents, sitemap, blogger

Demo: You can see it in action by clicking here.

How To Add a Sitemap with a List of Posts to Blogger

To implement it on your blog, follow the steps below:

Step 1. Login to your Blogger Dashboard and select your blog

Step 2. Go to "Pages" > click the "New Page" button.

Step 3. Click on the HTML tab and paste the following code inside the empty box:
<style>
p.labels a{color: #242424; text-transform: uppercase;font-size: 15px;}
a.post-titles {color: #0000FF;}
ol li{list-style-type:decimal;line-height:25px;}
</style>
<script>
//<![CDATA[
var postTitle=new Array();var postUrl=new Array();var postPublished=new Array();var postDate=new Array();var postLabels=new Array();var postRecent=new Array();var sortBy="titleasc";var tocLoaded=false;var numChars=250;var postFilter="";var numberfeed=0;function bloggersitemap(a){function b(){if("entry" in a.feed){var d=a.feed.entry.length;numberfeed=d;ii=0;for(var h=0;h<d;h++){var n=a.feed.entry[h];var e=n.title.$t;var m=n.published.$t.substring(0,10);var j;for(var g=0;g<n.link.length;g++){if(n.link[g].rel=="alternate"){j=n.link[g].href;break}}var o="";for(var g=0;g<n.link.length;g++){if(n.link[g].rel=="enclosure"){o=n.link[g].href;break}}var c="";if("category" in n){for(var g=0;g<n.category.length;g++){c=n.category[g].term;var f=c.lastIndexOf(";");if(f!=-1){c=c.substring(0,f)}postLabels[ii]=c;postTitle[ii]=e;postDate[ii]=m;postUrl[ii]=j;postPublished[ii]=o;if(h<10){postRecent[ii]=true}else{postRecent[ii]=false}ii=ii+1}}}}}b();sortBy="titleasc";sortPosts(sortBy);sortlabel();tocLoaded=true;displayToc2();document.write('</br><div class="sitemap-link"><a href="http://helplogger.blogspot.com/2013/12/add-sitemap-table-of-contents-to-blogger.html" style="font-size: 10px; text-decoration:none; color: #5146CD;">Get This Widget</a></div>')}function filterPosts(a){scroll(0,0);postFilter=a;displayToc(postFilter)}function allPosts(){sortlabel();postFilter="";displayToc(postFilter)}function sortPosts(d){function c(e,g){var f=postTitle[e];postTitle[e]=postTitle[g];postTitle[g]=f;var f=postDate[e];postDate[e]=postDate[g];postDate[g]=f;var f=postUrl[e];postUrl[e]=postUrl[g];postUrl[g]=f;var f=postLabels[e];postLabels[e]=postLabels[g];postLabels[g]=f;var f=postPublished[e];postPublished[e]=postPublished[g];postPublished[g]=f;var f=postRecent[e];postRecent[e]=postRecent[g];postRecent[g]=f}for(var b=0;b<postTitle.length-1;b++){for(var a=b+1;a<postTitle.length;a++){if(d=="titleasc"){if(postTitle[b]>postTitle[a]){c(b,a)}}if(d=="titledesc"){if(postTitle[b]<postTitle[a]){c(b,a)}}if(d=="dateoldest"){if(postDate[b]>postDate[a]){c(b,a)}}if(d=="datenewest"){if(postDate[b]<postDate[a]){c(b,a)}}if(d=="orderlabel"){if(postLabels[b]>postLabels[a]){c(b,a)}}}}}function sortlabel(){sortBy="orderlabel";sortPosts(sortBy);var a=0;var b=0;while(b<postTitle.length){temp1=postLabels[b];firsti=a;do{a=a+1}while(postLabels[a]==temp1);b=a;sortPosts2(firsti,a);if(b>postTitle.length){break}}}function sortPosts2(d,c){function e(f,h){var g=postTitle[f];postTitle[f]=postTitle[h];postTitle[h]=g;var g=postDate[f];postDate[f]=postDate[h];postDate[h]=g;var g=postUrl[f];postUrl[f]=postUrl[h];postUrl[h]=g;var g=postLabels[f];postLabels[f]=postLabels[h];postLabels[h]=g;var g=postPublished[f];postPublished[f]=postPublished[h];postPublished[h]=g;var g=postRecent[f];postRecent[f]=postRecent[h];postRecent[h]=g}for(var b=d;b<c-1;b++){for(var a=b+1;a<c;a++){if(postTitle[b]>postTitle[a]){e(b,a)}}}}function displayToc(a){var l=0;var h="";var e="Post Title";var m="Click to sort by title";var d="Date";var k="Click to sort by date";var c="Category";var j="";if(sortBy=="titleasc"){m+=" (descending)";k+=" (newest first)"}if(sortBy=="titledesc"){m+=" (ascending)";k+=" (newest first)"}if(sortBy=="dateoldest"){m+=" (ascending)";k+=" (newest first)"}if(sortBy=="datenewest"){m+=" (ascending)";k+=" (oldest first)"}if(postFilter!=""){j="Click to view all"}h+="<table>";h+="<tr>";h+='<td class="header1">';h+='<a href="javascript:toggleTitleSort();" title="'+m+'">'+e+"</a>";h+="</td>";h+='<td class="header2">';h+='<a href="javascript:toggleDateSort();" title="'+k+'">'+d+"</a>";h+="</td>";h+='<td class="header3">';h+='<a href="javascript:allPosts();" title="'+j+'">'+c+"</a>";h+="</td>";h+='<td class="header4">';h+="Read all";h+="</td>";h+="</tr>";for(var g=0;g<postTitle.length;g++){if(a==""){h+='<tr><td class="entry1"><a href="'+postUrl[g]+'">'+postTitle[g]+'</a></td><td class="entry2">'+postDate[g]+'</td><td class="entry3">'+postLabels[g]+'</td><td class="entry4"><a href="'+postPublished[g]+'">Read</a></td></tr>';l++}else{z=postLabels[g].lastIndexOf(a);if(z!=-1){h+='<tr><td class="entry1"><a href="'+postUrl[g]+'">'+postTitle[g]+'</a></td><td class="entry2">'+postDate[g]+'</td><td class="entry3">'+postLabels[g]+'</td><td class="entry4"><a href="'+postPublished[g]+'">Read</a></td></tr>';l++}}}h+="</table>";if(l==postTitle.length){var f='<span class="toc-note">Show All '+postTitle.length+" Posts<br/></span>"}else{var f='<span class="toc-note">Show '+l+" posts by category '";f+=postFilter+"' the "+postTitle.length+" Total Posts<br/></span>"}var b=document.getElementById("toc");b.innerHTML=f+h}function displayToc2(){var a=0;var b=0;while(b<postTitle.length){temp1=postLabels[b];document.write("<p/>");document.write('<p class="labels"><a href="/search/label/'+temp1+'">'+temp1+"</a></p><ol>");firsti=a;do{document.write("<li>");document.write('<a class="post-titles" href="'+postUrl[a]+'">'+postTitle[a]+"</a>");if(postRecent[a]==true){document.write(' - <strong><span style="color: rgb(255, 0, 0);">New!</span></strong>')}document.write("</li>");a=a+1}while(postLabels[a]==temp1);b=a;document.write("</ol>");sortPosts2(firsti,a);if(b>postTitle.length){break}}}function toggleTitleSort(){if(sortBy=="titleasc"){sortBy="titledesc"}else{sortBy="titleasc"}sortPosts(sortBy);displayToc(postFilter)}function toggleDateSort(){if(sortBy=="datenewest"){sortBy="dateoldest"}else{sortBy="datenewest"}sortPosts(sortBy);displayToc(postFilter)}function showToc(){if(tocLoaded){displayToc(postFilter);var a=document.getElementById("toclink")}else{alert("Just wait... TOC is loading")}}function hideToc(){var a=document.getElementById("toc");a.innerHTML="";var b=document.getElementById("toclink");b.innerHTML='<a href="#" onclick="scroll(0,0); showToc(); Effect.toggle(\'toc-result\',\'blind\');">?? Display Table of Contents</a> <img src="https://blogger.googleusercontent.com/img/b/R29vZ2xl/AVvXsEhVYZ8c699dfXUAjETWM774lNDSPWnNmE3Xq6yC1Lq71gqPaA_pNwl4xlfhBdWmiAUVtRx3tyzypOorrhJZFnBRcdyfpjXRdgeO6y6OkdhZtwZtod9bgF2JvRSh2nYno801PO5SBN0T-wyp/s1600/new_icon.gif"/>'}function looptemp2(){for(var a=0;a<numberfeed;a++){document.write("<br>");document.write('Post Link : <a href="'+postUrl[a]+'">'+postTitle[a]+"</a><br>");document.write('Read all : <a href="'+postPublished[a]+'">'+postTitle[a]+"</a><br>");document.write("<br>")}};
//]]>
</script>
<script src="http://helplogger.blogspot.com/feeds/posts/default?max-results=9999&amp;alt=json-in-script&amp;callback=bloggersitemap"></script>
After adding the above code, replace http://helplogger.blogspot.com with the address of your blog.

How to Customize the Sitemap for Blogger

  • to change the color and font size of categories title, replace the values in red
  • to change the color of the links, replace the value in green
Step 4. Click "Options" on the right side of the post editor and select "Don't allow, hide existing" for the Reader comments.

Step 5. Finally, click the "Publish" button and see the page. That's it!

The index of the posts is sorted alphabetically and is updated automatically each time a new post is published.

Thursday 19 December 2013

Using JQuery + EasyDrag to Move Elements or Images by Clicking on Them

This is a simple and easy-to-use jQuery plugin which enables drag and drop functionality to make your site more interactive so that readers can "play" with certain elements on the page by dragging them from one side to another. For example, they can drag the images with a script to move them on any part of the blog just with a mouse click.


Drag and Drop Elements or Images on click with jQuery & EasyDrag

To see how this works, please visit the demo blog and click on any item, then move it anywhere on the screen:


Adding EasyDrag & jQuery to Move Elements or Images in Blogger

1. Login to your Blogger account, go to 'Template' and click the 'Edit HTML' button:


2. Click anywhere inside the template's code and press the CTRL + F keys to search for this tag:
</head>
3. Just before </head> paste the following scripts:
<script src='http://code.jquery.com/jquery-latest.js' type='text/javascript'/>
<script type='text/javascript'>
//<![CDATA[
(function($){var isMouseDown=false;var currentElement=null;var dropCallbacks={};var dragCallbacks={};var lastMouseX;var lastMouseY;var lastElemTop;var lastElemLeft;var dragStatus={};$.getMousePosition=function(e){var posx=0;var posy=0;if(!e)var e=window.event;if(e.pageX||e.pageY){posx=e.pageX;posy=e.pageY;}
else if(e.clientX||e.clientY){posx=e.clientX+document.body.scrollLeft+document.documentElement.scrollLeft;posy=e.clientY+document.body.scrollTop+document.documentElement.scrollTop;}
return{'x':posx,'y':posy};};$.updatePosition=function(e){var pos=$.getMousePosition(e);var spanX=(pos.x-lastMouseX);var spanY=(pos.y-lastMouseY);$(currentElement).css("top",(lastElemTop+spanY));$(currentElement).css("left",(lastElemLeft+spanX));};$(document).mousemove(function(e){if(isMouseDown&&dragStatus[currentElement.id]=='on'){$.updatePosition(e);if(dragCallbacks[currentElement.id]!=undefined){dragCallbacks[currentElement.id](e,currentElement);}
return false;}});$(document).mouseup(function(e){if(isMouseDown&&dragStatus[currentElement.id]=='on'){isMouseDown=false;if(dropCallbacks[currentElement.id]!=undefined){dropCallbacks[currentElement.id](e,currentElement);}
return false;}});$.fn.ondrag=function(callback){return this.each(function(){dragCallbacks[this.id]=callback;});};$.fn.ondrop=function(callback){return this.each(function(){dropCallbacks[this.id]=callback;});};$.fn.dragOff=function(){return this.each(function(){dragStatus[this.id]='off';});};$.fn.dragOn=function(){return this.each(function(){dragStatus[this.id]='on';});};$.fn.easydrag=function(allowBubbling){return this.each(function(){if(undefined==this.id||!this.id.length)this.id="easydrag"+(new Date().getTime());dragStatus[this.id]="on";$(this).css("cursor","move");$(this).mousedown(function(e){$(this).css("position","absolute");$(this).css("z-index","10000");isMouseDown=true;currentElement=this;var pos=$.getMousePosition(e);lastMouseX=pos.x;lastMouseY=pos.y;lastElemTop=this.offsetTop;lastElemLeft=this.offsetLeft;$.updatePosition(e);return allowBubbling?true:false;});});};})(jQuery);
//]]>
</script>
Note: If you already have jQuery, please remove the code in red.

4. Save the changes by clicking the 'Save template' button.

How to Move Elements or Images on Click Using EasyDrag & jQuery

Now, when you want to use EasyDrag to drag and drop an image, use the code below inside the HTML of your post or page (create a New post, then switch to the HTML tab):
<img id="easydrag1" src="image-URL" style="border: 0px none; cursor: move;" />
<script type="text/javascript">
$(function(){ $("#easydrag1").easydrag();});
</script>
Note: change the text in blue with the URL of your image and please note that each image has an unique id. Here, for example, the id is called easeydrag1 which has been added both in the HTML of the image and JavaScript function.

If you need to use EasyDrag to move a second element, then add your image with a different id, for example easydrag2, otherwise it won't work:
<img id="easydrag1" src="image-URL" style="border: 0px none; cursor: move;" />
<script type="text/javascript">
<img id="easydrag2" src="image-URL" style="border: 0px none; cursor: move;" />
<script type="text/javascript">
$(function(){ $("#easydrag1").easydrag();});
$(function(){ $("#easydrag2").easydrag();});
</script>

How to add a link to a draggable image?

We will add a JavaScript event, so that when we will double click on the image, to open the page we want.

The code to use should look something this:
<img id="easydrag1" style="cursor:move; border:0px;" ondblClick="javascript:window.open('link-URL')" src="image-URL" /><script type="text/javascript">
$(function(){ $("#easydrag1").easydrag();});
</script>
Using the script above, the image can be dragged around easily and be activated by double clicking on it.

Filter out your visits to your blog from Google Analytics traffic statistics

The results of daily visits in the web hit counters always have a margin of error. In most of them, this margin is very high, therefore the statistics shown are not even a bit closer to the actual visits we have. Google Analytics has a very short margin of error, which makes it more reliable, so that we have a better idea of how many people visit us.

However, if you visit your own website, either to check if everything works well, to review comments, to answer them, to see if anyone is online, or just because you need to enter, then your visit will also be registered in the counter. This implies that the margin of error is larger again, because those visits are not our actual visits and we are not interested in knowing how many times we are coming back to our site, but how many people from elsewhere are visiting.

Therefore what we can do is to filter our IP so that we won't be registered in the statistics and thus to get "cleaner" results on the total number of visits and page views.
  1. The first thing is to find out what is your IP address. Just type "what is my ip address" on google and above all of the results it will say "Your public IP address is..." or you can use an online service that shows your IP. There are many of these sites, one of them being http://whatismyipaddress.com... just go to the site and it will automatically show your IP.
  2. Login to your Google Analytics account and click "Admin" in the orange bar on the right side. This will take you to the account administration screen.
  3. On the left is the "Account" section and below you'll find a tab called All Filters, just click the "+NEW FILTER" button.
  4. Give the filter any name you'd like. Filter Type is "Predefined filter", "Exclude", choose "traffic from the IP addresses" and "that are equal to" then enter your four numbered IP address you looked up in step 1. Check whether it's IPv6 or not (if you don't know leave it unchecked).
  5. Save the changes.
Screenshot:

google analytics filters

You can add as many IP as you want, depending on how many different computers you use to access your site. And that's it. Now you can browse your site without registering a click in the Google Analytics metrics.

Monday 16 December 2013

How To Add Snow In The Background of Your Blog Using CSS

Today we�re going to go over a super simple CSS technique that you can use to make it snow on your Blogger blog. It seems particularly attractive since it doesn't require scripts, only CSS and three small images.

An advantage of this method is that by not using scripts doesn't overload the blog, the disadvantage being that users with not so modern browsers, will not be able to see it (in Internet Explorer works for version 10 and up).

The snow will fall in the background of the blog, which, in addition, prevent interfering with links or content (because the flakes are images), also prevent blocking the visibility of the content of the blog.

falling snow, snow, winter background, blogger


How To Add Falling Snow To Blogger Blogspot

Step 1. Go to "Template" and click on the "Edit HTML" button:


Step 2. Click the small arrow on the left of <b:skin>...</b:skin> to expand the style (screenshot 1) and click anywhere inside the code area to search by using the CTRL + F keys for the ]]></b:skin> tag (screenshot 2)

Step 3. Add the following code just above it:
/* Snow falling for Blogger
----------------------------------------------- */
@keyframes snow {
0% {background-position: 0px 0px, 0px 0px, 0px 0px;}
100% {background-position: 500px 1000px, 400px 400px, 300px 300px;}
}

@-moz-keyframes snow {
0% {background-position: 0px 0px, 0px 0px, 0px 0px;}
100% {background-position: 500px 1000px, 400px 400px, 300px 300px;}
}

@-webkit-keyframes snow {
0% {background-position: 0px 0px, 0px 0px, 0px 0px;}
100% {background-position: 500px 1000px, 400px 400px, 300px 300px;}
}

@-ms-keyframes snow {
0% {background-position: 0px 0px, 0px 0px, 0px 0px;}
100% {background-position: 500px 1000px, 400px 400px, 300px 300px;}
}

#falling-snow {
background-image: url(https://blogger.googleusercontent.com/img/b/R29vZ2xl/AVvXsEjptupgNv4CWLazrtNsZgaj7W8N-5P_VzL8vFTvy6Za5i1bflzGEopNuS-UuIuRm5sPmBrFe3l9PbEjfem8x0q_O4PsFLjiU8w6TBHLNPzOgd8FAPSCnVuW2AUVzdQ8A5mzxPdtRK9VdnBe/s1600/snow.png), url(https://blogger.googleusercontent.com/img/b/R29vZ2xl/AVvXsEi67WPAwz2zRnROrb-KhNXLV8TxWIcHR4BioofaxtTQmOQBDCag1H0oz2vfLHTYZqvSFp7qhSXRxigqcL_Fn0OgGmtxdXp9g-stpIhczD4Yh5Ud8nROEd-cqP97XWQfvmn-tAcXxQHzcphf/s1600/snow3.png), url(https://blogger.googleusercontent.com/img/b/R29vZ2xl/AVvXsEj6Az2EH59Tp85zIaZ2-Sw1v_mRuzSgDUdhzEqjXtK-ZWh75TgZpV-Odyxzzz0xhIdg6IeVjS0_BRY9RdYzKY4kTJAu4cnLymuM0vPV96OFK692v9dMfUVLBK1GXpDAMyKGboghyphenhyphen6Nkh_hY/s1600/snow2.png);
-webkit-animation: snow 20s linear infinite;
-moz-animation: snow 20s linear infinite;
-ms-animation: snow 20s linear infinite;
animation: snow 20s linear infinite;
}
Screenshot 1:


Screenshot 2:


Step 3. Now, search (CTRL + F) the <body> tag or if you can't find it, search this line below:
<body expr:class='&quot;loading&quot; + data:blog.mobileClass'>
Step 4. Just below the tag, add this:
<div id='falling-snow'>
Step 5. Finally, find the closing </body> tag and add this tag just above it:
</div>
Step 6. Save the changes and that's it. Enjoy! :)

As you can see this tricks is very simple and easy to install, does not block the visibility of blog's content and most important, it has no scripts, only CSS and nothing else.

Tuesday 19 November 2013

Recent Rotating Post Gadget with Excerpt For Blogger

This JavaScript code will display the latest posts of any feed, the difference being that it has two parts which can be used individually or combined. The top of this widget will show a single post along with the title (link), author, date and a brief summary of its content. In addition, this post will rotate automatically within a list whose number of elements will be decided by us. At the bottom, we'll find a full list with recent posts that, on mouse over, will replace the post above, thus breaking the automatic cycle.

Before adding anything, let's see it in action to decide if it does what we want.


recent posts widget for blogger

How to Add Recent Rotating Posts Widget to Blogger

Step 1. Go to "Layout" > click on the "Add a Gadget" link.


Step 2. From the pop-up window, choose the "HTML/JavaScript" gadget


Step 3. Paste this code inside the empty box:
<style>
.gfg-root {
width: 100%;
height : auto;
position : relative;
overflow : hidden;
margin: 0 auto;
text-align : center;
font-size: 12px;
border: 1px solid #DBDBDB;
}
.gfg-title {
font-size: 16px;
font-weight : bold;
color : #6B6B6B;
background:#F3F3F3;
background-repeat: repeat;
line-height : 1.4em;
overflow : hidden;
white-space : nowrap;
padding: 5px;
text-shadow: 0px 2px #fff;
}
.gfg-entry {
background-color: #FFFFFF;
width : 100%;
height : 9.2em;
position : relative;
overflow : hidden;
text-align : left;
margin-top : 3px;
}
.gf-title a {
text-transform: capitalize;
color: #0000ff;
font-size: 14px;
}
.gfg-subtitle {
display: none;
}
.gfg-list {
position : relative;
overflow : hidden;
text-align : left;
}
.gfg-listentry {
line-height : 1.5em;
overflow : hidden;
white-space : nowrap;
text-overflow : ellipsis;
padding-left : 15px;
padding-right : 5px;
}
.gfg-listentry-odd {
background-color : #F3F3F3;
border-bottom : 1px dotted #CCCCCC;
padding: 5px;
}
.gfg-listentry-even {
background-color : #F3F3F3;
border-bottom : 1px dotted #CCCCCC;
padding: 5px;
}
.gfg-listentry-odd a{
color: #595959;
padding: 0 0px 0 10px;
}
.gfg-listentry-even a{
color: #242424;
padding: 0 0px 0 10px;
}
.gfg-listentry-highlight {
background: #FFFFFF;
}
.gfg-listentry-highlight:before {
position: absolute;
left: 0;
content: '\25BA ';
font-size: 14px;
color: #DBDBDB;
}
.gfg-listentry-highlight a {
color: #242424;
}
.gfg-root .gfg-entry .gf-result {
position : relative;
background-color: #ffffff;
width : auto;
height : 100%;
padding-left : 20px;
padding-right : 5px;
}
.gfg-root .gfg-entry .gf-result .gf-title {
font-size: 14px;
line-height : 1.2em;
overflow : hidden;
white-space : nowrap;
text-overflow : ellipsis;
margin-bottom : 2px;
margin-top: 5px;
}
.gfg-root .gfg-entry .gf-result .gf-snippet {
height : 3.8em;
color: #000000;
margin-top : 3px;
}
.clearFloat {
clear : both;}</style>
<script src="http://www.google.com/jsapi" type="text/javascript"></script><script src="http://www.google.com/uds/solutions/dynamicfeed/gfdynamicfeedcontrol.js" type="text/javascript"></script>
<script type="text/javascript">
function showGadget() {var feeds = [{title:'List',url:'http://helplogger.blogspot.com/feeds/posts/default?redirect=false&start-index=1&max-results=10'},];
new GFdynamicFeedControl(feeds, 'feedGadget',{title: 'Latest Posts', numResults : 10, displayTime : 5000, hoverTime : 500});} google.load("feeds", "1");
google.setOnLoadCallback(showGadget);
</script>
<div id="feedGadget">Loading...</div>

How to Customize the Recent Rotating Post Gadget

The URL in blue is for the feed. So, the http://helplogger.blogspot.com URL should be replaced with the feed URL of your blog.

Next is start-index=1. This number indicates which post will appear first on the list. By default, it is the latest post published on your blog, so if you want to begin displaying older posts, change the 1 value.

max-results=10 indicates the maximum number of posts that we will be reading from the feed, beginning from the one that we have set up before in the start-index=1. This number always needs to be equal or greater to what we should see later and what it does is to set the number of posts that will be shown in the gadget. The easiest way would be to put 500 in order not to fail, but the higher the number is, the longer this gadget will take to load, so it's better to adjust to what we need to show.

Finally, here are some other script parameters:
  • title: 'Latest Posts', is the widget's title that appears on top.
  • numResults: 10, number of posts that will show in the list.
  • displayTime: 5000, the delay time between posts in the rotator (in milliseconds).
  • hoverTime: 500, minimum time for an item in the list to be displayed at the top.
If you want to hide the list and show only the posts, change this part:
.gfg-list {
position : relative;
overflow : hidden;
text-align : left;
}
To:
.gfg-list {
display:none;
}
If you want to display only the list, change this:
.gfg-entry {
background-color: #FFFFFF;
width : 100%;
height : 9.2em;
position : relative;
overflow : hidden;
text-align : left;
margin-top : 3px;
}
To:
.gfg-entry {
display: none; }

Step 4. Save the gadget and you're done adding the recent rotating post widget with excerpt in Blogger.

Tuesday 12 November 2013

Scriptaculous image slider/carousel for Blogger

Image galleries, sliders and slideshows have become increasingly popular within web pages and more and more developers have been creating these amazing powerful, versatile and sleek galleries. In this tutorial, you will see how to display the relevant content in an attractive and usable manner, by adding this beautiful carousel slideshow to display a gallery of images with a cool sliding effect.
image slider for blogger

blogger widgets, blogger slider


How to Add the Scriptaculous Image Slider on Blogger

Step 1. Log into your Blogger Dashboard and select your blog, then go to "Template" and click the "Edit HTML" button:


Step 2. Click anywhere on the code area and press the CTRL + F keys. This will open a search box - type the tag below and press ENTER to find it:
</head>

Step 3. Just above the </head> tag, add these scripts:
<script src='http://www.google.com/jsapi'></script>
<script>
google.load("prototype","1.7.0.0");
google.load("scriptaculous", "1.9.0");
</script>

<script type='text/javascript'>
//<![CDATA[
//Builds a carousel model
//License: This file is entirely BSD licensed.
//Author: Brian R Miedlar (c) 2004-2009 miedlar.com
//Dependencies: prototype.js
var OS=Class.create();OS.PageLoading=true;OS.PageLoadComplete=function(){OS.PageLoading=false;$A(OS.BehaviourQueue).each(function(selectors){OS.ApplyBehaviour(selectors);});OS.BehaviourQueue=[];};Event.observe(document,'dom:loaded',function(){OS.PageLoadComplete();});OS.BehaviourQueue=[];OS.RegisterBehaviour=function(selectors){if(!OS.PageLoading){OS.ApplyBehaviour(selectors);return;}
OS.BehaviourQueue.push(selectors);}
OS.ApplyBehaviour=function(selectors){$H(selectors).each(function(item){var sKey=item.key;var iDelay=0;var iToken=sKey.indexOf("!D");if(iToken>0){iDelay=parseFloat(sKey.substring(iToken+2))||0;sKey=sKey.substring(0,iToken);iDelay=parseInt(iDelay);}
$$(sKey).each(function(element){if(!iDelay){item.value(element);return;}
item.value.delay(iDelay,element);});});};Element.display=function(element,show){Element[(show)?'show':'hide'](element);}
var CarouselItem=Class.create();CarouselItem.prototype={initialize:function(){this.key=null;this.value=null;this.element=null;}};var Carousel=Class.create();Carousel.prototype={initialize:function(key,carouselElement,itemWidth,itemHeight,observer,options){this.loaded=false;this.key=key;this.observer=observer;this.carouselElement=$(carouselElement);if(!this.carouselElement){alert('Warning: Invalid carousel element: '+carouselElement);return;}
this.itemsElement=this.carouselElement.down('.items');if(!this.itemsElement){alert('Warning: Class \'items\' does not exist as a child element in carousel: '+carouselElement);return;}
this.items=[];this.activeItem=null;this.activeIndex=0;this.navScrollIndex=0;this.itemHeight=itemHeight;this.itemWidth=itemWidth;if(!options)options={};this.options=Object.extend({duration:1.0,direction:'horizontal',moveOpacity:.6,setSize:4,allowAutoLoopOnSet:false,allowAutoLoopOnIndividual:true},options);this.backElement=this.carouselElement.down('.navButton.previous');this.forwardElement=this.carouselElement.down('.navButton.next');if(this.backElement)Event.observe(this.backElement,'click',this.scrollBack.bind(this));if(this.forwardElement)Event.observe(this.forwardElement,'click',this.scrollForward.bind(this));},load:function(){var eList=this.itemsElement;this.items.clear();eList.select('.item').each(function(item){item.carouselKey=null;var sKey='';try{sKey=item.down('.key').innerHTML;}catch(e){alert('Warning: Carousel Items require a child with classname [key]');return;}
var oCarouselItem=new CarouselItem();if(this.options.itemParser)oCarouselItem.value=this.options.itemParser(item);oCarouselItem.index=this.items.length;oCarouselItem.key=sKey;oCarouselItem.element=item;this.items.push(oCarouselItem);if(item.hasClassName('selected')){this.activeItem=oCarouselItem;this.activeIndex=this.items.size()-1;}
if(this.options.setItemEvents)this.options.setItemEvents(this,item,oCarouselItem,this.observer);}.bind(this));this.loaded=true;this.afterLoad();},destroy:function(){this.loaded=false;var eList=this.itemsElement;this.items.clear();if(this.options.unsetItemEvents){eList.select('.item').each(function(item,ix){this.options.unsetItemEvents(this,item,this.items[ix],this.observer);}.bind(this));}},afterLoad:function(){if(this.items.length==0){alert('Warning: No Carousel Items Exist');return;}
this.moveToIndex(this.activeIndex);if(this.activeItem)this.activate(this.activeItem);if(this.observer.fireActiveCarouselLoaded)this.observer.fireActiveCarouselLoaded(this);},scrollForward:function(){var iIndex=0;if(this.navScrollIndex>this.items.length-(this.options.setSize+1)){if(!this.options.allowAutoLoopOnSet)return;}else{iIndex=this.navScrollIndex+(this.options.setSize-1);}
this.scrollToIndex(iIndex);},scrollBack:function(){var iIndex=this.navScrollIndex-(this.options.setSize-1);if(iIndex<0){if(!this.options.allowAutoLoopOnSet){iIndex=0;}else{iIndex=this.items.length-this.options.setSize;if(this.navScrollIndex>0||iIndex<0)iIndex=0;}}
this.scrollToIndex(iIndex);},getLeft:function(index){return index*(-this.itemWidth);},getTop:function(index){return index*(-this.itemHeight);},activate:function(carouselItem){if(this.activeItem)this.observer.fireDeactiveCarouselItem(this,this.activeItem.element,this.activeItem);if(carouselItem==null)return;this.activeItem=carouselItem;if(this.observer.fireActiveCarouselItem)this.observer.fireActiveCarouselItem(this,carouselItem.element,carouselItem);},reactivate:function(){if(!this.activeItem)return;this.activate(this.activeItem);},next:function(){if(this.activeItem==null){this.activate(this.items[0]);return;}
var iIndex=this.activeItem.index+1;if(iIndex>=this.items.length){iIndex=0;if(!this.options.allowAutoLoopOnIndividual)iIndex=this.items.length-1;}
this.activate(this.items[iIndex]);this.activeIndex=iIndex;if(iIndex==0){this.scrollToIndex(0);return;}
if(iIndex-this.options.setSize>=this.navScrollIndex-1)this.scrollForward();},previous:function(){if(this.activeItem==null){this.activate(this.items[0]);return;}
var iIndex=this.activeItem.index-1;if(iIndex<0){if(this.options.allowAutoLoopOnIndividual){iIndex=this.items.length-1;}else{iIndex=0;}}
this.activate(this.items[iIndex]);this.activeIndex=iIndex;if(iIndex==0){this.scrollToIndex(0);return;}
if(iIndex==this.items.length-1){var iNavIndex=this.items.length-this.options.setSize;if(iNavIndex<0)iNavIndex=0;this.scrollToIndex(iNavIndex);return;}
if(iIndex<this.navScrollIndex+1)this.scrollBack();},scrollToIndex:function(index,duration){if(index<0)index=this.activeIndex;duration=duration||this.options.duration;if(this.options.direction=='vertical'){var iPreviousTop=this.getTop(this.navScrollIndex);var iTop=this.getTop(index);var iCurrentTop=parseInt(Element.getStyle(this.itemsElement,'top'))||0;var offset=iPreviousTop-iCurrentTop;var move=iTop-iPreviousTop;if(move>0){move=move+offset;}else{move=move-offset;}
Element.setOpacity(this.itemsElement,this.options.moveOpacity);var ef=new Effect.Move(this.itemsElement,{'duration':duration,'y':move,'afterFinish':function(){Element.setStyle(this.itemsElement,{'top':iTop+'px'});Element.setOpacity(this.itemsElement,1.0);}.bind(this)});ef=null;}else{var iPreviousLeft=this.getLeft(this.navScrollIndex);var iLeft=this.getLeft(index);var iCurrentLeft=parseInt(Element.getStyle(this.itemsElement,'left'))||0;var offset=iPreviousLeft-iCurrentLeft;var move=iLeft-iCurrentLeft;if(move>0){move=move+offset;}else{move=move-offset;}
Element.setOpacity(this.itemsElement,this.options.moveOpacity);var ef=new Effect.Move(this.itemsElement,{'duration':duration,'x':move,'afterFinish':function(){Element.setStyle(this.itemsElement,{'left':iLeft+'px'});Element.setOpacity(this.itemsElement,1.0);}.bind(this)});ef=null;}
this.navScrollIndex=index;Element.display(this.forwardElement,this.navScrollIndex<=this.items.length-(this.options.setSize+1)||this.options.allowAutoLoopOnSet);Element.display(this.backElement,(parseInt(this.navScrollIndex)||0)!=0||this.options.allowAutoLoopOnSet);if(this.observer.fireCarouselAtIndex)this.observer.fireCarouselAtIndex(this,index);},moveToIndex:function(index){if(this.options.direction=='vertical'){var iTop=this.getTop(index);Element.setStyle(this.itemsElement,{'top':iTop+'px'});Element.setOpacity(this.itemsElement,1.0);}else{var iLeft=this.getLeft(index);Element.setStyle(this.itemsElement,{'left':iLeft+'px'});Element.setOpacity(this.itemsElement,1.0);}
this.navScrollIndex=index;Element.display(this.forwardElement,this.navScrollIndex<=this.items.length-(this.options.setSize+1)||this.options.allowAutoLoopOnSet);Element.display(this.backElement,(parseInt(this.navScrollIndex)||0)!=0||this.options.allowAutoLoopOnSet);}};var AppBehavior=Class.create();AppBehavior.Load=function(){OS.RegisterBehaviour(AppBehavior.CarouselRules);}
AppBehavior.CarouselRules={'#Carousel2':function(element){AppBehavior.PictureCarousel=new Carousel('PictureCarousel',element,70,70,AppBehavior,{setSize:5,duration:.5,direction:'horizontal',itemParser:function(item){var sKey=item.down('.key').innerHTML;var sCaption=item.down('.caption').innerHTML;var sPictureHtml=item.down('.picture').innerHTML;return{name:sCaption,pictureHtml:sPictureHtml};},setItemEvents:function(carousel,itemElement,carouselItem,observer){Event.observe(itemElement,'click',function(){carousel.activate(carouselItem);});},allowAutoLoopOnSet:true,allowAutoLoopOnIndividual:false});AppBehavior.PictureCarousel.load();},'#Cmd_NextItem':function(element){Event.observe(element,'click',function(){AppBehavior.ProfileCarousel.next();});},'#Cmd_PreviousItem':function(element){Event.observe(element,'click',function(){AppBehavior.ProfileCarousel.previous();});}}
AppBehavior.fireActiveCarouselLoaded=function(carousel){}
AppBehavior.fireActiveCarouselItem=function(carousel,element,item){element.addClassName('selected');switch(carousel.key){case'ProfileCarousel':$('ViewerCaption').update(item.value.name);$('ViewerData').update(item.value.email);Element.show('Viewer');break;case'PictureCarousel':$('ViewerCaption').update(item.value.name);$('ViewerData').update(item.value.pictureHtml);Element.show('Viewer');break;case'GroupCarousel':$('ViewerCaption').update(item.value.name);$('ViewerData').update(item.value.email);Element.show('Viewer');break;}}
AppBehavior.fireDeactiveCarouselItem=function(carousel,element,item){element.removeClassName('selected');switch(carousel.key){case'ProfileCarousel':Element.hide('Viewer');break;case'PictureCarousel':Element.hide('Viewer');break;case'GroupCarousel':Element.hide('Viewer');break;}}
AppBehavior.Load();
//]]>
</script>
Note: If you already have Scriptaculous and Prototype, it's not necessary adding the code in red but please note that this may not work with some versions of jQuery.

Step 4. Next, search for the following tag (for more info, see the screenshot below):
]]></b:skin>
image carousel, blogger image slider, blogger widgets
Screenshot
Step 5. Just above that tag, add this CSS code:
.carousel {
position:relative;
clear:both;
margin:10px -20px 20px;
border:2px solid #000; /* Carousel border */
background-color:#333333; /* Background color */
}
.carousel .navButton { cursor:pointer; display:block;
text-indent:-9999px;
background-repeat:none;
z-index:10;
}
.carousel .container {
position:absolute;
overflow:hidden;
}
.carousel .items {
position:absolute;  }
#Carousel2 {
height:88px; /* container height */
width:100%; /* container width */
}
#Carousel2 .container {
top:12px;
width:100%; /* container width for the visible images */
height:100px; /* container height for the visible images */
}
#Carousel2 .items { top:0; left:2px;
width:1700px; /* overall width for all the thumbnails */
}
#Carousel2 .item { height:70px; width:70px; float:left; clear:right; }
#Carousel2 .item .icon img { position:relative; left:0px; width:65px !important; height:65px; cursor:pointer;}
#Carousel2 .navButton { position:absolute; bottom:0px; width:24px; height:87px; }
#Carousel2 .navButton.previous { left:0px; background-image:url(https://blogger.googleusercontent.com/img/b/R29vZ2xl/AVvXsEiOvrrKI1hhts93kBUvft0wQoe4d7kXfCroTk5AGWe8xM4V6jrvAWWeyKvuqgLf4uPxpkigmCAA6zIEmM62LzY5MGghZ_c82EaCvBGgKOYSs_ddhrIYGeDzZs8_iokT021WUfxqOALeDHI/s1600/button-left.png); }
#Carousel2 .navButton.next { right:2px; background-image:url(https://blogger.googleusercontent.com/img/b/R29vZ2xl/AVvXsEj81Mj0qrYbn4zj4lLp6GGe3UDnXr7lxMTQeHaq8yFDYK8PGIx84rWoEp6AoeWCaQ6_IdhFAW64t3yIlLdVFOeDBel9iDnhdaxkKaf0fKPcRvIOAZHnHYk46zVxM3U6OfT4fm9AvkEQ-58/s1600/button-right.png); }
#Carousel2 .item .key { display:none;}
#Carousel2 .item .picture { display:none;}

Note:

Check the comments in green to see which parts you can customize, such as the border and background color of the carousel. Please note that the arrows are images, so if you want to change them, you need to replace the two URLs in blue with those of your images.

If you want to change the size of the container, change the /* container width */ (width of the carousel), the /* container width for the visible images */ (area where the thumbnails are visible) and the /* overall width of the thumbnails container */ value (1700px) which is the container for all the picutres that you added.

Step 6. To save the changes, click the "Save Template" button.

Step 7. Finally, go to "Layout" and click the "Add a Gadget" link. After the pop-up window opens, choose "HTML/Javascript" and paste the HTML structure of the carousel inside the empty box:
<div id="Carousel2" class="carousel">
<div class="button navButton previous" style="display:none;">Back</div>
<div class="button navButton next" style="display:none;">Forward</div>
<div class="container">
<div class="items">

<div class="item">
<div class="key caption">Thumb</div>
<div class="icon">
<a href="link URL"><img width="65" height="65" src="image URL" /></a></div>
<div class="picture"></div>
</div>

<div class="item">
<div class="key caption">Thumb</div>
<div class="icon">
<a href="link URL"><img width="65" height="65" src="image URL" /></a></div>
<div class="picture"></div>
</div>

<div class="item">
<div class="key caption">Thumb</div>
<div class="icon">
<a href="link URL"><img width="65" height="65" src="image URL" /></a></div>
<div class="picture"></div>
</div>

<div class="item">
<div class="key caption">Thumb</div>
<div class="icon">
<a href="link URL"><img width="65" height="65" src="image URL" /></a></div>
<div class="picture"></div>
</div>

<div class="item">
<div class="key caption">Thumb</div>
<div class="icon">
<a href="link URL"><img width="65" height="65" src="image URL" /></a></div>
<div class="picture"></div>
</div>

<div class="item">
<div class="key caption">Thumb</div>
<div class="icon">
<a href="link URL"><img width="65" height="65" src="image URL" /></a></div>
<div class="picture"></div>
</div>

<div class="item">
<div class="key caption">Thumb</div>
<div class="icon">
<a href="link URL"><img width="65" height="65" src="image URL" /></a></div>
<div class="picture"></div>
</div>

<div class="item">
<div class="key caption">Thumb</div>
<div class="icon">
<a href="link URL"><img width="65" height="65" src="image URL" /></a></div>
<div class="picture"></div>
</div>

<div class="item">
<div class="key caption">Thumb</div>
<div class="icon">
<a href="link URL"><img width="65" height="65" src="image URL" /></a></div>
<div class="picture"></div>
</div>

<div class="item">
<div class="key caption">Thumb</div>
<div class="icon">
<a href="link URL"><img width="65" height="65" src="image URL" /></a></div>
<div class="picture"></div>
</div>

<div class="item">
<div class="key caption">Thumb</div>
<div class="icon">
<a href="link URL"><img width="65" height="65" src="image URL" /></a></div>
<div class="picture"></div>
</div>

<div class="item">
<div class="key caption">Thumb</div>
<div class="icon">
<a href="link URL"><img width="65" height="65" src="image URL" /></a></div>
<div class="picture"></div>
</div>

<div class="item">
<div class="key caption">Thumb</div>
<div class="icon">
<a href="link URL"><img width="65" height="65" src="image URL" /></a></div>
<div class="picture"></div>
</div>

<div class="item">
<div class="key caption">Thumb</div>
<div class="icon">
<a href="link URL"><img width="65" height="65" src="image URL" /></a></div>
<div class="picture"></div>
</div>

<div class="item">
<div class="key caption">Thumb</div>
<div class="icon">
<a href="link URL"><img width="65" height="65" src="image URL" /></a></div>
<div class="picture"></div>
</div>

<div class="item">
<div class="key caption">Thumb</div>
<div class="icon">
<a href="link URL"><img width="65" height="65" src="image URL" /></a></div>
<div class="picture"></div>
</div>

<div class="item">
<div class="key caption">Thumb</div>
<div class="icon">
<a href="link URL"><img width="65" height="65" src="image URL" /></a></div>
<div class="picture"></div>
</div>

<div class="item">
<div class="key caption">Thumb</div>
<div class="icon">
<a href="link URL"><img width="65" height="65" src="image URL" /></a></div>
<div class="picture"></div>
</div>

<div class="item">
<div class="key caption">Thumb</div>
<div class="icon">
<a href="link URL"><img width="65" height="65" src="image URL" /></a></div>
<div class="picture"></div>
</div>

</div>
</div>
</div>
Note: Replace the text in blue with your links and image URLs. The link URL is optional, so you can add it only if you want to link the images to some posts.

Step 8. Once you added your pics to the carousel, click the "Save" button to save the widget and make it visible on your blog.

If you wish to add more images or remove some, change the width of the thumbnails as well, otherwise some pictures will appear behind the others.

To add more pictures, paste the following code just before the </div> tags in red:
<div class="item">
<div class="key caption">Thumb</div>
<div class="icon">
<a href="link URL"><img width="65" height="65" src="image URL" /></a></div>
<div class="picture"></div>
</div>

Saturday 9 November 2013

How to Write SEO Optimized Blog Posts

I'm not an SEO expert and what you will read further is not top secret, but the basic optimization that everyone should apply in order to write SEO optimized blog posts. And with these techniques, effort and a bit of patience, you can occupy the best places in the search results of different search engines.

Obviously, not all cases are the same, neither all blogs are positioned in the same manner, some might have greater competition than others depending on how popular the topic is; therefore, when it comes to web ranking, there's no specific time that applies for all. Having said this, let's get to the point of this post.

Focus on a topic

Whatever the topic of your blog is, when you try to write a seo optimized blog post, focus on a specific topic that has a clear purpose, with no distractions. For example, if you write about "Digital Cameras", then the beginning and ending of your post should be only about it. Don't start talking about digital cameras and end up telling about what you have done last weekend. A reader goes to a page because is looking for a specific information. So, unless it is not a personal blog (where you write about your daily life), do not deviate from the topic.

Define the post title

The post title should be short and to the point, so that you can briefly summarize the content of the post. But you shouldn't abuse this either. Although it has to be concise, don't try to 'save' words which might be keys to the search.

Examples:
A collection of all the cameras that have been released last year on the market
The best digital cameras of 2013
Clearly, the first one hasn't been defined very much, and the second one is not only more accurate, but it is also more relevant for what people are searching on the internet.

The keywords

Keywords are those terms that the most people are searching for on the internet and you should try focusing on them when writing a post; these keywords need to be included throughout the entire post, but be careful to not overstuff your content with them.

Related: How to Choose the Right SEO Keywords

Example:
During the fourth week of the technology, there were many products that are used today, and the most famous experts gave a speech on them.
At the opening of the fourth Technology Week, the experts talked about various topics, including how to choose a digital camera, had discussions about the pros and cons of the iPad, and which are the best smartphones.
In the first example, we have written without paying attention to any terms. While, in the second one, we used phrases that are searched on the internet by the most users.

So, the most popular keywords should be included wisely without cluttering your posts with them, or it can be counterproductive.

Again, these keywords should be included in the posts title, as well.

Rely on synonyms

While it is a good strategy to use specific keywords, we should not limit ourselves to a single word. It is recommended using synonyms because users do not name things in same way and using less keywords, we can avoid leaving the impression that we are being too repetitive and insistent.

Examples:
For those who enjoy good quality pictures, Nikon D7000s Digital Camera is a 16.2 megapixel digital camera that takes great pictures.
For those who enjoy good quality images, Nikon D7000s is a 16.2 megapixel digital camera that takes excellent pictures.
In the first example, we have repeated the word 'digital camera' and 'pictures' twice. While, in the second one, we used the digital camera keyword once and changed the word 'pictures' with 'images'.

This way, the reader will find a greater diversity of words and might enjoy the article more.

Using bold and italics

A good practice when you write seo optimized blog posts would be to make the keywords bold by wrapping them in strong tags, so that they will stand out from the rest. But keep in mind that this shouldn't be done with CSS, but with HTML, i.e. they should not be tagged with font-weight: bold; but rather with <b> or even better, with <strong>.

Examples:
For those who enjoy good quality images, Nikon D7000s is a 16.2 megapixel digital camera that takes excellent pictures.
The result seems to be the same, but it is not. Although these three keywords are in bold, only one is more attractive to robots, which is the first:
For those who enjoy <strong>good quality images</strong>, <b>Nikon D7000s</b> is a 16.2 megapixel <span style="font-weight: bold;">digital camera</span> that takes excellent pictures.
The same goes for the italics. Use them for highlighting important words, but don't place them between font-style: italic; but rather between <i> or even better <em>.
For those who enjoy <strong>good quality images</strong>, <em>Nikon D7000s</em> is a 16.2 megapixel <span style="font-style: italic;">digital camera</span> that takes excellent pictures.
Again, the first one has a better chance of ranking than the others. Thus, it is recommended to highlight the keywords in bold and italics, or to put them between <strong> and </strong>, or between <em> and </em>.

Using External Links

Some may say that we shouldn't use links in the posts because we are giving away our Page Rank. This is not quite true. Using referral links to sites that have already shaped their credibility, will also help us to shape our own. Certainly, we should not flood our posts with links, but we can do it when is needed and especially with sites that talk about the same topics as our own.

Another important thing to mention is that, we should avoid putting the typical "click here" or similar texts. When you put a link, the anchor text should be fairly descriptive.

Examples:
<a href="Link URL">Click here</a> to know more
More information about <a href="Link URL">digital cameras</a>
In the first example, the anchor text is not relevant and descriptive, but in the second it is.

Rank with your images

Posts with images are not only visually appealing, but might help the reader to understand what you are talking about. So, whenever you can, use an image in your post to illustrate the writing, but don't overdo it. Many images or very large images can slow the loading time of the blog.

Related: How to Optimize Images for Better SEO Rankings

New and relevant content

You should focus not only on writing many posts, but also making them relevant to your readers. New and original content is more attractive to the search engines, than a copy & paste (actually, the last gets penalized). So try to write new stuff, even if you think that all has been said. Each person has a different way of saying things.

Also, always get informed before writing a post. Do a research and see if the information is valid; based on that, you will gain the trust of your readers.

Final Words


With these few techniques you can increase the chances of ranking your posts higher in search engines. As I mentioned earlier, these aren't things that no one heard about, but I know that many are beginners and may not know how to write seo optimized blog posts.

It does not hurt repeating that the results won't appear overnight, but with some effort and patience, you should see the desired results over time.

Monday 28 October 2013

How to Add a Tiny jQuery Circleslider to Blogger

Tiny Circleslider is a small jQuery plugin generating a circular carousel of images that we can slide infinitely (circular). When clicking on the red dot, the main picture moves to the left and another set of images will slide out.

There is nothing complicated about using this type of carousel, however when it is about customizing it, we need to use a bit of arithmetic. All these details can be found in the author's homepage, so I'll just limit myself to show you the basics.

To see it in action, please visit the below demo blog and just drag the red dot:


tiny jquery circleslider, image slider

Adding the Tiny CircleSlider to a Blogger Blog

In order to make it work, first task is to add the javascript jQuery library in the template:

Step 1. Log in to your Blogger account > select your blog

Step 2. Go to "Template" and hit the "Edit HTML" button:

blogger template, edit html

Step 3. Click anywhere on the code area and search by using the CTRL + F keys for this tag:
</head>
blogger template html

Step 4. Just above the </head> tag, add the following scripts:
<script src='http://ajax.googleapis.com/ajax/libs/jquery/1.10.2/jquery.min.js' type='text/javascript'/>
<script>
//<![CDATA[
/*! Tiny Circleslider - v2.0.8 - 2015-08-08
 * http://www.baijs.com/tinycircleslider
 *
 * Copyright (c) 2015 Maarten Baijs <wieringen@gmail.com>;
 * Licensed under the MIT license */

!function(a){"function"==typeof define&&define.amd?define(["jquery"],a):"object"==typeof exports?module.exports=a(require("jquery")):a(jQuery)}(function(a){function b(b,e){function f(){return k(),w.append(x.first().clone()).css("width",B.width*(x.length+1)),g(),r(0),v.move(v.options.start,v.options.interval),v}function g(){G&&(b[0].ontouchstart=u,b[0].ontouchmove=q,b[0].ontouchend=s),y.bind("mousedown",u);var c=function(b){return b.preventDefault(),b.stopImmediatePropagation(),v.stop(),v.move(a(this).attr("data-slide-index")),!1};G&&b.delegate(".dot","touchstart",c),b.delegate(".dot","mousedown",c)}function h(a){E=setTimeout(function(){v.move(v.slideCurrent+1,!0)},a?50:v.options.intervalTime)}function i(a){return a*(Math.PI/180)}function j(a){return 180*a/Math.PI}function k(){var c=document.createDocumentFragment();z.remove(),x.each(function(b,d){var e=null,f=parseInt(a(d).attr("data-degrees"),10)||360*b/v.slidesTotal,g={top:-Math.cos(i(f))*v.options.radius+A.height/2-D.height/2,left:Math.sin(i(f))*v.options.radius+A.width/2-D.width/2};z.length>0&&(e=z.clone(),e.addClass(a(d).attr("data-classname")).css(g),c.appendChild(e[0])),v.dots.push({angle:f,slide:d,dot:e})}),v.dots.sort(function(a,b){return a.angle-b.angle}),a.each(v.dots,function(b,c){a(c.dot).length>0&&a(c.dot).addClass("dot-"+(b+1)).attr("data-slide-index",b).html("<span>"+(b+1)+"</span>")}),b.append(c),z=b.find(".dot")}function l(a,b){var c,d,e;return a>b?(c=a-b,d=-(b+360-a)):(c=a+360-b,d=-(b-a)),e=c<Math.abs(d)?c:d,[e,d,c]}function m(b){var c=9999,d=9999,e=9999,f=0,g=0,h=0;return a.each(v.dots,function(a,i){var j=l(i.angle,b);Math.abs(j[0])<Math.abs(e)&&(e=j[0],h=a),Math.abs(j[1])<Math.abs(c)&&(c=j[1],f=a),Math.abs(j[2])<Math.abs(d)&&(d=j[2],g=a)}),[[h,f,g],[e,c,d]]}function n(a){return 0>a?360+a%-360:a%360}function o(a,b,c){var d=a,e=!1;Math.abs(a)>Math.abs(b)?(d=-b,e=!0):I?requestAnimationFrame(function(){o(d,b+a)}):F=setTimeout(function(){o(d,b+a,.9*c)},c),v.angleCurrent=n(v.angleCurrent-d),r(v.angleCurrent,e)}function p(a){return{x:H?a.targetTouches[0].pageX:a.pageX||a.clientX,y:H?a.targetTouches[0].pageY:a.pageY||a.clientY}}function q(a){var c=b.offset(),d={left:p(a).x-c.left-A.width/2,top:p(a).y-c.top-A.height/2};return v.angleCurrent=n(j(Math.atan2(d.left,-d.top))),I||r(v.angleCurrent),!1}function r(a,c){closestSlidesAndAngles=m(a),closestSlides=closestSlidesAndAngles[0],closestAngles=closestSlidesAndAngles[1],w.css("left",-(closestSlides[1]*B.width+Math.abs(closestAngles[1])*B.width/(Math.abs(closestAngles[1])+Math.abs(closestAngles[2])))),y.css({top:-Math.cos(i(a))*v.options.radius+(A.height/2-C.height/2),left:Math.sin(i(a))*v.options.radius+(A.width/2-C.width/2)}),c&&b.trigger("move",[x[v.slideCurrent],v.slideCurrent])}function s(b){return a(b.target).hasClass("dot")?!1:(v.dragging=!1,b.preventDefault(),a(document).unbind("mousemove mouseup"),y.unbind("mouseup"),v.options.dotsHide&&z.stop(!0,!0).fadeOut("slow"),v.options.dotsSnap&&v.move(m(v.angleCurrent)[0][0]),void 0)}function t(){v.dragging&&(r(v.angleCurrent),requestAnimationFrame(function(){t()}))}function u(b){return b.preventDefault(),H="touchstart"==b.type,v.dragging=!0,a(b.target).hasClass("dot")?!1:(v.stop(),a(document).mousemove(q),a(document).mouseup(s),y.mouseup(s),v.options.dotsHide&&z.stop(!0,!0).fadeIn("slow"),I&&t(),void 0)}this.options=a.extend({},d,e),this._defaults=d,this._name=c;var v=this,w=(b.find(".viewport"),b.find(".overview")),x=w.children(),y=b.find(".thumb"),z=b.find(".dot"),A=(x.find("a"),{width:b.outerWidth(!0),height:b.outerHeight(!0)}),B={width:x.first().outerWidth(!0),height:x.first().outerHeight(!0)},C={width:y.outerWidth(!0),height:y.outerHeight(!0)},D={width:z.outerWidth(),height:z.outerHeight()},E=null,F=null,G="ontouchstart"in window,H=!1,I="requestAnimationFrame"in window;return this.dots=[],this.slideCurrent=0,this.angleCurrent=0,this.slidesTotal=x.length,this.intervalActive=!1,this.start=function(a){return v.options.interval&&(v.intervalActive=!0,h(a)),v},this.stop=function(){return v.intervalActive=!1,clearTimeout(E),v},this.move=function(a){var b=Math.max(0,isNaN(a)?v.slideCurrent:a);b>=v.slidesTotal&&(b=0);var c=v.dots[b]&&v.dots[b].angle,d=l(c,v.angleCurrent)[0],e=d>0?-2:2;return v.slideCurrent=b,o(e,d,50),v.start(),v},f()}var c="tinycircleslider",d={interval:!1,intervalTime:3500,dotsSnap:!1,dotsHide:!0,radius:140,start:0};a.fn[c]=function(d){return this.each(function(){a.data(this,"plugin_"+c)||a.data(this,"plugin_"+c,new b(a(this),d))})}});
//]]>
</script>
Please note that if you already have another version of jQuery, you will need to remove the line in red.

Step 5. Now, let's add the CSS styles above the same </head> tag:
<style>
  #rotatescroll { /* is the rectangle container */
    height: 300px;
    position: relative;
    width: 300px;
  }
  #rotatescroll .viewport { /* is the rectangle containing the images */
    height: 300px;
    position: relative;
    margin: 0 auto;
    overflow: hidden;
    width: 300px
  }
  #rotatescroll .overview { /* is the list with the images */
    left: 0;
    list-style: none;
    margin: 0;
    padding: 0;
    position: absolute;
    top: 0;
  }
  #rotatescroll .overview li { /* each item of the list */
    float: left;
    height: 300px;
    position: relative;
    width: 300px;
  }
  #rotatescroll .overlay { /* the image with the circle overlapping the list */
    background: transparent url(https://blogger.googleusercontent.com/img/b/R29vZ2xl/AVvXsEh7xJDQBm_5ax2B5nsqUuoedYdUjDvZo0ybiPpTtI2PDKn4e4RbjN8LRJ6VfDcb1p-BD5uZk1MO4JtfLuDKPSpkgTi19pKtbY8UZgrAwTBOuo8saj43oyVwhjVrO5wPfLccxTVEor5aUQ4Z/s1600/bg-rotatescroll.png) no-repeat 0 0;
    height: 300px;
    left: 0;
    position: absolute;
    top: 0;
    width:300px;
  }
  #rotatescroll .thumb { /* the red circle that allows us to navigate */
    background:transparent url(https://blogger.googleusercontent.com/img/b/R29vZ2xl/AVvXsEgErSbwYT26M5SXK3MjVpKiS1qRvQJOSqADc4UTsad80PC5H_Xji6aAcE6OUaQmNWygBypGuE8Nq01vSFM08OodXy93uNudViE5QJDKtpwA4PWRX846HJCLhMP4fPnQn47VK0EiMFbFbEmv/s1600/bg-thumb.png) no-repeat 0 0;
    cursor: pointer;
    height: 26px;
    left: 137px;
    position: absolute;
    top: -3px;
    width: 26px;
    z-index: 200;
  }
  #rotatescroll .dot { /* the points indicating the position of each image */
    background: transparent url(https://blogger.googleusercontent.com/img/b/R29vZ2xl/AVvXsEjX0tgVm4Sb4iiFdz3rAN4AJNTyaCqEkfutRF7tbSlQ18MADXYQHqxUiFwT2wOjDEHlLGZMRan8wQxYIbhSBdLQHhBsKyb_7BSD58Co8OIwLxgzN1SWRihsHLirzBzmg9yz3zi5vKM_mpga/s1600/bg-dot.png) no-repeat 0 0;
    display: none;
    height: 12px;
    left: 155px;
    position: absolute;
    top: 3px;
    width: 12px;
    z-index: 100;
  }
  #rotatescroll .dot span { /* are hidden by default */
    display: none;
  }
 #rotatescroll .viewport ul.overview li img {
   width: 300px;
   min-height: 300px;
   object-fit: cover;
   padding:0;
   border:0;
 }
</style>
Screenshot
Step 6. Save the changes by clicking the "Save Template" button

And here's the HTML that has to be added to where we want to display the carousel. To add it inside a post, click the "New post" button on the left side of your dashboard and paste the below code in the "HTML" box of your post:
<div id="rotatescroll">
  <div class="viewport">
    <ul class="overview">
      <li><img src="imageURL" /></li>
      <li><img src="imageURL" /></li>
      <li><img src="imageURL" /></li>
      <li><img src="imageURL" /></li>
      <li><img src="imageURL" /></li>
    </ul>
  </div>
  <div class="dot"></div>
  <div class="overlay"></div>
  <div class="thumb"></div>
</div>

<script type="text/javascript">
$(document).ready(function(){
$('#rotatescroll').tinycircleslider({
interval: true,
snaptodots: true
});
});
</script>
blogger template
Adding HTML inside a Blogger post

Replace the imageURL text with the URL of your images.

Some other options that could be added, separated by commas:
  1. snaptodots: false if you want no dots to be shown when dragging them
  2. hidedots: false if you want to display the internal points (by default is true)
  3. intervaltime - is the time between slides (by default 3500)
  4. radius - defines the size of the circle (by default is 140)
To add the Tiny jQuery Circleslider to your sidebar, simply go to "Layout" > click the "Add a Gadget link" > from the popup window, choose "HTML/Javascript" and paste the code inside the empty box.

Sunday 27 October 2013

Turn off the lights with jQuery

For those who enjoy watching videos on the internet, this is a very useful script made with jQuery by Janko. And what this script does? It will turn off the lights for you, so that everything on the page will be fading to dark, except the video, and everything around the video will be less visible, in a way that nothing will distract you while watching it.

You can test it on the following demo blog - click the link that says "Turn off the lights" and the page will be darkened. To make the page elements visible again, just click the "Turn on the lights" link:


How to add the "Turn off the Lights" Feature to Blogger/Blogspot

Step 1. Log into your Blogger account and click on your blog, then go to "Template" and hit the "Edit HTML" button


Step 2. Click anywhere inside the code area and search for the following tag by pressing the CTRL + F keys (hit Enter to find it):
</head>

Step 3. After you found it, paste the below scripts just above it:
<script src='http://ajax.googleapis.com/ajax/libs/jquery/1.10.2/jquery.min.js' type='text/javascript'/>
<script type='text/javascript'>
//<![CDATA[
$(document).ready(function(){
$("#lightsoff").css("height", $(document).height()).hide();
$(".lightSwitcher").click(function(){
$("#lightsoff").toggle();
if ($("#lightsoff").is(":hidden"))
$(this).html("Turn off the lights").removeClass("turnedOff");
else
$(this).html("Turn on the lights").addClass("turnedOff");
});
});
//]]>
</script>
Note: if you already have one version of jquery in the template, please remove the line in red.

Step 4. Now search for the following tag:
]]></b:skin>
Step 5. Just above ]]></b:skin> add the following CSS code:
/* Turn off the lights
----------------------------------------------- */
#lightsVideo {
position:relative;
z-index:102;
}
#switch {
max-width:640px;
text-align:left;
position:relative;
height:25px;
display:block;
}
.lightSwitcher {
position:absolute;
z-index:101;
background-image:url(https://blogger.googleusercontent.com/img/b/R29vZ2xl/AVvXsEiT9vob3o38u2awSLhEaVDlSOQ1XV_MsPvpl6RDl1LqHvxqkMyWXNZpDB-m9uRqeHXMaJWkWhTW9Nnz1IJ83U-ZInfzl1G-lm7XlzMpHrxQgj5uOsTiN_PQlze-ZlVi9psmAXYH2rPWeSS9/s1600/lights-on.png);
background-repeat:no-repeat;
background-position:left;
padding: 0 0 0 20px;
outline:none;
text-decoration:none;
}
.lightSwitcher:hover {text-decoration:underline;}
.turnedOff {
color:#ffff00 !important;
background-image:url(https://blogger.googleusercontent.com/img/b/R29vZ2xl/AVvXsEiFGwaOsJmnbPn3CeSKFRxdH3EWBlKVzM1nNm3y6yVxGlXMbylygwNy2W-icSsZ33rt7-49DrVLLl0v56kULr2u3sbJWcy4E9azcHqkWOHn4CNz_C-H8ayue0YhFK84nwuhG4FAoHxVRo_A/s1600/lights-off.png);
}
#lightsoff {
background:#000;
opacity:0.9;
filter:alpha(opacity=90);
position:absolute;
left:0;
top:0;
width:100%;
z-index:100;
}
Step 6. Finally, find this tag:
</body>
Just above the </body> tag, add this HTML code:
<div id='lightsoff'/>
Step 7. Click the "Save Template" button and that's it!

Now, each time you add a video, either in a post or using a HTML/Javascript gadget, use this code:
<center>
<div id="switch"><a class="lightSwitcher" href="javascript:void(0);">Turn off the lights</a></div>
<div id="lightsVideo">
...Here goes the code of the video...
</div>
</center>
Add the iFrame code of your video instead of the text in blue and "Save" the gadget or "Publish" your post. Now you can enjoy your videos with the lights off!

Remember that this trick uses jQuery and if you have another version of jQuery, you need to remove it, otherwise it might not work.

Before/After Photo Effect with jQuery

If you have a design or makeup blog, or if you are using before and after image comparison, this script will most likely be useful for you. In this tutorial, you will see how to add the Before/After plugin, a script that works with jQuery in order to display two pictures dynamically for comparing them at the same time.

To see how it works, click on the demo link from below and drag horizontally the small bar to see both images that are being compared:


Implementing this script is really easy. We just need jQuery, the Before/After script, and the two images to compare.

How to add Before/After Effect on Blogger Images

Step 1. Go to "Template" and click on the "Edit HTML" button. Once the template HTMK editor opens up, click anywhere inside the code area and press the CTRL + F keys to search for the following tag - hit Enter to find it:
</head>
Step 2. Right before </head> paste the following scripts:
<script src='http://ajax.googleapis.com/ajax/libs/jquery/1.10.2/jquery.min.js' type='text/javascript'/>
<script src='http://code.jquery.com/ui/1.10.3/jquery-ui.js' type='text/javascript'/>
<script type='text/javascript'>
//<![CDATA[
(function(a){a.fn.extend({beforeAfter:function(b){var d={animateIntro:false,introDelay:1000,introDuration:1000,showFullLinks:true,imagePath:"/js/beforeAfter/"};var b=a.extend(d,b);var c=Math.round(Math.random()*100000000);return this.each(function(){var e=b;var h=a(this);var n=a("img:first",h).width();var p=a("img:first",h).height();a(h).width(n).height(p).css({overflow:"hidden",position:"relative",padding:"0"});var m=a("img:first",h).attr("src");var j=a("img:last",h).attr("src");a("img:first",h).attr("id","beforeimage"+c);a("img:last",h).attr("id","afterimage"+c);a("img",h).remove();a("div",h).css("float","left");a(h).prepend('<div id="dragwrapper'+c+'"><div id="drag'+c+'"><img width="8" height="56" alt="handle" src="https://blogger.googleusercontent.com/img/b/R29vZ2xl/AVvXsEiZTu2oXnVMMf1la8vsEAo1tUL7slvgu9GYjF454z1MP2DqGq2F_VFRQxEN8EtgzH3uOMoxHeg1dxoaHhsVu8-7WCca5th41kRVoU9gKLuyGxrPH-wytPNuklj9lLGd7BBeYcjb2gkT0nEw/s1600/handle.png" title="Drag to the left or right to see the Before/After" id="handle'+c+'" /></div></div>');a("#dragwrapper"+c).css({position:"absolute",padding:"0",left:(n/2)-(a("#handle"+c).width()/2)+"px","z-index":"20"}).width(a("#handle"+c).width()).height(p);a("#dragwrapper"+c).css({opacity:0.25});a("div:eq(2)",h).height(p).width(n/2).css({"background-image":"url("+m+")",position:"absolute",overflow:"hidden",left:"0px","z-index":"10"});a("div:eq(3)",h).height(p).width(n).css({"background-image":"url("+j+")",position:"absolute",overflow:"hidden",right:"0px"});a("#drag"+c).width(2).height(p).css({background:"#888",position:"absolute",left:"3px"});a("#beforeimage"+c).css({position:"absolute",top:"0px",left:"0px"});a("#afterimage"+c).css({position:"absolute",top:"0px",right:"0px"});a("#handle"+c).css({"z-index":"100",position:"relative",cursor:"pointer",top:(p/2)-(a("#handle"+c).height()/2)+"px",left:"-3px"});a(h).append('<img src="https://blogger.googleusercontent.com/img/b/R29vZ2xl/AVvXsEiT8bxiPRPEp7XvHggj4QWal9nSjlcBt64OG0TcgkMkUyDkVqkKlwdoBrq935RclkPXhbqAyQ6nL_szFkXuUxqDM4DBHhCDcBZS7S38OqKokOgNXoMeO0Jr3To2IqZRCQy7BqkhWKEBJJ24/s1600/b_a-lt-small.png" width="7" height="15" id="lt-arrow'+c+'"><img src="https://blogger.googleusercontent.com/img/b/R29vZ2xl/AVvXsEitHUVpCwpakVm4N5USGtzraIAAEStCQtrFpVj9MoP0BNC0sKPIh-0YnBPJW-ti-Uv1z3GlrtXgREo0CqthJg7lwlt6-Qb7GeHC7TJCiFn5zSmQxcXNcb8blG6gJ4cu5ZOPGsZIuH7hPym8/s1600/b_a-rt-small.png" width="7" height="15" id="rt-arrow'+c+'">');if(e.showFullLinks){a(h).after('<div class="balinks" id="links'+c+'" style="position:relative"><span class="bflinks"><a id="showleft'+c+'" href="javascript:void(0)">Show only before</a></span><span class="bflinks"><a id="showright'+c+'" href="javascript:void(0)">Show only after</a></span></div>');a("#links"+c).width(n);a("#showleft"+c).css({position:"relative",left:"0px"}).click(function(){a("div:eq(2)",h).animate({width:n},200);a("#dragwrapper"+c).animate({left:n-a("#dragwrapper"+c).width()+"px"},200)});a("#showright"+c).css({position:"absolute",right:"0px"}).click(function(){a("div:eq(2)",h).animate({width:0},200);a("#dragwrapper"+c).animate({left:"0px"},200)})}var g=a("#dragwrapper"+c).offset();var k=g.left;var i=a("div:eq(2)",h).width();var f=a("div:eq(3)",h).width();a("#dragwrapper"+c).draggable({handle:a("#handle"+c),containment:h,axis:"x",drag:function(q,o){var s=a(this).offset();var r=s.left-k;a("div:eq(2)",h).width(i+r);a("#lt-arrow"+c).stop().animate({opacity:0},0);a("#rt-arrow"+c).stop().animate({opacity:0},0)}});if(e.animateIntro){a("div:eq(2)",h).width(n);a("#dragwrapper"+c).css("left",n-(a("#dragwrapper"+c).width()/2)+"px");setTimeout(function(){a("#dragwrapper"+c).css({opacity:1}).animate({left:(n/2)-(a("#dragwrapper"+c).width()/2)+"px"},e.introDuration,function(){a("#dragwrapper"+c).animate({opacity:0.25},1000)});a("div:eq(2)",h).width(n).animate({width:n/2+"px"},e.introDuration,function(){l()})},e.introDelay)}else{l()}function l(){a(h).hover(function(){a("#lt-arrow"+c).stop().css({"z-index":"20",position:"absolute",top:p/2-a("#lt-arrow"+c).height()/2+"px",left:parseInt(a("#dragwrapper"+c).css("left"))-10+"px"}).animate({opacity:1,left:parseInt(a("#lt-arrow"+c).css("left"))-6+"px"},200);a("#rt-arrow"+c).stop().css({position:"absolute",top:p/2-a("#lt-arrow"+c).height()/2+"px",left:parseInt(a("#dragwrapper"+c).css("left"))+10+"px"}).animate({opacity:1,left:parseInt(a("#rt-arrow"+c).css("left"))+6+"px"},200);a("#dragwrapper"+c).animate({opacity:1},200)},function(){a("#lt-arrow"+c).animate({opacity:0,left:parseInt(a("#lt-arrow"+c).css("left"))-6+"px"},350);a("#rt-arrow"+c).animate({opacity:0,left:parseInt(a("#rt-arrow"+c).css("left"))+6+"px"},350);a("#dragwrapper"+c).animate({opacity:0.25},350)});a(h).click(function(q){var r=q.pageX-this.offsetLeft;var o=n-r;a("#dragwrapper"+c).stop().animate({left:r-(a("#dragwrapper"+c).width()/2)+"px"},600);a("div:eq(2)",h).stop().animate({width:r+"px"},600);a("#lt-arrow"+c).stop().animate({opacity:0},50);a("#rt-arrow"+c).stop().animate({opacity:0},50)});a(h).one("mousemove",function(){a("#dragwrapper"+c).stop().animate({opacity:1},500)})}})}})})(jQuery);
//]]>
</script>
<script type='text/javascript'>
$(function(){
$(&#39;#beforeafter1&#39;).beforeAfter({showFullLinks : true});
});
</script>
Step 3. Click the "Save template" button to save your changes.

Note: if the above script doesn't work for you, add it above the </body> tag. Also, please see if you have added jQuery in your template (if you did so, then remove the line in green).

Step 3. To add it as a gadget - go to "Layout" and click on the "Add a gadget" link, then choose "HTML/Javascript" option. Paste this code inside the empty box:
<div id='beforeafter1'>
<div><img alt='before' src='URL of the first image' width='500' height='291'/></div>
<div><img alt='after' src='URL of the second image' width='500' height='291'/></div>
</div>
Add the URL of the first image that is the "Before" image, and the URL of the second image that should be the "After" image. Also, don't forget to specify the width and height of each picture, so that they work on all browsers (see the part in orange where you need to add the height and width of your images).

If you want to add more images, you will need to change the ID of the container. In my example, the container is called beforeafter1, so you will need to change it to beforeafter2 and so on, although, you can choose any name.

Then, add another line, like the blue one from below, in the first code that you added in step 2:
<script type='text/javascript'>
$(function(){
$(&#39;#beforeafter1&#39;).beforeAfter({showFullLinks : true});
$(&#39;#beforeafter2&#39;).beforeAfter({showFullLinks : true});
});
</script>
You can add as many before/after images as you want, as long as all containers have a different ID and the corresponding lines are added in the script.

Below each image /photo container are the "Show only Before" and "Show only after" links that once clicked, will display the "before" or "after" picture. If you want to hide these links, then just change "true" to "false" in the first code (step 2) and they will not be displayed anymore.

Note: if you see white space around the drag icons, then search for this code in your template:
   <Group description="Images" selector=".main-inner">
     <Variable name="image.background.color" description="Background Color" type="color" default="#ffffff" value="#ffffff"/>
And change the #ffffff value to transparent.

Credit: Catch my fame.