Saturday 20 December 2014

How to Build High Quality Backlinks

One of the secrets to creating more web traffic with your posts is to build in some backlinks. To build high quality backlinks is one of the most popular methods to boost your content over the competition. However, finding the right methods to build the backlinks is going to take a little effort.

Everything starts with understanding what a backlink is and what it will do for your content. From there, you can then extend your efforts to build even more backlinks using creative and effective means that maximizes the potential of your content.
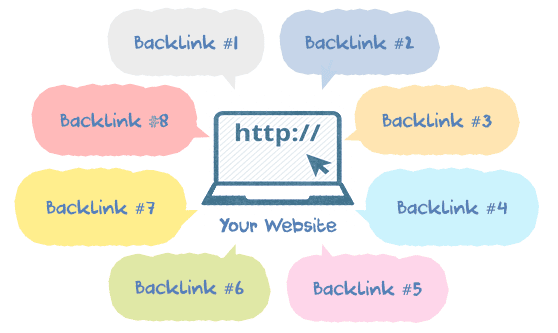
backlinks

What is a Backlink?

A backlink is an incoming hyperlink that connects the web page or content to another website. Backlinks are very important when it comes to page ranking as Google rates them highly. However, the backlinks themselves must be of good quality in order to generate the rankings needed to boost your content ahead of the competition.

Quality of the backlinks is important because having 10 good ones will beat 200 bad ones in terms of Google rankings. So, you must strive for quality each and every time. However, it will take time to build up backlinks to your articles because people will have to see it and then decide to link to it in order to add more value to their site.

If you look at adding good backlinks as a long term strategy, you will eventually reap the rewards that they offer. What follows are some interesting ways to start building good quality backlinks so that you can start your success today a little bit at a time.

Create Long, Interesting Posts

One of the easiest ways to start creating good backlinks is by writing a good, long tutorial post that uses images, charts and other graphics to really make it interesting. It will need to be from 1000 to 1200 words long and not have any filler, so the information really needs to be good and tight to make it interesting.

How-To guides often make the best long posts, especially if you can really hit the details so that people will fully understand how to do what you are explaining to them.

Participate in Forums

A person who is active in the forums when it comes to the subject that you are writing is building a network of potential fans who might offer high quality backlinks to their work. This is a delicate matter as you don't want to come across as someone only interested in what they can do for you. This will mean offering quality backlinks to those who participate in the forum as well if you find their articles useful and informative.

Write e-Books

An e-Book is one of the best ways to help spread the word about your talents and you can ask your friends to share it with the world through social media as well. You can also send your links to the best in social bookmarking sites as well to help augment your efforts.

With e-Books, you don't have to write very many, but it does help if you create ones that are very useful, highly readable and can be shared so that you can build high quality backlinks.

Create Special Days

One of the more interesting ways to build high quality backlinks is creating special days like St. Patrick's Day, Halloween or Valentine's Day to offer discounts on your products or services. You can actually build up to the day as well with special writing and content features to help pull in more traffic.

Remember, you'll need to do some research on your audience to see what type of holidays and content works best for their interest, but Valentine's Day is one that everyone shares, so that is an easy one to write good content, or run a contest that is bound to get good, high quality backlinks.

Have Free Products

Everyone likes free products and this can help you boost the number of visitors to your website. You can have a free e-Book or even a promotional gift if you want. While it may take some investment, the result will be getting more web traffic which in turn creates more demand for your products or services.

Videos

YouTube may very well be the biggest marketing tool of the moment with no signs of slowing down. If you can create a funny, interesting video then you will start getting some great backlinks. Today, the technology to create a solid, professional-looking video is dirt cheap compared to just a decade ago.

You can create "how-to" videos or find something interesting to make a video about as long as it relates to the industry in which your business is in. The key is to do something fun and enjoyable for your audience so that they will start sharing it with their friends.

Interact with Other Blogs

When you read a blog or see a video you like that is within your industry, don't just say "good job" and leave it at that. Write a good, interesting comment or review so that you can really share your thoughts. Remember to be positive, articulate and get right to the point. If you can write your thoughts in an entertaining, audience-pleasing way, you can start building up an audience for your comments and reviews.

Do Guest Blogging

Want to make a great impression? Find a good place to guest blog and write until you get that post to go viral. This will not only attract you an audience, but by helping out someone else you will build high quality backlinks as well.

It will take time, effort and the ability to write well. But if you can pull it off, your stint as a guest blogger will pay off big time for your efforts. The key is to write something that attracts people's attention and provides you with a place to write again for the blogger.

Guest blogging can be very rewarding in more ways than one, so if you have the time to do it right, then you should market your services as a guest blogger.

These are just some of the methods you can use to build high quality backlinks and start building up your web traffic.

What to Do Before Applying for Google AdSense

It seems that everyone wants to make money by joining up with Google AdSense and why not? Google AdSense is a relatively simple, straightforward way to actually start earning some extra money with your efforts. However, things have changed from the early days of AdSense when joining was not much of an issue. Today, applying for AdSense takes more effort and some preparation so that you can take full advantage of their services.

First, you will need a good reason to apply for AdSense so you can reap the benefits that they offer. Here you will find out more about what Google AdSense is all about, what they offer and how you can properly prepare yourself before joining to really take advantage.

applying to google adsense

What is Google AdSense?

One of the most established internet networks to offer advertisement publishing, AdSense uses the Pay Per Click (PPC) system to help businesses reach out to others on the web. At one time, Google used to provide AdSense to everyone who used their Blogspot program, but now that has changed.

Today, AdSense is one of the most respected thanks to the many thousands of satisfied publishers and customers who use the service. It is straightforward, easy to use and always pays on time which makes it very attractive to anyone wanting to have this service. If you do your work the right way, it will pay better than any other similar service on the web.

However, it is their very success that now makes them harder to join. When you apply, everything has to be just right otherwise you will not be approved.

How to Avoid Getting Your Application Rejected

There are a number of things to avoid when applying for AdSense so that your entry will not be discarded. Here are just a few.

Read Google Policies: Just like studying for a test, Google posts their policies about what it takes for your site to get into AdSense. So, take the time to read them and be sure that your website follows the rules.

Have Good Content: If your website doesn't have good or sufficient content, it will not be accepted. So, be sure that you provide them with enough to review. In addition, it has to be neat, professional and grammatically correct otherwise it will give them the excuse to toss out your application.

Aesthetically Pleasing: Garish yellows and lots of distracting glitz will also stop you in your tracks when you apply for AdSense. Your website should have a good, solid design that is comfortable to look at and pleasing for the visitor.

Post Your Contact Information: If Google cannot find a way to contact you through your website, you might as well not apply. Having an "About Us" page with a contact form is the minimum to getting accepted.

Now that you've done the basics, it is time to hedge your bets when it comes to applying for AdSense by adding in items and procedures that will enhance your chances. While nothing is guaranteed, the following steps will help your website in getting approved.

10 Ways to Increase Your Chances when Applying for AdSense

1. Policy for Privacy

It may seem odd to have a privacy policy for your blog, but it is vital if you want to get AdSense approval. Without it, you might as well not apply at all. The policy itself should describe to those who visit your blog what they will see and what they can and cannot do.

2. Contact Information

This is where you put in your contact information. At the very least, it should consist of an email so that readers can contact you directly about any issue they have on your blog.

3. About Us

This is where you tell people a little about who you are, what your business does and how you are going to accomplish it. This is sort of like an introductory page to your efforts and it critical when you apply for Adsense.

4. Email & Name Verification

Be sure that you put your email as well as your name in your About Me or Contact Us page so that it will help Google verify you quickly.

5. Verify Age

Always use your correct name and date of birth when applying for AdSense. This is mostly for those who are under 18, but it is important to be truthful otherwise you'll never get approved.

6. Appropriate Design

Your blog should look attractive, professional and easy to use. You don't have to be fancy or pour in thousands of dollars, just make it clean and neat will be sufficient.

7. Have Plenty of Posts

Do you know that there is no minimum number of posts stated by Google in terms of what is required for joining AdSense? Even so, if you only have a handful, do not count on getting approved. You should shoot for about 500 or so before applying to demonstrate your seriousness about your efforts and make sure that they are at least 500 words in length.

8. Remember the Rules

No pornography, illegal items, advocating drug use or other items that will not get you any AdSense at all. Plus, if your posts are all less than 200 words, that will not work either.

9. Adds Value

Your blog or website must provide real value for your audience. This will not only help keep people visiting your site, but it will also impress Google as well.

10. Unique, Top Level Domain

Basically, this means that your domain should be a ".com" in order to succeed. Plus, the name itself needs to be short as possible, related to your area of interest and easy to remember.

When applying for AdSense, you will need to keep all of these things in mind so that you will be accepted. However, all of the attributes that Google AdSense requires are also ones that will boost your website as well. So, keep this in mind when you apply for AdSense because the result will be a blog that will start earning you another income stream that can build over time.

Monday 15 December 2014

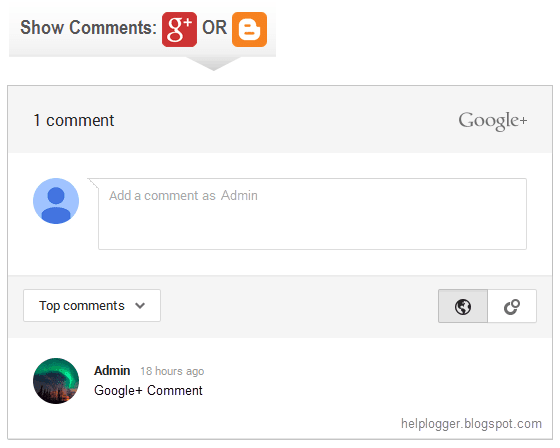
Show/Hide Blogger and Google+ Comments System With Toggle

Many Blogger site owners received the new Google+ Comment System pretty negatively because it forced all commenting users to create their own Google+ account before they were able to write a comment. The Google+ Comment System on Blogger was convenient to writers, but discouraged many users from continuing to comment on blogs because they simply didn't want to use Google+. For those that did use Google+ to make a comment, Blogger would never email you and notify you that someone left a comment; you could go days or weeks without ever realizing that you never responded to a reader.

In addition to frustrating your audience, the Google+ Comment System on Blogger depended upon the URL of your blog post. By changing your URLs or moving around your blog posts internally, you run the risk of losing every one of your comments that was placed using Google+.

Previously, the only way to solve this problem was to disable the comment system through your account settings, thus giving up your ability to use their Google+ account. Now, there's an easy new way to have the best of both worlds. Allowing fans of Google+ as well as everyday blog readers to access all same features, you�ll be able to engage every visitor equally. You can respond to comments while still being able to communicate with other Google+ users outside of your site and take advantage of the Google+ Comment System on Blogger.

google plus comments, blogger

How to Integrate Blogger and Google Plus Comments

To make the installation as simple as possible, I used inline jQuery and CSS, but who wants can change this code later. Also, the most accessible place I found to add it would be just after <b:include data='post' name='post'/>. So, let's start adding it:

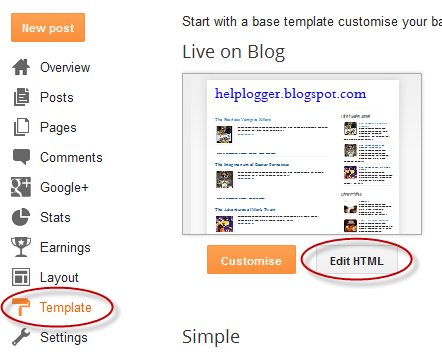
Step 1. Log into your Blogger account and select your blog > go to 'Template' and press the 'Edit HTML' button on the right side.


Step 2. Click anywhere inside the code area and press CTRL + F keys to open the editor's search box and search for the following code:
<b:include data='post' name='post'/>
Step 3. Just after <b:include data='post' name='post'/> add the following code:
<b:if cond='data:blog.pageType == &quot;item&quot;'>
<style>#comments, #gplus-comments-visibility {display:none;} .comments-icons {background: url(https://blogger.googleusercontent.com/img/b/R29vZ2xl/AVvXsEjOTsse9rksB4GOFqKQMQnWPRSSOUVCm1GppY04nywBKhQvS7jSFuLTP1k9nqvjte7OxRBNYN1crEec_wHLqHIbQtXRqH-ufA_xpwg529RV3Y0yBlx_BHJdfaLEHhCX4xITeYQjldQ2oS-q/s1600/speech-bubble.png) no-repeat; font-size: 20px; font-family: &quot;Arial Narrow&quot;,Arial,sans-serif; color: #555; font-weight: bold; padding: 18px 15px 0; height: 70px; } .comments-icons a img {vertical-align: middle;}</style>
<div class='comments-icons'>
Show Comments: <a class='show-hide-comments' href='javascript:void();' onclick='$(&quot;#gplus-comments-visibility&quot;).slideToggle();$(&quot;#comments&quot;).hide();'><img class='gplus-icon' height='35' src='https://blogger.googleusercontent.com/img/b/R29vZ2xl/AVvXsEjpR-PhWrHkCzUdFzER_VDPZFXJB0-jaVwnptzk9hIsppFrNH2neqzoHTusJZY2BQ0b5HncGbwkOCaA0zDsfvj9OO3-ggjgPK48G1be04z-rnaQGb3cqllNVvuecW0to8tKO5mWcciSZCF8/s1600/google-plus-logo.png' width='35'/></a> OR <a class='show-hide-comments' href='javascript:void();' onclick='$(&quot;#comments&quot;).slideToggle();$(&quot;#gplus-comments-visibility&quot;).hide();'><img class='blogger-icon' height='35' src='https://blogger.googleusercontent.com/img/b/R29vZ2xl/AVvXsEjAsFWFGGuWBksiukI61HE7l4aHNm4Xm6m2PVW2v2r4vEuryj4AV_C9D776uTm9FbQ1WS0v9I_b739Kl8gNuSfHCa3fi_7MQ218hYY1xRef5G_QSlJcoaMzntPgyyuHYy6nfreIG87X1V-A/s1600/blogger-logo.png' width='35'/></a>
</div>
<div id='gplus-comments-visibility'>
<div class='g-comments' data-first_party_property='BLOGGER' data-view_type='FILTERED_POSTMOD' data-width='550' expr:data-href='data:post.url'/>
</div>      
</b:if>

Note: data-width is for setting the width of the comment box, so the number (550) indicated there can be changed according to the design of your blog.

Step 4. Press the "Save Template" button located at the top of the editor and view your blog to see if you have successfully added Google+ commenting system to Blogger.

Please note that in order to make this work, you need to make sure that you are using a version of jQuery in your site. Otherwise, add this line just above the </head> tag using the HTML template editor:
<script src='https://ajax.googleapis.com/ajax/libs/jquery/1.6.4/jquery.min.js' type='text/javascript'/>
That's it!
From now on, any reader that views your post has the option of making a comment using their Google+ account, or the native Blogger comments. Your readers will enjoy the flexibility that your site provides and you will also benefit from the inclusive services offered by Google.

Wednesday 3 December 2014

Facebook Popup Like Box Widget For Blogger

Facebook has become the leading social media service on the Internet playing host to over 1.3 billion users; of those, 800 million login to their dashboard feeds at least once a day. Thanks to the vast number of active users on services like Facebook, acquiring new readers as a blogger or content provider has become easier than ever.

In order to produce an effective digital campaign, you absolutely must take advantage of social media by doing things like integrating Facebook on Blogger. Email marketing can be useful, but it comes with restrictions that could limit your blog's potential. Perhaps the most significant problem is that emails don't come with a face or personality like Facebook does.

Think of a time when you received an email in you inbox from someone you didn't know. Where you inclined to open it or did you send it right to the junk folder? If it's your first introduction to new consumer, they simply don't know who you are, what you want, and how you got their email. This sets off an initial breakdown of any type of trust that might have developed. The reputation of email marketing is further deteriorated with a study done by Kaspersky Lab, an Internet research firm. They estimate that around 70% of all the emails sent in the world are spam.

Sharing site content using a Facebook Like Box is just one of many strategies that can generate a regular flow of traffic from a diverse demographic that might have been previously inaccessible. Adding a Facebook Like Box to your site helps to reduces your individual workload, and instead distributes that ability equally among your readers.

When someone reads your content and appreciates the kind of work that you produce, they'll be willing to share that information to their followers and fans, setting off a viral reaction. The first step necessary to making this a reality is to make this change to your site. These next few steps will provide you with a quick and easy guide on how to add a 'Like Box' to your Blogger site so that you can began taking advantage of these great opportunities.


Click here for a DEMO


How to Add the Facebook Popup Like Box Widget

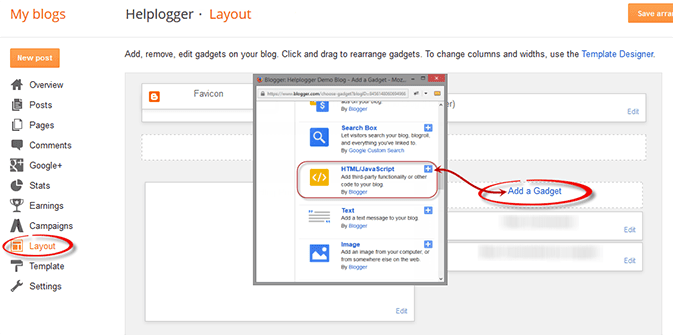
1. Log into your Blogger account and select your blog > go to 'Layout' & click the 'Add a Gadget' link on the right side.
2. Once the popup window is open, select the HTML/JavaScript gadget from the list:


3. Copy and paste the following code inside the empty box:
<script src='http://ajax.googleapis.com/ajax/libs/jquery/1.7.2/jquery.min.js' type='text/javascript'></script>
<style type="text/css">
#fbox-background{display:none;background:rgba(0,0,0,0.8);width:100%;height:100%;position:fixed;top:0;left:0;z-index:99999}#fbox-close{width:100%;height:100%}#fbox-display{background:#eaeaea;border:5px solid #828282;width:340px;height:230px;position:absolute;top:32%;left:37%;-webkit-border-radius:5px;-moz-border-radius:5px;border-radius:5px}#fbox-button{float:right;cursor:pointer;position:absolute;right:0;top:0}#fbox-button:before{content:"CLOSE";padding:5px 8px;background:#828282;color:#eaeaea;font-weight:700;font-size:10px;font-family:Tahoma}#fbox-link,#fbox-link a.visited,#fbox-link a,#fbox-link a:hover{color:#aaa;font-size:9px;text-decoration:none;text-align:center;padding:5px}
</style>
<script type='text/javascript'>
//<![CDATA[
jQuery.cookie=function(a,b,c){if(arguments.length>1&&"[object Object]"!==String(b)){if(c=jQuery.extend({},c),null!==b&&void 0!==b||(c.expires=-1),"number"==typeof c.expires){var d=c.expires,e=c.expires=new Date;e.setDate(e.getDate()+d)}return b=String(b),document.cookie=[encodeURIComponent(a),"=",c.raw?b:encodeURIComponent(b),c.expires?"; expires="+c.expires.toUTCString():"",c.path?"; path="+c.path:"",c.domain?"; domain="+c.domain:"",c.secure?"; secure":""].join("")}c=b||{};var f,g=c.raw?function(a){return a}:decodeURIComponent;return(f=new RegExp("(?:^|; )"+encodeURIComponent(a)+"=([^;]*)").exec(document.cookie))?g(f[1]):null};
//]]>
</script>
<script type='text/javascript'>
jQuery(document).ready(function($){
if($.cookie('popup_facebook_box') != 'yes'){
$('#fbox-background').delay(5000).fadeIn('medium');
$('#fbox-button, #fbox-close').click(function(){
$('#fbox-background').stop().fadeOut('medium');
});
}
$.cookie('popup_facebook_box', 'yes', { path: '/', expires: 7 });
});
</script>
<div id='fbox-background'>
<div id='fbox-close'>
</div>
<div id='fbox-display'>
<div id='fbox-button'>
</div>
<iframe allowtransparency='true' frameborder='0' scrolling='no' src='//www.facebook.com/plugins/likebox.php?
href=https://www.facebook.com/pages/Helplogger/120574614736021&width=339&height=255&colorscheme=light&show_faces=true&show_border=false&stream=false&header=false'
style='border: none; overflow: hidden; background: #fff; width: 339px; height: 200px;'></iframe>
<div id="fbox-link">Powered by <a style="padding-left: 0px;" href="http://helplogger.blogspot.com/2014/12/facebook-popup-like-box-blogger-widget.html" rel="nofollow">Helplogger</a></div>
</div>
</div>
4. Press the 'Save' button to add the widget to your blog. That's it!

Facebook Popup Like Box Customization

After adding the code, replace the address in blue https://www.facebook.com/pages/Helplogger/120574614736021 with your site's facebook page URL.

The widget will appear 5 seconds after the page finishes loading. If you want to change this delay, change the number 5000 to a greater or lesser number in this part:
.delay(5000)
By default, the like box only shows up the first time the user visits your page.  If you would like the Facebook box to popup every time the page loads, then remove this line of code:
$.cookie('popup_facebook_box', 'yes', { path: '/', expires: 7 });
If you want to display only when user visits your homepage, go to 'Template' > hit the 'Edit HTML' button on the right side and search by clicking anywhere inside the code area and pressing the CTRL + F keys for this tag:
</body>
Paste the facebook popup widget right above the body tag and make sure to include the conditional tags below:
<b:if cond='data:page.type == "index"'>ADD THE FACEBOOK WIDGET CODE HERE </b:if>
After saving this widget, you can test it out by returning to one of your old posts which should bring up a little popup widget asking if you'd like to join the site's Facebook page.

If you don't see the Facebook Like Box on the page, you may need to delete your cookies or check out the 'Customization' section above in order to display the widget every time a user visits your site. Once this widget is added to your site, all your hard work should start to translate into an increase in web traffic and number of Facebook fans.

Sunday 19 October 2014

Add 6 Stylish Custom Search Boxes To Blogger

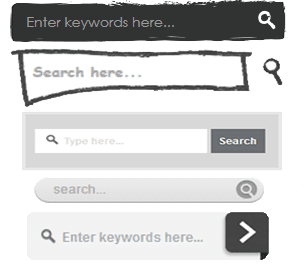
There's an unspoken rule in the world of web design that says that every website have a search box. You can, and should, design a custom search gadget to Blogger that contributes to the theme of your site while providing some key benefits to both your customers and you.

Benefits to Customers

Search boxes not only help to increase your website's design usability, but they're very convenient to site visitors and regulars. For those that have been to your site before, they know what they want and they want it now. These are the impatient people who don't feel like wading through different links. If you don't accommodate this problem you might risk losing those readers.

For newer customers who want to get a feel for your site before investing any more time, it gives them the chance to look for their interests on both eCommerce sites and blog sites.

Benefits To You

Adding a custom search gadget to Blogger perhaps best benefit eCommerce sites because it's an industry that inherently offers a lot of very specific products. For instance, if you sold clothing apparel and someone was only look for shirts, the search would result would only bring up shirts so that person can look through everything in one place.

Bloggers might not have products to offer, but adding a custom search gadget to Blogger can help site analytics and SEO. Google Analytics offers a tool that will track all the searches performed by your search bar, so that you can use this data when improving your keyword usage and content choices. Google web crawlers and search engine bots will also test out phrases in these boxes on the rare occasion to make sure that all your content leads to somewhere creates a closed loop.

Add Your Own Custom Search Gadget To Blogger

Just because you should have a search bar doesn't mean you you're restricted to what time. Your site's search bar should be easy to find and readily available whenever someone needs it, but other than that the look of the design is up to you. If you want to add a custom search gadget to Blogger, here are 6 stylish choices to pick from. Just copy the code below the search box that you want to add and follow the steps below:

<style type="text/css">
#searchbox{background:#d8d8d8;border:4px solid #e8e8e8;padding:20px 10px;width:250px}input:focus::-webkit-input-placeholder{color:transparent}input:focus:-moz-placeholder{color:transparent}input:focus::-moz-placeholder{color:transparent}#searchbox input{outline:none}#searchbox input[type="text"]{background:url(https://blogger.googleusercontent.com/img/b/R29vZ2xl/AVvXsEh3zKctt85otxeqFqeJtBbC1Pvr2aROfwV97FiT9me4a-QNitI82JeFVSPkXdKZ4qlXGLqQxZyrTg-mkUJ64SNKZPL0vA-9H-7o7ledKtmAdKtAfV122v0yf-UBpfyNp6FdciXB6yP-bGMN/s1600/search-dark.png) no-repeat 10px 6px #fff;border-width:1px;border-style:solid;border-color:#fff;font:bold 12px Arial,Helvetica,Sans-serif;color:#bebebe;width:55%;padding:8px 15px 8px 30px}#button-submit{background:#6A6F75;border-width:0;padding:9px 0;width:23%;cursor:pointer;font:bold 12px Arial,Helvetica;color:#fff;text-shadow:0 1px 0 #555}#button-submit:hover{background:#4f5356}#button-submit:active{background:#5b5d60;outline:none}#button-submit::-moz-focus-inner{border:0}
</style>
<form id="searchbox" method="get" action="/search">
<input name="q" type="text" size="15" placeholder="Type here..." />
<input id="button-submit" type="submit" value="Search" /></form>

<style type="text/css">
#searchbox{width:240px}#searchbox input{outline:none}input:focus::-webkit-input-placeholder{color:transparent}input:focus:-moz-placeholder{color:transparent}input:focus::-moz-placeholder{color:transparent}#searchbox input[type="text"]{background:url(https://blogger.googleusercontent.com/img/b/R29vZ2xl/AVvXsEh3zKctt85otxeqFqeJtBbC1Pvr2aROfwV97FiT9me4a-QNitI82JeFVSPkXdKZ4qlXGLqQxZyrTg-mkUJ64SNKZPL0vA-9H-7o7ledKtmAdKtAfV122v0yf-UBpfyNp6FdciXB6yP-bGMN/s1600/search-dark.png) no-repeat 10px 13px #f2f2f2;border:2px solid #f2f2f2;font:bold 12px Arial,Helvetica,Sans-serif;color:#6A6F75;width:160px;padding:14px 17px 12px 30px;-webkit-border-radius:5px 0 0 5px;-moz-border-radius:5px 0 0 5px;border-radius:5px 0 0 5px;text-shadow:0 2px 3px #fff;-webkit-transition:all 0.7s ease 0s;-moz-transition:all 0.7s ease 0s;-o-transition:all 0.7s ease 0s;transition:all 0.7s ease 0s;}#searchbox input[type="text"]:focus{background:#f7f7f7;border:2px solid #f7f7f7;width:200px;padding-left:10px}#button-submit{background:url(https://blogger.googleusercontent.com/img/b/R29vZ2xl/AVvXsEgQhuWNwFS18dvWsaman7aI3nSwfm5GZ1sWBJvOcutkhKWinZEx9zx3PflpHj34LReYMUHBVXgsdMmPbV74lTXUHn8cz1-SFlqpaC8vO_STxeA0TzLRMhlkNw7QYCaF2xXqdLGC19877vfu/s1600/slider-arrow-right.png) no-repeat;margin-left:-40px;border-width:0;width:43px;height:45px}
</style>
<form id="searchbox" method="get" action="/search" autocomplete="off"><input name="q" type="text" size="15" placeholder="Enter keywords here..." />
<input id="button-submit" type="submit" value=" "/></form>

<style type="text/css">
#searchbox{background:url(https://blogger.googleusercontent.com/img/b/R29vZ2xl/AVvXsEi0-owEDiUcaRADhDxef8VB1RHJpp1eJhpTUixzug_HDtY3Yvk2Nf7iFWmB5BFyP69Zvezn1d0pNZafD-ZQth69YxnVLSHcv_MI1Oyur1MI2i7bp5HjqCufhQSUJtIiOH_Ho1ZMoiSIgNJ8/s1600/searchbar.png) no-repeat;width:208px;height:29px}input:focus::-webkit-input-placeholder{color:transparent}input:focus:-moz-placeholder{color:transparent}input:focus::-moz-placeholder{color:transparent}#searchbox input{outline:none}#searchbox input[type="text"]{background:transparent;margin:3px 0 0 20px;padding:5px 0;border-width:0;font-family:"Arial Narrow",Arial,sans-serif;font-size:12px;color:#828282;width:70%;display:inline-table;vertical-align:top}#button-submit{background:url(https://blogger.googleusercontent.com/img/b/R29vZ2xl/AVvXsEi4RdoroHowOTzfLG57TOSLreV9_45H46aFU8bG-AJmnGPsWP477tMrNcavGvMXWpsdTI90dUKis_2mb_bTdUC-vwVXCfcgPpXjX8Lj_n8LtjEIZKCEJc5Sfgrb0ivholUPYyi44SS1Vl5M/s1600/magnifier.png) no-repeat;border-width:0;cursor:pointer;margin-left:10px;margin-top:4px;width:21px;height:22px}#button-submit:hover{background:url(https://blogger.googleusercontent.com/img/b/R29vZ2xl/AVvXsEgec8wlo_TVsJ8S9GBR2Z2NkfvbmzoySeY3R2E9X9bu4j9jgzFqcm3dQgxF3mKg_fa0_n04VG-aKf5GjEKB3sYNskdRtFEzKP5Ia5nb2-KQ_HNXcafEm6LbmLOsysB4awX_6Z3KlJZhsKs_/s1600/magnifier-hover.png) no-repeat}#button-submit:active{background:url(https://blogger.googleusercontent.com/img/b/R29vZ2xl/AVvXsEgec8wlo_TVsJ8S9GBR2Z2NkfvbmzoySeY3R2E9X9bu4j9jgzFqcm3dQgxF3mKg_fa0_n04VG-aKf5GjEKB3sYNskdRtFEzKP5Ia5nb2-KQ_HNXcafEm6LbmLOsysB4awX_6Z3KlJZhsKs_/s1600/magnifier-hover.png) no-repeat;outline:none}#button-submit::-moz-focus-inner{border:0}
</style>
<form id="searchbox" method="get" action="/search" autocomplete="off"><input name="q" type="text" size="15" placeholder="search..." /><input id="button-submit" type="submit" value="" /></form>

<style type="text/css">
#searchbox{background:url(https://blogger.googleusercontent.com/img/b/R29vZ2xl/AVvXsEiIUECh1TxCSJaEvcYyRPE5RpVm5a78binzOzUiykZUDDGMqJLK-IIHg848TwvmpG4GR6DFB4jVvUOPMHPRTvXQU7JRMuZIK4NiGwc6adzdaoNVLv3M3M6LU0pcDOS_ROGI_1g-Oy6BrY0s/s1600/search-box.png) no-repeat;height:27px;width:202px}input:focus::-webkit-input-placeholder{color:transparent}input:focus:-moz-placeholder{color:transparent}input:focus::-moz-placeholder{color:transparent}#searchbox input{outline:none}#searchbox input[type="text"]{background:transparent;margin:0 0 0 12px;padding:5px 0;border-width:0;font:italic 12px "Arial Narrow",Arial,sans-serif;width:77%;color:#828282;display:inline-table;vertical-align:top}#button-submit{background:url(https://blogger.googleusercontent.com/img/b/R29vZ2xl/AVvXsEiVKyeFV4JOSPRRJK766YrN7FnHAbDfeDjP29vrZSenNRWFw9FSpDpu0BU7V5oxkYgPx8RJgv2QnQGW4vx0K-EJtpdYB0TyuLESQrIOqsofp2rWU6BLgOqk5Rg6I7Eew8ybIDwIwojPPu29/s1600/search-button.png) no-repeat;border-width:0;cursor:pointer;width:30px;height:25px}#button-submit:hover{background:url(https://blogger.googleusercontent.com/img/b/R29vZ2xl/AVvXsEiCVI48140F6V2XZ1tEnKGYcY4pLGcTuS8enFxxKksswa6zou1q2LoZX1tRXMWxlYShlCHl2FoNU-GxN_r653hCEZfXGsdIrNblT4Orq3poVTcOu34lpWGWqR0ua1Zef5HMNDQy8Pif0LXz/s1600/search-button-hover.png) no-repeat}#button-submit::-moz-focus-inner{border:0}
</style>
<form id="searchbox" method="get" action="/search" autocomplete="off"><input name="q" type="text" size="15" placeholder="search..." /><input id="button-submit" type="submit" value="" /></form>

<style type="text/css">
#searchbox{background:url(https://blogger.googleusercontent.com/img/b/R29vZ2xl/AVvXsEiSiHLYIvn9q5dJMvlqCZK99Z7Q8DDOugOTQIKF97J0DCoUrqNd6ajA0anFWUjk3ff0PJvPBL1Tjev2k-PmMvivSu7Etb9hok_Jp0Zip1D3191HdX1iPMuuK9gt81RjPRriqFmNY_t1bD0b/s1600/search-box1.png) no-repeat;width:250px;height:65px}input:focus::-webkit-input-placeholder{color:transparent}input:focus:-moz-placeholder{color:transparent}input:focus::-moz-placeholder{color:transparent}#searchbox input{outline:none}#searchbox input[type="text"]{background:transparent;padding:2px 0 2px 20px;margin:10px 15px 0 0;border-width:0;font:bold 16px "Brush Script MT",cursive;color:#595959;width:65%;display:inline-table;vertical-align:top}#button-submit{background:url(https://blogger.googleusercontent.com/img/b/R29vZ2xl/AVvXsEjE2ZrJYQ9y3I5mFp7EXvGpHiNitYpzcoW-IF7RXg0lAWm92G160nvVXoud5ZGaKP00vTtm-sxm62ED3CUCLZEiW8qX30B4VXIjR_RSJdBo8T__VbVJgNHptyxWjf45Ef9EcQ3oXoFDxy7c/s1600/magnifier.png) no-repeat;border-width:0;cursor:pointer;margin-top:10px;width:19px;height:25px}#button-submit:hover{background:url(https://blogger.googleusercontent.com/img/b/R29vZ2xl/AVvXsEg40EjZV6Qy52-s4yhpy14W3UbccrmTyHlIww-TxG2GpSklGh-N3z2SmWqCJ_I9zyPnhEdWzNI9Got4malbdMfKqdLT3r-adix1Z4CRXUAEGbyX9dIyuGsNzfImQKyQYfJiQidFBpNjWbVI/s1600/magnifier-hover.png) no-repeat}#button-submit:active{background:url(https://blogger.googleusercontent.com/img/b/R29vZ2xl/AVvXsEg40EjZV6Qy52-s4yhpy14W3UbccrmTyHlIww-TxG2GpSklGh-N3z2SmWqCJ_I9zyPnhEdWzNI9Got4malbdMfKqdLT3r-adix1Z4CRXUAEGbyX9dIyuGsNzfImQKyQYfJiQidFBpNjWbVI/s1600/magnifier-hover.png) no-repeat;outline:none}#button-submit::-moz-focus-inner{border:0}
</style>
<form id="searchbox" method="get" action="/search" autocomplete="off"><input class="textarea" name="q" type="text" size="15" placeholder="Search here..." /><input id="button-submit" type="submit" value="" /></form>

<style type="text/css">
#searchbox{width:280px;background:url(https://blogger.googleusercontent.com/img/b/R29vZ2xl/AVvXsEhjPXqY5KnfkAzPY9ClFW0wxLPfQf2eS7DwlRP-zeaTWry4Yg1cNQqLq52zEgQRoyUggAZhTsErS5itnJach9EQAYvEGyy-z_pwtTTy0yO6ltyx9bqbduZZGrTJAc6O9qtEPtybAyWqR_b4/s1600/search-box.png) no-repeat}#searchbox input{outline:none}input:focus::-webkit-input-placeholder{color:transparent}input:focus:-moz-placeholder{color:transparent}input:focus::-moz-placeholder{color:transparent}#searchbox input[type="text"]{background:transparent;border:0;font:14px "Avant Garde",Avantgarde,"Century Gothic",CenturyGothic,"AppleGothic",sans-serif;color:#f2f2f2!important;padding:10px 35px 10px 20px;width:220px}#searchbox input[type="text"]:focus{color:#fff}#button-submit{background:url(https://blogger.googleusercontent.com/img/b/R29vZ2xl/AVvXsEijdoOcCT5Cit5vAG65pob_saiLsuHdyVqIRUwGHDPFUEAVzRMqOd-Rnsi0D_ZQtrVS_scXZSA7ABzdFFychVGV533LqgjgYrrfxLr4anG9HcLIOnLWVQGMEc9te2q1wkYjBUfKuUDR5gpA/s1600/search-icon.png) no-repeat;margin-left:-40px;border-width:0;width:40px;height:50px;cursor:pointer}#button-submit:hover{background:url(https://blogger.googleusercontent.com/img/b/R29vZ2xl/AVvXsEhDiavQDYDGGPB6ul02JGKg2IIpBYr2L4MSu7sRROq2t37oi1i7oU2yAzHfO7EUMr9XiBiKMfpGupXG8UZUutxPvj-FIpT7d_faUzsUadbw_2uA_lL0enTd3rJoHyY6OXOntA7oXkl7UGIe/s1600/search-icon-hover.png)}
</style>
<form id="searchbox" method="get" action="/search" autocomplete="off"><input name="q" type="text" size="15" placeholder="Enter keywords here..." /><input id="button-submit" type="submit" value=" "/></form>

Steps: How to Add a Custom Search Box to Blogger

Step 1. Log in to your Blogger account, then go to Layout > click on the 'Add a gadget' link on the left side.

Step 2. Choose HTML/JavaScript from the pop-up window > paste the code of the search box inside the empty box.

Step 3. Press Save.


That's it!

There you have it, 6 stylish choices that will let you take advantage from all the great benefits of using a search box, while still helping you make your blog stand out. After adding your new search bar, your visitors will be able to navigate through your site and get to the same place using both the box and the navigation bar.

Thursday 4 September 2014

How To Host Blogger CSS and JavaScript Files in Google Drive

Anyone that has ever worked on a web design or development can tell you that where you decide to store your files is important. Every time someone visits your site, the server or host will access this location and bring up the relevant files that need to be displayed. Wherever you decide to store your files, this will have an impact on some important aspects like the speed that your site loads, your overall SEO ranking and your ability to make necessary adjustments to the site.

Things To Think About

When you are designing your online structure and where to store your important CSS and JavaScript files, here is a run down on how this decision might impact your site later on:

Site Loading Speed

By combining some of the style sheets and website files, the Blogger server only has to collect information from a single location. When you split up your files or decentralize the file system, it takes a longer time for all the data to come together to make your site possible.

Slow loading speeds can negatively impact your SEO ratings because the slower the site is, the less likely that visitors are going to wait around for it to load. If someone visits your site and immediately clicks the 'back' button because it's taking too long to load, that is going to increase your bounce rate and provide Google with statistics that show your site is either low quality or irrelevant to the search keywords.

File Storage Affects SEO

In addition to increasing your bounce rate, storing your files in a central location and managing the name of your files can affect SEO site wide. Web crawlers enlisted by Google, or some of the other search engines, index both the code on your site, and the name and directory of your files. If file names are random or not placed in the proper categories, the web crawlers aren't going to know what to do with the information.

Clear file structure and a central location provide you with incentive to organize everything and name them appropriately. All the content that is relevant to the subject of your website or blog will be in the same location for web crawlers to review.

Storage Locations Affect Editing Abilities

Shuffling through files and folders or opening up FTP connections just to make some simple edits can be a hassle, and take up a lot of time that could have otherwise have been spent writing new content.

If you're a Blogger site owner, this is something you need to think about. When you need to make alterations to things like social media sharing buttons, popular posts, recent posts and related posts widgets, you have to know where everything is intended to go, or risk losing both available content and money.

Some of the larger sites that produce hundreds of unique articles each month can't afford to have content in different locations. When articles start to get lost out of order, they run the risk of duplicating content on their site, or forgetting to post it altogether. Things should be right at your fingertips to minimize mistakes and reduce the amount of time spent editing the site while it's still live.

Storing Javascript/CSS Files With Google Drive

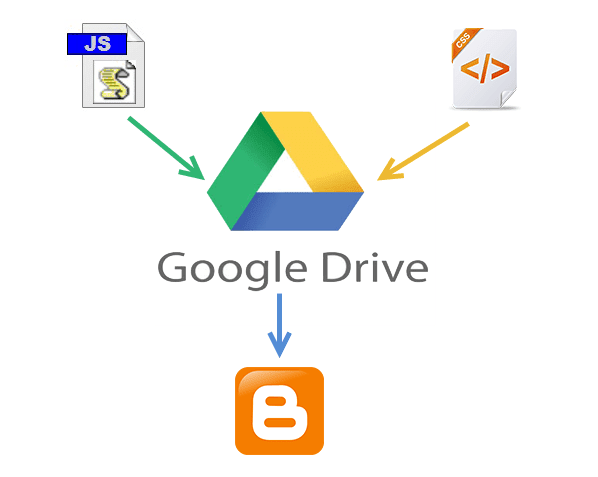
Storing Blogger CSS and JavaScript files with Google Drive will help to eliminate any of the problems mentioned above and reduce the clutter among your services. Taking this method can increase your site speed, increase the opportunities for a successful SEO campaign, and make your life so much easier.

Google Drive provides ample amount of space to store large files, and offers collaboration services so that you can work among different team members on the same project. Some of the files that you upload into the cloud services can remain unpublished and stay within the private site, whereas other files like blog posts can be published or stored to the public site.

Another beneficial feature of storing all your Blogger files on Google Drive is that it is highly secure. Google comes with the backing of one of the leading companies in the technical world so that you can be sure your content is safe from hackers and those looking to compromise your site.

This guide will provide you with step-by-step instructions on how to setup your Blogger site using Google Drive. It's completely free to take advantage of this strategy, and will provide you with a solid platform from which to build your blog.
host blogger css javascript files

Step 1. Prepare the CSS/JavaScript Files

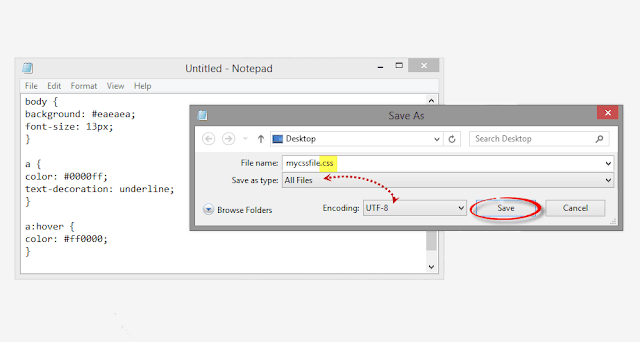
  • First, we need to create the file that we need to host. To host a CSS file, open the Notepad and paste the CSS code (if it is enclosed within the <style> and </style> tags, remove them). 
  • In the Notepad menu, select 'File' > 'Save as' and type the file name with the .css extension just like I did with mycssfile.css - see the screenshot below.
create a css file
  • In the same window, choose "All files" in the "Save as type" option and set the Character Encoding to UTF-8.
  • If you want to host a JavaScript file, add the .js extension (instead of .css) at the end of your file name (remove the <script>...</script> tags if you see them). Click "Save" and navigate to the location where you want to save the file.

Step 2. Upload Your File on Google Drive

  • Access https://drive.google.com and log in with your Gmail account. After you logged in, click on the 'Create' button and add a new separate folder to upload your JavaScript and CSS files.
create folder in Google drive
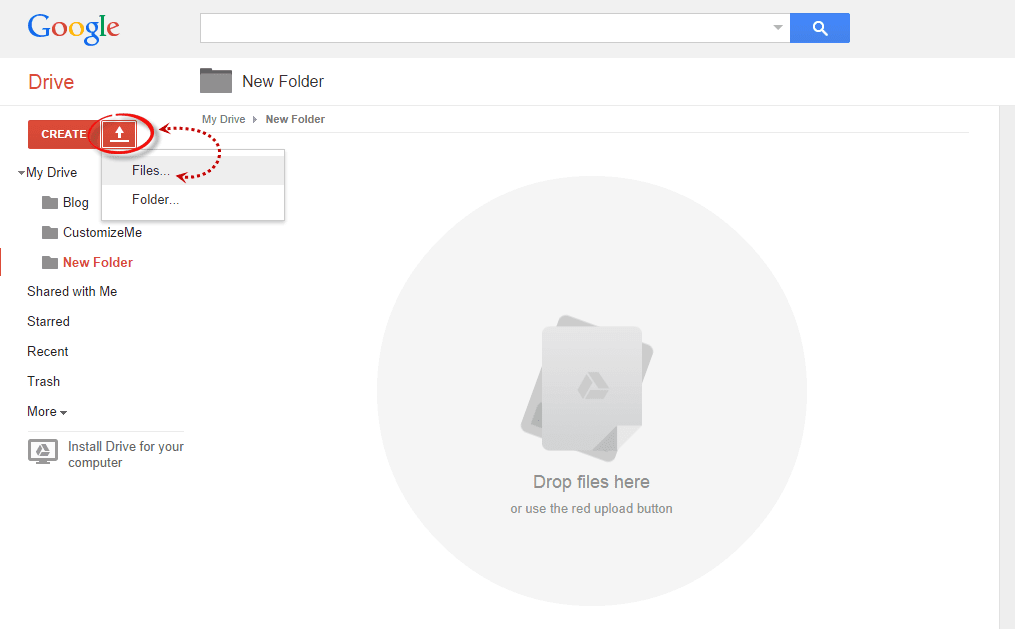
  • Open the newly created folder, and click on the Upload button with the upward arrow to choose the files that you need to upload.
upload files using google drive
  • Now, navigate to the location where you saved the files, select them (to select multiple files, press and hold down the Ctrl key on your keyboard and then click on them) and press the Open button.
  • After the files have been successfully uploaded, right click on the file names (to select all your files in the folder, click on the checkbox) and select 'Share':
share google drive files
  • In the 'Sharing settings' window, click on the 'Change' link and choose the 'Public on the web' option. Press 'Save' and copy the link(s) of your uploaded file(s) from the 'Links to share' box highlighted in blue, then paste it into a Notepad to use it later.
javascript css file sharing

Step 3. How to Add an External CSS/JavaScript file to Blogger

Before you can use the links, you must replace 'https://drive.google.com/file/d' to 'https://googledrive.com/host' and remove '/edit?usp=sharing' in the link.

For example, the link to mycssfile.css that I copied looks like this:
https://drive.google.com/file/d/0B4n9GL3eVuV-TkphMkc3SFR2Slk/edit?usp=sharing
Notice the part in blue after the "/file/d/" part. That is the file ID which is used to access it via the new hosting service. It should start with the following URL:
https://googledrive.com/host/
Add the file ID like this (remove the '/edit?usp=sharing' part):
https://googledrive.com/host/0B4n9GL3eVuV-TkphMkc3SFR2Slk
Now log into your Blogger account, select your blog and go to Template > Edit HTML. Click anywhere inside the code area and press the CTRL + F keys to open the search box:

open blogger search box

If you want to add a CSS file, type the following tag inside the search box and hit Enter to find it:
<head>
Just BELOW the <head> tag, add this line:
<link rel="stylesheet" type="text/css" href="https://googledrive.com/host/0B4n9GL3eVuV-TkphMkc3SFR2Slk" />
And replace https://googledrive.com/host/0B4n9GL3eVuV-TkphMkc3SFR2Slk with the link of your CSS file:

add external css to blogger

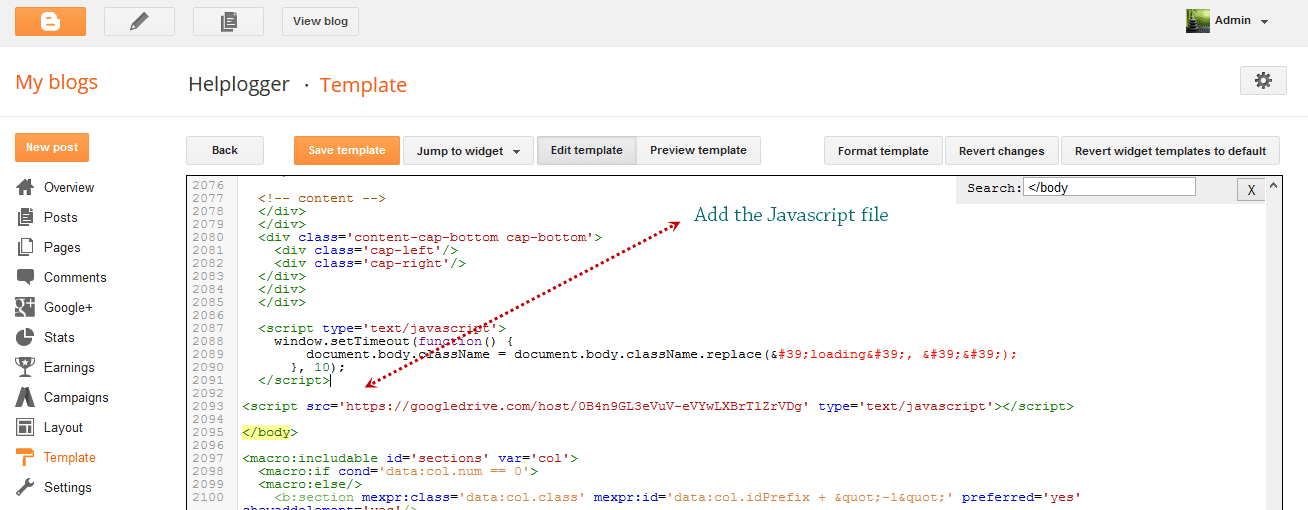
If you want to add a Javascript file, search for the following tag:
</body>
And add this line just ABOVE it:
<script src='https://googledrive.com/host/0B4n9GL3eVuV-eVYwLXBrTlZrVDg' type='text/javascript'></script>
Replace the line in blue with your URL:

add external javascript js to blogger

Finally, press the 'Save template' button to save the changes. And you're done!

In Conclusion

Once you have saved all your file folders and closed out of the drive, open your site in a browser and make sure that all the changes have completed successfully.

Next time you want to edit any of the information or move internal files, all you have to do is open up the Google Drive folder on your account and make the modifications from that location. Those files will then automatically sync to the online folder and make updates to your site. This works the same if you want to change the appearance by modifying the CSS code to extend the header, footer, or make customizations.

As you can see, changing your file storage out so that is CSS and JavaScript is stored on your Google Drive account is easy to do and only takes a few minutes. After you make the change, you can begin benefiting from faster loading speeds, higher SEO rankings, and overall a more convenient platform to work from to increase the efficiency of your work.

Wednesday 27 August 2014

How to Display Most Commented Posts in Blogger

One of the best gadgets for your Blogger blog is a popular posts widget for your sidebar. This lets visitors see what your trending posts are right now and encourages them to click on them to read them. This basic widget is just a little too basic, however, for the modern day website visitor. Not only do they want to see your trending posts, but they also want to join the discussions that are happening on your blog. To do that, you'll need a most commented posts widget for Blogger.

Having a customized widget on your site is a lot easier than you might think. In order to have an effective widget, however, you're going to need a few specific things to help you out.

most commented posts widget


Here's What You're Going To Get

There are certain aspects in the design of a most commented posts widget that you should expect. That's why you'll find these specific components with this custom widget:
  • Ordered by popularity. The posts that have the most comments are the most likely to have visitors want to read the post and join in with the conversation. By ordering your posts based on the popularity of them, you'll give each visitor the chance to see what the hype really is about! This lets you have a charted graphic that gives a visitor easy recognition, but also allows you to keep it straight and aligned if you're looking for a cleaner look.
  • Graphic incorporation. Blog posts that have at least one graphic incorporated with them will receive 100% more traffic than posts that have no images at all. For every graphic that you include with a blog post, the more likely you are to get a click! The same is true with your most commented posts widget, so be sure to incorporate graphics that stand out with your design.
  • Descriptions that blend in. The internet today revolves around the value that you can provide each individual user. People don't just click on things because they look visually tempting. They click on them because they promise a level of value that another website like yours isn't able to provide. By having descriptions that blend in, you'll be able to enhance the perceived value that your site can provide. This leads to more clicks!
Related: Add Multi-Colored Popular Posts to Blogger

Add the Most Commented Posts Widget to Blogger

Step 1. Log in to your Blogger account and go to Template, press the "Edit HTML" button.

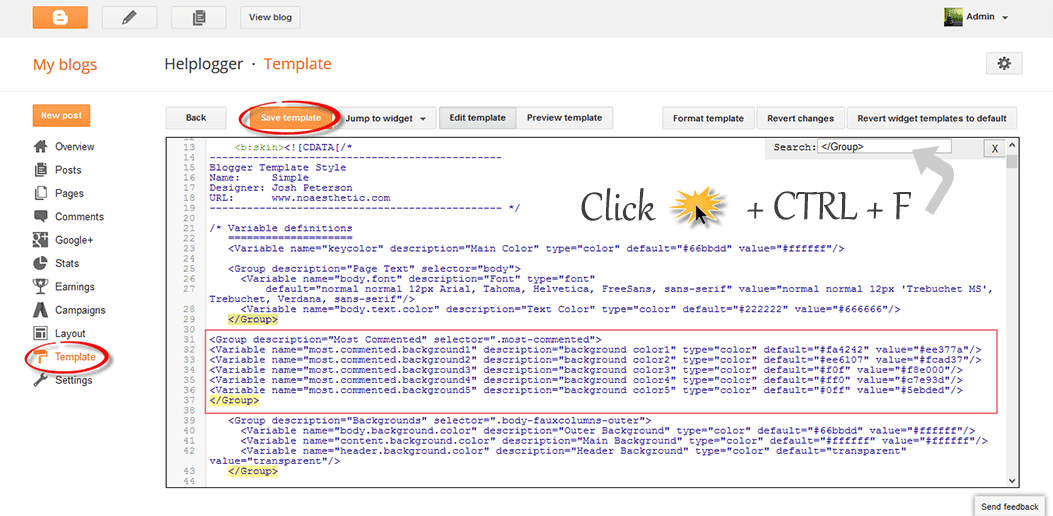
Step 2. Click anywhere inside the code area and press the CTRL + F keys to open the Blogger' search box. Type the following tag inside it and hit Enter to find it:
</Group>
Step 3. Just below </Group>, add this code:
<Group description="Most Commented" selector=".most-commented">
<Variable name="most.commented.background1" description="background color1" type="color" default="#fa4242" value="#ee377a"/>
<Variable name="most.commented.background2" description="background color2" type="color" default="#ee6107" value="#fcad37"/>
<Variable name="most.commented.background3" description="background color3" type="color" default="#f0f" value="#f8e000"/>
<Variable name="most.commented.background4" description="background color4" type="color" default="#ff0" value="#c7e93d"/>
<Variable name="most.commented.background5" description="background color5" type="color" default="#0ff" value="#5ebded"/>
</Group>

add code to blogger html
Note: if you can't find the </Group> tag, try to find the following tag instead and add the variables just below it:
<b:skin><![CDATA[

Step 4. Now search for the following tag (CTRL + F):
]]></b:skin>
Step 5. And just above it, add this CSS code:
.comment-count {
    padding: 3px 10px;
    background: #fff;
    color: #000;
    font-size: 10px;
    float: right;
}

.most-commented ul {
    padding: 0px !important;
    font-family: Century Gothic, sans-serif;
}

.most-commented ul li {
    list-style-type: none;
    padding: 10px;
    color: #555;
    margin-top: -10px;
}

.most-commented ul li a {
    color: #444;
    font-weight: bold;
    text-decoration: none;
    font-size: 11px;
}

.most-commented ul li img {
    float: left;
    margin: 0px 5px 0px 0px;
    width: 60px;
    height: 60px;
}

.most-commented:nth-child(3n+0) {
    background: $(most.commented.background1);
    width: 100%;
}

.most-commented:nth-child(4n+0) {
    background: $(most.commented.background2);
    width: 95%;
}

.most-commented:nth-child(5n+0) {
    background: $(most.commented.background3);
    width: 90%;
}

.most-commented:nth-child(6n+0) {
    background: $(most.commented.background4);
    width: 85%;
}

.most-commented:nth-child(7n+0) {
    background: $(most.commented.background5);
    width: 80%;
}
Step 6. Save the template.

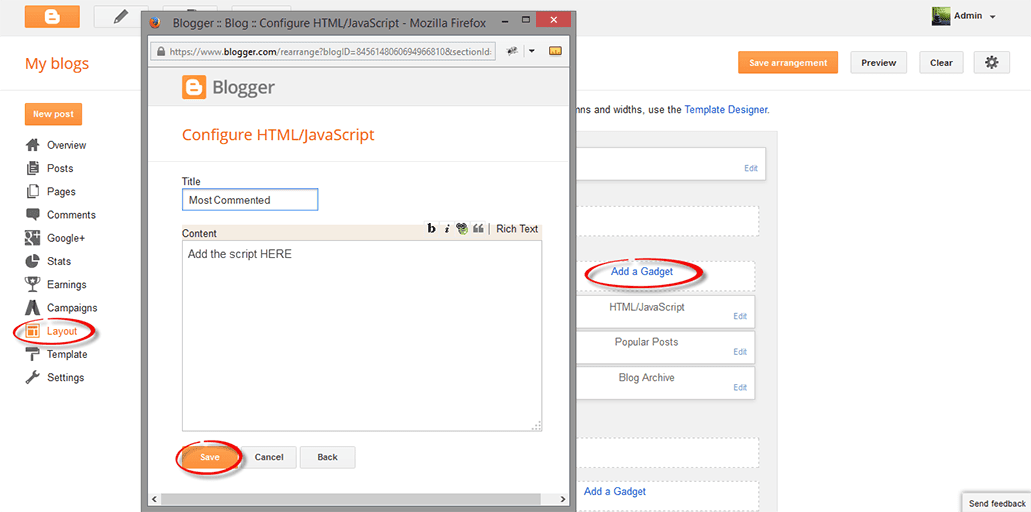
Now, let's add the Most Commented Posts widget to the Layout of our Blogger blog. Head over to the "Layout" section of your Blogger dashboard and click on the "Add a gadget" link on the right side. From the pop-up window, scroll down the list and select the "HTML/JavaScript" gadget:

blogger html javascript gadget

Copy and paste this script inside the content box:
<script type="text/javascript">
function stripTags(s,n) {
    return s.replace(/<.*?>/ig,"").split(/\s+/).slice(0,n-1).join(" ")
}
function mostcommented(feed) {
    var i;
    for (i = 0; i < feed.count ; i++) {
var postURL = "'" + feed.value.items[i].link + "'";
var postTitle = feed.value.items[i].title;
var postthumbnail = "<img src="+feed.value.items[i].postthumbnail+" />";
var postDescription = feed.value.items[i].postdescription;
var postComments = feed.value.items[i].commentcount;
var postList = '<div class="most-commented"><ul><li><div class="comment-count">' + postComments + "</div>" + postthumbnail + "<a href="+ postURL + '">' + postTitle + "</a>"  + '<p>' +stripTags(postDescription,10)+'...</p>' + '</li></ul></div>';
 document.write(postList);
     }
 }
 </script>
<script src="http://pipes.yahoo.com/pipes/pipe.run?
AddUrlHere=http://helplogger.blogspot.com
&NumberofPosts=5
&_id=2cb5eb603ed55a6264ee1484e5fdd45c
&_callback=mostcommented
&_render=json"
type="text/javascript"></script><span style="font-size: 80%; float:left;"><a href="http://helplogger.blogspot.com/2014/08/most-commented-posts-blogger-widget.html">Add this widget</a></span>
Here, change http://helplogger.blogspot.com with your blog URL. If you want to add more characters to the description, modify the "10" value in red from "postDescription,10".

If you want a more simple look (without the thumbnails and post snippets), add this script instead:
<script type="text/javascript">
function stripTags(s,n)
    {
    return s.replace(/<.*?>/ig,"").split(/\s+/).slice(0,n-1).join(" ")
}
function mostcommented(feed) {
 var i;
 for (i = 0; i < feed.count ; i++)
 {
var postURL = "'" + feed.value.items[i].link + "'";
var postTitle = feed.value.items[i].title;
var postComments = feed.value.items[i].commentcount;
var postList = '<div class="most-commented"><ul><li style="margin-bottom: 10px"><div class="comment-count">' + postComments + "</div>" + "<a href="+ postURL + '">' + postTitle + "</a>"  + '</li></ul></div>';
 document.write(postList);
 }
 }
 </script>
<script src="http://pipes.yahoo.com/pipes/pipe.run?
 AddUrlHere=http://helplogger.blogspot.com
&NumberofPosts=5
&_id=2cb5eb603ed55a6264ee1484e5fdd45c
&_callback=mostcommented
&_render=json"
type="text/javascript"></script>
<span style="font-size: 80%; float:left;"><a href="http://helplogger.blogspot.com/2014/08/most-commented-posts-blogger-widget.html">Add this widget</a></span>
.... and replace http://helplogger.blogspot.com with your address.
To add the "comments" text after the comments number, replace the line in red:
<div class="comment-count">' + postComments + "</div>"
with:
<div class="comment-count">' + postComments + " comments" + "</div>"
Once you have finished adding your own settings, press the "Save" button to enable the gadget in the sidebar of your blog. That's it!

configure html javascript gadget

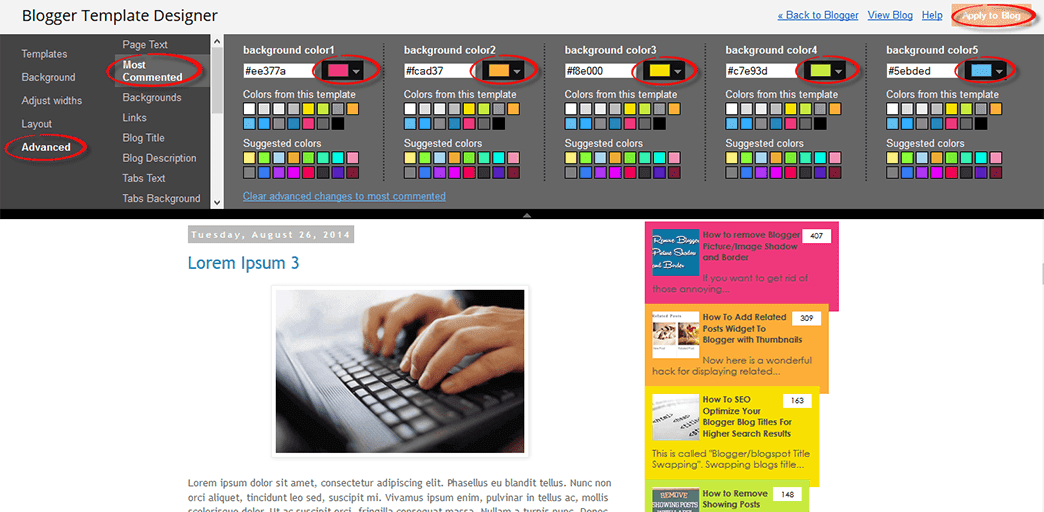
To change the background colors of the most commented posts, go to "Template" > hit the "Customize" button and navigate to "Advanced" > "Most Commented" tab. Here you can pick 5 different colors by clicking on the color boxes:

blogger template designer

Once you've selected your favorite color scheme, click the "Apply to blog" button to save the changes... and you're done.

Why Use the Most Commented Posts widget?

The basic psychology in every human is that they want to feel like they belong to a community. That's exactly what this customized widget will bring to your site. No matter what content drew a visitor to see your content, this widget will invite them to join the lively parts of your piece of the internet. This helps to build relationships, with you and with other visitors, and this relationship-building engagement is what you need to start having real value.

Take the time to install this most commented posts widget on your site and you'll see for yourself why this is one of the most useful widgets that is available right now. Enjoy ;)

Tuesday 26 August 2014

How Firebug Helps You Design Your Blogger Blog

For most bloggers, the idea of adjusting the coding of their blog to improve the user experience is daunting at best and often quite frightening. HTML5, CSS, and other coding elements are their own virtual language and for the average Blogger user looking to update a personal blog, the automatic settings are about as good as it gets. What if there was a better way to code a blog, whether a beginner or a pro, that could be done within the browser itself?

If you're using Firefox or Chrome, then you should also be using Firebug. It allows you to code your website in real time, so you can maximize the UX of your blog in no time at all.

You No Longer Need To Edit Through Blogger!

If you've ever tried to update a Blogger theme through the editing functions of the website, then you know how difficult it can be. You can preview your designs, but you can't save any changes to officially see what is going to happen with your site until you publish the edits. If you've missed just one line of code or forgotten one small element, you're going to have to go back into the editing matrix, find the error, update it again, and repeat until you have a responsive blog once again.

What Firebug allows you to do is see all of those elements that make up a website in real time. Instead of editing and then publishing, you can edit in real time and see updates happen, all without affecting the user experiences of visitors that are coming to your site while you're editing. You can change the fonts, colors, or virtually anything else within the design of the site quickly and see the results of your work as it happens. Don't like it? Just undo your changes.

It's really that easy.

Using Firebug to Customize CSS in Blogger

This guide will show you how to modify the CSS code of a Blogger template. Usually, the Blogger Template CSS style declarations are editable through the style.css file, found between the <b:skin> and </b:skin> tags.

To download Firebug and get more details regarding its powerful features, visit: Firebug for Firefox, or if you are using Chrome, get the Firebug Lite app. I would recommend to use Firefox, which is more complete and quick, but, nevertheless, both work the same.

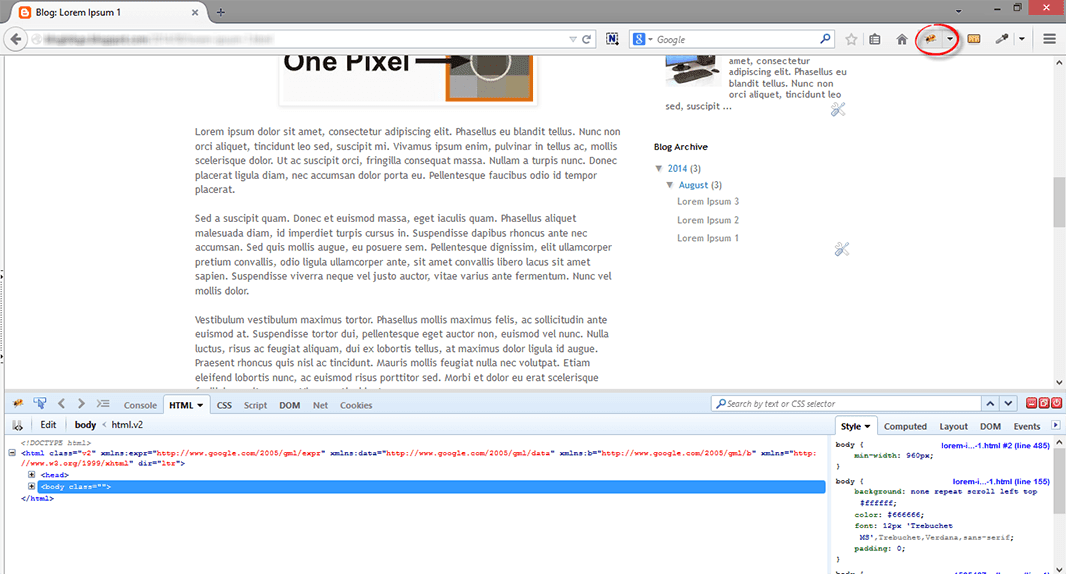
Once Firebug is installed, a small bug icon will be available in the upper right of your Web browser's address bar. Clicking it, a horizontally split screen will be shown at the bottom of the browser's window. The page will continue to show in the upper half, while the lower half will show the HTML of the current web page.

firebug

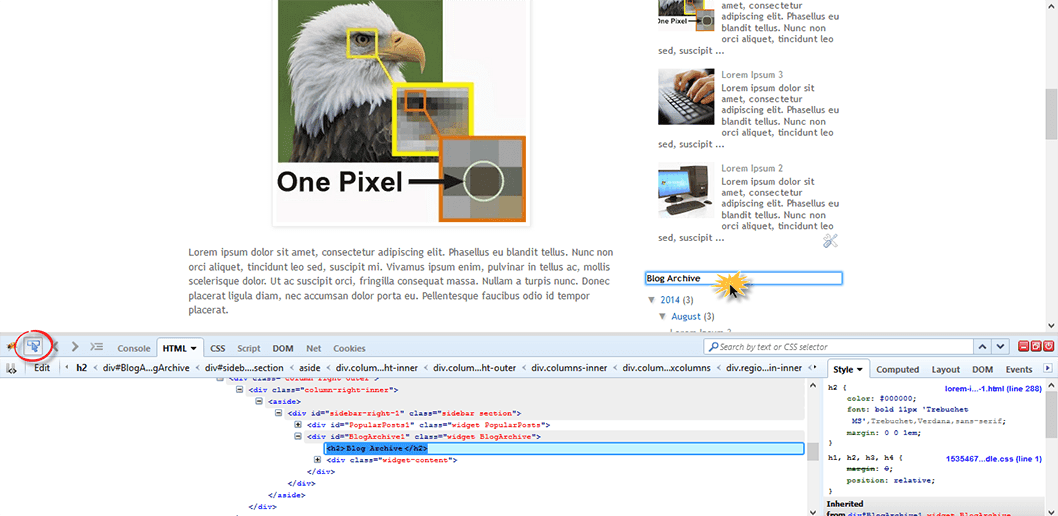
To customize any web element from a Blogger template, just click either on the Firebug icon in the toolbar, or the "Inspect Element with Firebug" item in the context menu. Next, click the blue cursor button to Inspect and place the cursor right over the element to customize.

For example, let's say that we want to change the title of the "Blog Archive" gadget. After we clicked the inspect button, mouse over the "Blog Archive" title which will be highlighted as shown in the screenshot below. To change this element, click on it:

inspect element using firebug

Now that we decided which element we want to change, right click on the "Style" panel and select the "Add rule" option:

add CSS rule in firebug

This will give the class or the id of the highlighted element - in our case, the heading of the Blog Archive (#BlogArchive1 > h2). To edit this rule that we just added, click anywhere near the left curly bracket that will open a text box, so that we can type a new CSS declaration:

firebug css declaration

And here comes the fun part. Let's say that we want to make the title red. We will type color and hit Enter, then we will type the color value or the red text and hit Enter. We will also set the set the font size to 20px, text alignment to center (text-align: center) and make the text underlined (text-decoration: underline):

modify blogger css with firebug

The cool thing about Firebug is that when modifying any CSS property, you can see the results directly applied on the page. So, after adding these declarations, we'll see a big red underlined title for our Blog Archive gadget (see in the screenshot above).

To apply this CSS rule on a Blogger template, just select it beginning from the right curly bracket and to the #(id) or .(class) symbol, then right click it and Copy the CSS code.

copy firebug css rule

Before making any change, it's highly recommended to make a backup of your current template. Go to "Template" and click the "Backup/Restore" button on the upper right side. On the same "Template" location, click on the "Customize" button and navigate to "Advanced" > "Add CSS". Paste the CSS rule that you just copied into the CSS box:

add firebug css to blogger template

Click the "Apply to blog" button on the upper right corner to save the changes and view your blog.

Firebug Also Gives You One Distinct Advantage...

One of the best reasons to install Firebug into Chrome or Firefox is that it allows you to emulate some of your favorite website designs quickly and easily. Instead of hiring a web designer to do the work, which could cost you thousands, you can simply start Firebug and see what the CSS styles are for your favorite site. This allows you to create a similar widget.

From there, all you've got to do is change the coding to make the design elements work under the rules of your own custom.css. This means you can make easy design changes to your Blogger blog without having to go through all of the menus and editing functions so that your template can truly be your own. Do you have some work to do? Sure - but Firebug does all of the primary work for you.

All you've got to do is have a creative mind and a few minutes to make changes to the coding design. Whether you've been coding for years or are just starting your first blog, this is definitely the best way to make sure that your visitors have the best experience possible!

Monday 25 August 2014

Add a Pinterest Pin It Mouseover Button on Blogger Images

Images have always played a prominent role in attracting new visitors through search engines like Google and Bing. But when Pinterest decided to enter the social media mix, it upped the ante in a big way.

Pinterest lets blog owners use their service to add a 'pin' to photos or content images on the site. When visitors of that site see a photo they like, they can choose to click on the red Pinterest button for Blogger, and add it to their Pinterest account.

The person who pressed your Pinterest button for Blogger can now see your photo on their dashboard, and share it with friends or followers on the service. They can also come across this photo when users add keywords or category tags to the image. More importantly, that photo links to your site when clicked on and will contain a description title of your blog name or post.

Therefore, adding the Pinterest button for Blogger will help you to benefit from tons of new traffic coming from Pinterest and people who had found your photos and post links using the service. Here are some steps to add your very own Pinterest button.

1. Access your Blogger Template

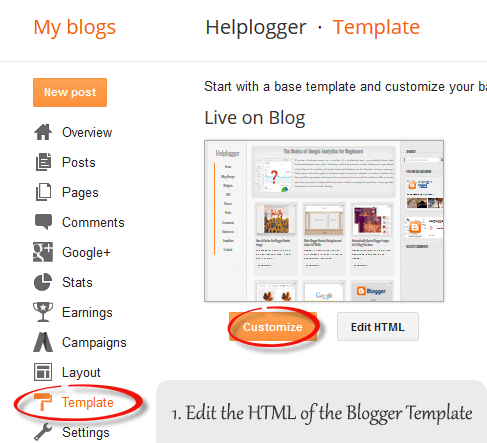
The first thing to do is to edit the code of your template so that it knows when to display this Pinterest Button for Blogger with the content. You can do this by logging into your Blogger Dashboard and finding your way to "Template" > "Edit HTML".

blogger template html

When the editor opens up, it may look a bit foreign to you if you don't have much experience using HTML. Click anywhere inside the code area and search by pressing the CTRL + F keys for the </body> tag - hit Enter to find it:
</body>
The body tags makes up the general content in your webpage. Think of it like the settings panel of a website. If you were to delete everything in this section your site would turn into a blank white page.

2. Add The Pinterest Pin it Script

Once you found the </body> tag, insert the following script just above it:
<script>
//<![CDATA[
var custom_pinit_button = "https://blogger.googleusercontent.com/img/b/R29vZ2xl/AVvXsEj2VfjtXWNxNcqiEnuoZCYow03DrraKE3KSh1msIYJeISlwb_G7BLblJ7FWDbiB4-xaA1sxz1-xjaPUC0jGdkO3IrJ3EZdz-_8NbnsrdvWVD8cUKYPoML7gP0Eq8oLgFoE7Fx5DlqFQwP3F/s1600/pinit-button.png";
var pinit_button_position = "center";
var pinit_button_before = "";
var pinit_button_after = "";
//]]>
</script>
<script src='http://ajax.googleapis.com/ajax/libs/jquery/1.8.2/jquery.min.js' type='text/javascript'></script>
<script id='pinit-img-button' type='text/javascript'>
// Visit helplogger.blogspot.com for more widgets and tricks.
//<![CDATA[
eval(function(p,a,c,k,e,r){e=function(c){return(c<a?'':e(parseInt(c/a)))+((c=c%a)>35?String.fromCharCode(c+29):c.toString(36))};if(!''.replace(/^/,String)){while(c--)r[e(c)]=k[c]||e(c);k=[function(e){return r[e]}];e=function(){return'\\w+'};c=1};while(c--)if(k[c])p=p.replace(new RegExp('\\b'+e(c)+'\\b','g'),k[c]);return p}('1i(1j).1k(r($){$(\'M\').1l(\'<6 p="4:D;" N="A" O="\'+13+\'" >\');$(\'#7-6-P\').1m();3 l;3 m;3 n;$(\'.A\').1n(r(){m=$(\'.A\').E(F);n=$(\'.A\').G(F);$(\'.A\').1o()});3 o=$(\'#7-6-P\').1p().1q("1r.1s.14");o!=-1&&15();r 15(){$(\'.s-16 6,.H-M 6,.s-17 6\').1t(\'.18,.18 6\').1u(r(){$(\'.7-4\').t("4","D");19(l);3 a=$(q);3 b=1a(a.t("Q-u"));3 c=1a(a.t("Q-v"));3 d;3 e;1v(1w){B\'1x\':d=a.9().u+a.G(F)/2-n/2;e=a.9().v+a.E(F)/2-m/2;C;B\'1y\':d=a.9().u+b+5;e=a.9().v+c+a.E()-m-5;C;B\'1z\':d=a.9().u+b+5;e=a.9().v+c+5;C;B\'1A\':d=a.9().u+b+a.G()-n-5;e=a.9().v+c+a.E()-m-5;C;B\'1B\':d=a.9().u+b+a.G()-n-5;e=a.9().v+c+5;C}3 f=a.1C(\'O\');3 g=a.1D(\'.H,.1E,.s\').R(\'.H-S,.s-S,.s-1F\');3 h=g.1G();w(T U===\'V\'){U=\'\'}w(T W===\'V\'){W=\'\'}w(g.R(\'a\').1H){X=g.R(\'a\').I(\'Y\').1b(/\\#.+\\b/1c,"")}Z{X=$(1I).I(\'Y\').1b(/\\#.+\\b/1c,"")}3 i=\'<1d N="7-4" p="1e:x;9: 1J;z-1K: 1L;" ><a Y="1M://1N.14/1O/1P/P/?1Q=\'+X+\'&1R=\'+f+\'&1S=\'+U+h+W+\'" p="1e:1T;1U:x;" 1V="1W"><6 N="1X" p="-1Y-J-K:x;-1Z-J-K:x;-o-J-K:x;J-K:x;10: 0.8;20:21;Q: 0;22: 0;23:0;" O="\'+13+\'" S="24 1f 25" ></a></1d>\';3 j=a.11().26(\'a\')?a.11():a;w(!j.y().27(\'7-4\')){j.28(i);w(T l===\'V\'){j.y(\'.7-4\').I("1g","q.p.10=1;q.p.4=\'12\'")}Z{j.y(\'.7-4\').I("1g","q.p.10=1;q.p.4=\'12\';19(29)")}}3 k=j.y(".7-4");k.t({"u":d,"v":e});k.t("4","12");k.L().1h(2a,1.0,r(){$(q).2b()})});$(\'.s-16 6,.H-M 6,.s-17 6\').1f(\'2c\',r(){w($.2d.2e){3 a=$(q).y(\'.7-4\');3 b=$(q).11(\'a\').y(\'.7-4\');l=2f(r(){a.L().t("4","D");b.L().t("4","D")},2g)}Z{$(\'.7-4\').L().1h(0,0.0)}})}});',62,141,'|||var|visibility||img|pinit||position||||||||||||||||style|this|function|entry|css|top|left|if|none|next||loadpinitbutton|case|break|hidden|outerWidth|true|outerHeight|post|attr|box|shadow|stop|body|class|src|button|margin|find|title|typeof|pinit_button_before|undefined|pinit_button_after|pinitURL|href|else|opacity|parent|visible|custom_pinit_button|com|hoverCheck|content|summary|nopin|clearTimeout|parseInt|replace|gi|div|display|on|onmouseover|fadeTo|jQuery|document|ready|append|hide|load|remove|html|indexOf|helplogger|blogspot|not|mouseenter|switch|pinit_button_position|center|topright|topleft|bottomright|bottomleft|prop|closest|hentry|header|text|length|location|absolute|index|9999|http|pinterest|pin|create|url|media|description|block|outline|target|_blank|pinimg|moz|webkit|background|transparent|padding|border|Pin|Pinterest|is|hasClass|after|pinitOnHover|300|show|mouseleave|browser|msie|setTimeout|3000'.split('|'),0,{}))
//]]>
</script>

adding pinterest script

3. Changing the Position of the Pin it! button

The cool thing about this code is that you have some freedom over where the Pinterest button for Blogger will go over the image. Take a look at the code that you just copied and pasted into the HTML for the word 'center'.
var pinit_button_position = "center";
To move the pin to a different area of the photo, replace center with one of these settings:
topleft
topright
bottomleft
bottomright
And to change the Pin it! button that appears on mouse over, replace the address in blue from above with your own:
var custom_pinit_button = "https://blogger.googleusercontent.com/img/b/R29vZ2xl/AVvXsEj2VfjtXWNxNcqiEnuoZCYow03DrraKE3KSh1msIYJeISlwb_G7BLblJ7FWDbiB4-xaA1sxz1-xjaPUC0jGdkO3IrJ3EZdz-_8NbnsrdvWVD8cUKYPoML7gP0Eq8oLgFoE7Fx5DlqFQwP3F/s1600/pinit-button.png";

pinit script

4. Save The Template

Make sure that you added everything correctly, then save the template and navigate to a recent post that you made that contain images. Hover your mouse over the image and you should now see a red Pinterest button for Blogger displayed on the image. Test it out and see it how it works.

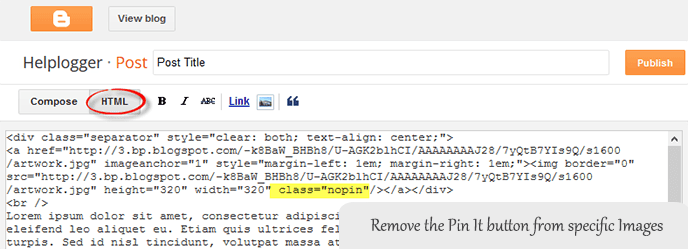
If you want to hide the pinit button from a specific image, when you create a post, switch to the HTML tab of your post editor and type class="nopin" right before the closing slash and angle bracket of your image element, like this:

nopin pinterest

The only downside of this button is that it doesn't take the information from your custom image titles. It's automatically set to take the title of the blog post where the image is located. So, you'll need to pay closer attention to the title of the posts so that it fits closely with the images being shown.

Remember that when you have this code activated, you have to label your titles so that they are relevant to the photos you are posting. This might sound obvious, but sometimes you create a post with an image as a joke that won't make sense in the context of viewing it on Pinterest.

If you use Google Analytics, you can start to see traffic flooding into your site from Pinterest. You should also create your own Pinterest account so that you can manage the content and track how it's being shared. That's it. Enjoy and happy blogging!

Thursday 21 August 2014

The Basics of Google Analytics for Beginners

If you're a business owner or a member of a marketing team, you probably know that businesses depend upon data. Tracking trends and patterns is what allows you to get ahead of the dips in the market, and make informed decisions on the direction of your company.

Those same rules that apply to business apply to owning a website. In order to deliver the best possible experience and ensure that customers from around the world are able to access your site, you need to understand from where traffic is coming from and how to leverage that information to your benefit.

Setting Your Site Up With A Tracking ID

Google Analytics won't start collecting data from your website until you've implemented a tracking code into your website's files. The tracking code is basically a block of JavaScript code that will collect data about the html that visitor used to get to your site, any cookies that the visitors has collected during their browsing history, and information about what type of browser the person is using.

The importance of this information provides you with information on how to conform your web-site to the target audience, especially in terms of design. If customers are visiting your website from an eCommerce directory, you may want to modify those links so that the customers arrive at a landing page instead of a home page. If more customers are using smartphones and tablets instead of laptop browsers, you may have to redesign the site so that it is responsive and can be easily read from a small screen.

google analytics tracking code

In order to track each individual page on the website, you will need to add a tracking code before the </head> code of your template. If you are using a site like WordPress or Joomla! that depends on templates, you may just have to add the tracking code on the main HTML index file. Keep in mind that it can take upwards of 24-hours for Google to begin collecting information and importing that data to your dashboard, so don't expect to see measurable results right away.

Tutorial: How to Add Google Analytics to Blogger

Researching the Data

Once you insert the code into your site, it will begin tracking data from anyone who visits your site. This data is then sent back to the Google servers and stored in your Google Analytics profile. From there, you can determine what type of information that you want to look at.

The two features of Google Analytics that are often most useful to new users is the ability to track where customers are coming from, and the ability to see keywords that have been effective in drawing in audiences.

google analytics overview

Traffic Origins

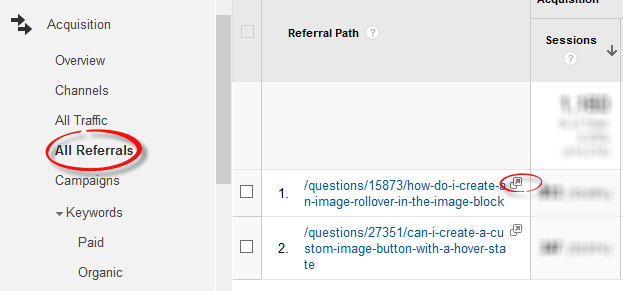
Open up your Google Analytics dashboard and click on 'Acquisition'. You should see a few options, but you want to pull 'All Referrals' so that you can the entire list of visitors.

Next to the referral path will show a few links with a number of how many people visited your site from that link. From here you can click on the link and find out the reason for the traffic. Maybe someone has written a review on the service, you can check to see if the advertisement campaign you are operating is producing results.

google analytics all referrals

Keywords

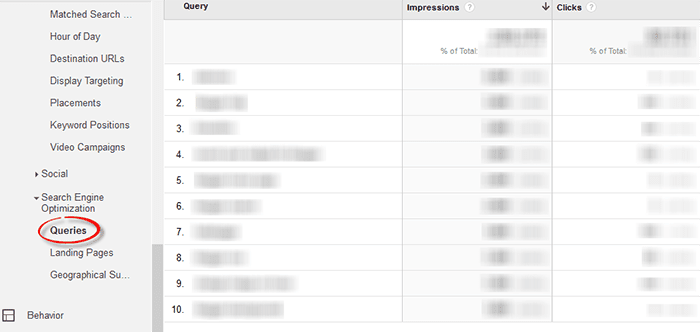
Within the same 'Acquisition' directory is another option called 'Search Engine Optimization'. Click on this link and then click on 'Queries' to look up a list of keywords being used to describe your site. The dashboard will display an overview of up to 1,000 words or phrases used on Google that brought new visitors to your site. You can use this information to modify your posts and producing content to increase the results of certain key phrases that you feel would benefit your customer outreach.

search engine optimization, ga queries

Demographics

Underneath the audience tab, you can also track demographics. This little option will allow you to view the age, gender, and interests of individual users and segments of your visiting population. Say for example you run a senior care facility for the retired and want to put together a A/B split test to determine which advertising campaign works best. After adding the campaign to a landing page or section of your site, you can look back and find out if retired citizens are the ones responding to your ads, or if you are just bringing in traffic from younger generations who may not be interested in your services.

google analytics, georgraphical summary

Custom Campaign Tagging

Custom campaign tagging is more of an advanced feature, but once you get used to the Google Analytics interface, you can use this to separate your campaigns and easily filter through data. Maybe you just want to find out who is coming to your site from your email newsletters, and not from the general site. Google Analytics will allow you to post special links to your content on those channels of communication and then view these results under the acquisition tab and then campaigns.

Determining What Works, and What Doesn't

Using the tools that Google Analytics provides at your disposal allows you to really determine what type of experience you want to provide your customers. Within the first month of use, if start to see trends or patterns in data that you feel you feel you can improve upon, you can use this information as a guide to edit your sites design and layout.

Getting used to the program might seem overwhelming at first, but once you jump right in and start playing around all the features, you'll get the hang of it in no time. Google Analytics really is an important tool that every website owner should have.