What would seem to be counterintuitive to that idea is the default Blogger settings for header positioning. Whenever you upload a header to the site, it will automatically be aligned to the left of the page. Some Blogger users may be okay with this setting, especially if they are using a header design that doesn't contain a background. Others may find that their background headers appear cut off, incomplete, or indistinguishable from the rest of their content.
If you find yourself in the second category of users, there is a way to adjust the positioning of your header so that it is displayed as a center Blogger header. By centering your site header, you have greater flexibility over the overall design, and it allows you to really shine light on this content. It's hard to miss a header that is placed smack dab in the middle of the screen on every page that someone navigates to.
Center Header Image with Blogger Template Designer

Making the change is relatively easy. You'll be able to make these adjustments on every page of your Blogger blog without having to change them individually. All you need to do is to modify the CSS of your blog that can be found directly through your Blogger dashboard. Even if you have little to no experience in web design or coding, you can center Blogger header by following these next few steps.
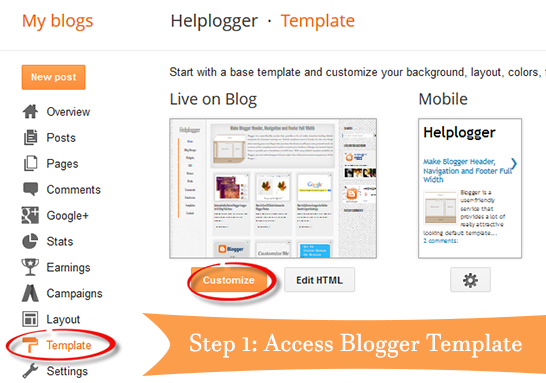
Step 1. Log in your blogger account and select your blog, then go to "Template" and click the "Customize" button on the right side.

Step 2. Navigate to "Advanced" > "Add CSS" tab and paste the code in the empty box:
#header-inner {If you have a small image and you want it to become full width, add this CSS instead:
background-position: center !important;
width: 100% !important;
text-align: center;
}
#header-inner img {
margin: auto;
}
#header-inner {
background-size: cover;
width: 100% !important;
text-align: center;
}
#header-inner img {
width: 100%;
height: 100%;
}
Step 3. Hit the ENTER key after you paste the code snippet, then click the "Apply to Blog" button.

Here are some other aligning options for your headers:
Align Blogger Header Banner and Text Side by Side
Image on the right and title on the left
#header-inner {
background-position: right !important;
width: 100% !important;
}
.titlewrapper, .descriptionwrapper {
float: left;
clear: both;
margin-left: 20px;
}
Image on the left and title on the right
#header-inner {Note: for larger images, you may need to resize them in order to make them appear side by side with the text.
background-position: left !important;
width: 100% !important;
}
.titlewrapper, .descriptionwrapper {
float: right;
clear: both;
margin-right: 20px;
}
That's it!
After making the changes to the CSS and saving your modifications, you may navigate back to your homepage. Refresh the page and you'll notice that the header is now centered, instead of on the left. Click on a few of your page links and make sure that this modification has been made to every page or post on the blog.If by chance you don't see the changes to the header, go back through the code that you modified and make sure that you have copied and pasted the information into the file exactly as instructed. Even minor modifications in the code, or a missing semicolon may fail to make the changes you are trying to achieve, or come away with different results than what's expected.
The great thing about CSS is that it is your site's central hub for all things design. From the CSS file, you can modify just about any appearance on your site to give the blog a custom look and feel. Once you're comfortable performing minor adjustments to the appearance of your site, you can start to get creative and come up with your very own modifications.


0 comments:
Post a Comment